ENGR 101 | University of Michigan
Project 4: gLyft
Engineering intersections: Computer Science / Engineering Entrepreneurship
Implementing this project provides an opportunity to practice file I/O, functions, loops, and data structures (vectors and structs).
The autograded portion of the final submission is worth 100 points, and the style and comments grade is worth 10 points, for a total of 110 points.
Important Dates for Project 4
Below is a suggested project timeline that you may use. You can adjust the dates around any commitments or classwork that you have going on in other courses.
| Date | What to have done by this day |
| Saturday, April 11th |
|
| Tuesday, April 14th |
|
| Friday, April 17th |
|
| Monday, April 20th |
|
| Tuesday, April 21st |
|
| Friday, April 24th |
|
Educational Objectives and Resources
This project has two aspects. First, this project is an educational tool within the context of ENGR 101, designed to help you learn certain programming skills. This project also serves as an example of a project that you might be given at an internship or job in the future; therefore, we have structured the project description in way that is similar to the kind of document you might be given in your future professional capacity.
Educational Objectives
The purpose of this project is to give you an opportunity to practice designing, implementing, and testing a fairly complex program on your own. This is the summative project in ENGR 101, and successfully completing this project will deepen your understanding of core computing concepts and skills such as: thoughtfully designing a program, using structs and vectors to organize data inside a program, planning and implementing useful helper functions, and carefully testing a complex program piece-by-piece to create a robust, reliable program.
A secondary purpose of this project is to strengthen your skill at applying a well-documented computer science algorithm to an engineering problem. This project is an example of a common problem called the Traveling Salesperson Problem. More background on the Traveling Salesperson Problem, including the approach used in this project, is in the next section.
Engineering Concepts
There are two high level engineering concepts that will be used in this project: the traveling salesperson problem and data corruption. These two concepts are briefly explained in the next sections.
Traveling Salesperson Problem (TSP)
The traveling salesperson problem is a commonly-used optimization problem that asks:
Given a list of cities and the distances between each pair of cities, what is the shortest possible route that visits each city exactly once and returns to the origin city? [Wikipedia]
The “cities” and “distances” can have different definitions according to the application of the TSP algorithm. The problem has analogous questions in circuit design (shortest distance the laser needs to travel to create a circuit board), delivery logistics (shortest time to complete package delivery to homes and/or businesses), school bus routes, and similar engineering challenges.
There are many different algorithms that have been developed to solve this problem. In this project, we will use the nearest neighbor algorithm to determine which planet to go to next. The nearest neighbor algorithm we will use is defined here as:
- Start at a given location
- Find the closest location that has not already been visited
- Go to that location
- Mark that this location has been “visited”
- Repeat steps 2-4 until all locations have been visited
- Go to the specified end location
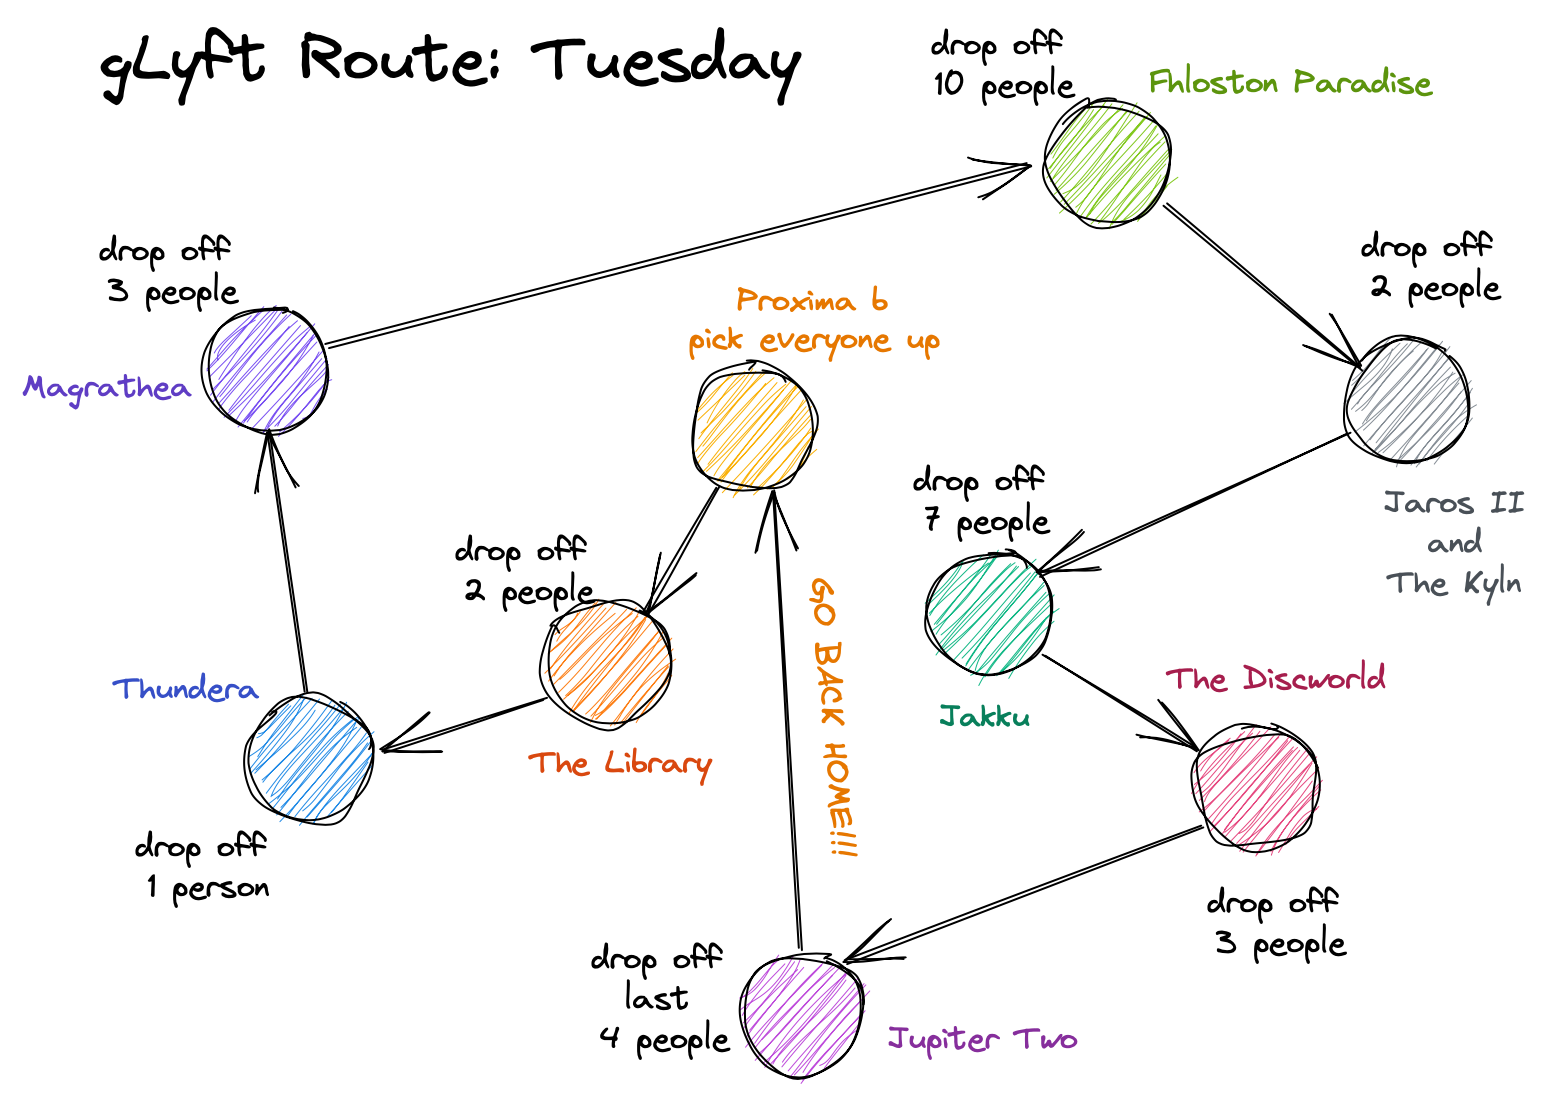
A sample path found using this algorithm is shown in Fig. 1. Note that this is a “greedy” algorithm – it picks the single closest location that hasn’t already been visited, regardless of where the other yet-to-be-visited locations are, traffic in and out of those locations, or total distance traveled. Therefore, this greedy algorithm does not generally find the best path through all the required locations, but it often finds a path that is close to optimal. Step 6 above is required for our particular application in this project – it is not a necessary part of the nearest neighbor algorithm.
Figure 1. Example of how the nearest neighbor algorithm works. Note how the path changes based on the starting location! (Photo Source: Wikimedia Commons)
Data Corruption
Transmission of data is always subject to potential corruption. Data corruption occurs when data transmitted by one computer and received by a second computer does not match the actual data transmitted by the first computer. Data are stored in computers in binary form: a collection of 0s and 1s. When these data are transmitted from one computer to another over a long distance, it is possible for a 0 to be received as a 1 or vice-versa due to noise in the system. This means some data may be corrupted and requires correction. There are many ways of checking for data corruption; error detection and correction is a critical component of modern computing.
In this project, we are going to work on some basic data correction based on known error effects as an introduction to the concept of data corruption. Some of the data that is used by our program has errors that need to be corrected. For example, a string that is read in as this:
HaiXXl_to_the_XXVictors_ValXXiant
needs to be corrected to this:
Hail to the Victors Valiant
Project Roadmap
This is a big picture view of how to complete this project. Most of the pieces listed here also have a corresponding section later in this document that provides more detail.
- Read through the project specification (DO THIS FIRST)
- Read the contents on the left so you understand the organization of these specs.
- Understand the data sources/files and how to use them; go to office hours if you do not.
- Understand the project task at a high level: what does your program need to produce? Go to office hours if you are not sure about anything.
- Understand the guidance provided for the different steps in the program; go to office hours if you have any questions.
- Prepare your workspace
- Download all data sources files/functions
- Download all starter files
- Put all of this stuff in the same folder/directory on your computer (otherwise your program won’t be able to run)
- Plan your helper functions
- Sketch out a plan for how you want to break up the steps that your program needs to do. Show your plan to course staff during office hours so we can help you more efficiently!
- Plan your helper functions: names, types, parameters, and how you want to pass the parameters.
- Add the helper function prototypes to your
route.hlibrary header file
- PROJECT CHECKPOINT: Be able to produce the “map” of the planets. This includes:
- Correctly reading in the planet information from the data files
- Correctly creating a vector of vectors to represent the map
- Correctly placing the planet symbols in the correct location
- Correctly adding your helper function definitions to your
route.cpplibrary implementation file
- Implement and test the complete program, including:
- Correctly matching the planet names with their locations
- Correctly fixing the corrupted data
- Correctly implementing the Nearest Neighbor Algorithm to plan the route for the gLyft driver
- Verifying that the your
journey.txtfile exactly matches thejourney_1.txtandjourney_2.txtfiles that correspond to the two provided test cases
- Double check style and commenting. See the Submission and Grading section for information on style grading.
- Submit all files to the autograder.
Things to Know Before You Get Started
This project is less structured than the previous projects because we want you to have a chance to design and implement a program that makes sense to you. But that doesn’t mean we don’t have some helpful hints to share about how to go about setting up your program! Take a look at these sections as you start to design your program for this project.
Tips and Tricks
Here are some tips to (hopefully) reduce your frustration on this project:
-
Make sure to place all of your data sources (the
.txtfiles) in the same directory as theroute.h,route.cpp, andplanRoute.cppfiles. -
Read the Project 4 FAQs. These FAQs have common questions from students, so read these questions and answers before you start programming.
-
Test each step of your program before you move on to the next step. For example, unit test each helper function you create, and test the driver program as you go. It’s better (and easier in the long run) to start small, verify the program is working correctly, and then continue to add small steps as you go.
-
Use
coutstatements to check the names of planets after cleaning them and variables that you are using to track things in your program. Usecoutstatements to check the value that a function returns to make sure it’s working correctly. Usecoutstatements to check the values of variables in a loop. Usecoutstatements everywhere! Just remember to delete them once you no longer need them so that your program doesn’t print out unnecessary information.
Getting Started
There are many, many different ways to successfully approach this project. We encourage you to develop a good program design before composing your code. If you are stuck with getting started, refer back to what we’ve covered in homework, lecture, and labs: string manipulation, vectors, structs, vectors of structs, functions, and input/output.
Storing Planetary Data: Use a Vector of Structs
We strongly recommend using structs to store the planetary data. Structs are a logical choice since each planet has the same set of data (name, ID, location, etc.) and because one naturally thinks about the planet first and then all the data associated with that planet (as opposed to thinking of a bunch of names, then a bunch of IDs, then a bunch of row numbers, etc.). A vector of structs will conveniently store all planetary data for use later in your program.
Getting the Warning About “comparison of integers of different signs”
We strongly recommend that you continue to compile using the -Wall and -pedantic flags to help you catch bugs in your program. Sometimes, these warnings are important to fix, and sometimes the warnings are more in the way of a “heads up” that you can ignore if you want to. For example, if you have some code that uses a vector of ints like this:
vector <int> test_vector;
for (int i = 0; i < test_vector.size(); ++i) {
    // do vector stuff
}
and you compile using the -Wall and -pedantic flags, you might see an error that looks something like this:
warning: comparison of integers of different signs: 'int'
and 'std::__1::vector<int, std::__1::allocator<int> >::size_type'
(aka 'unsigned long') [-Wsign-compare]
        for (int i = 0; i < test_vector.size(); ++i){
This error message is trying to warn you that you are comparing integers whose values might represent different things: a signed integer vs. an unsigned integer. Remember how we have different variable types in C++ like int, double, bool, string, and vector? Well, there are different types of variables that can represent integers with different ranges and/or use different amounts of memory in the computer. This warning is telling us that we’re comparing i (a “regular” signed integer) to the value that is returned by the vector’s .size() function (an “unsigned long” integer which has a different range of values than “regular” integers).
We don’t really get into the different kinds of integers (or different types of double values) in ENGR 101 because our applications don’t require this level of memory control and instruction… and because we’re covering quite enough content as it is! In this case of the “traversing a vector” pattern, you can safely ignore this warning because our vectors are small enough that comparing a signed integer to an unsigned integer will not cause us any problems. However, if you would like to resolve this error so that you don’t have to look at it every time you re-compile, you can change how you traverse the vector.
The .size() vector function returns a value with type size_t (this means it is an unsigned integer). Therefore, to make the warning go away, we need to compare the value returned by .size() to an unsigned integer, rather than our usual signed integer. So, we can declare i to be a size_t variable instead of an int variable:
vector <int> test_vector;
for (size_t i = 0; i < test_vector.size(); ++i) {
    // do vector stuff
}
Changing your loop to use a size_t counter variable will resolve the “comparison of integers of different signs” warning.
Passing Parameters to Functions
Recall that when you write functions which pass in large data structures, such as vectors and structs, it is best to use pass-by-reference. Refer back to your notes/homeworks to remind you when to use pass-by-value, pass-by-reference, and const pass-by-reference.
Submission and Grading
This project has three deliverables: route.h, route.cpp, and planRoute.cpp. See the Deliverables section for more details.
After the due date, the Autograder portion of the project will be graded in two parts. First, the Autograder will be responsible for evaluating your submission. Second, one of our graders will evaluate your submission for style and commenting and will provide a maximum score of 10 points. The project specs review assignment is worth 10 points. Thus, the maximum total number of points on this project is 120 points.
Reminder: You must complete the project using only those coding tools and concepts that we have covered in this course. Projects submissions that include coding approaches that we have not covered will have 50% of the maximum possible Autograder points deducted from the project score. See the syllabus’ Project Completion Policy for more details.
Submitting Prior to the Project Deadline
Submit the .cpp files and the .h file to the Autograder for grading. You do not have wait until you have the program ready to submit before you submit to the Autograder for the first time.
However, because this project’s program is entirely your own design, it is harder for us to test individual parts of your program on the Autograder. Many of the test cases on the Autograder are “all or nothing” for this project, and there are not as many test cases for individual program steps/tasks as there were for previous projects.
We strongly recommend that you thoroughly test your program locally (on your own computer) before you start using the Autograder as a debugger.
There are two test cases that you can use locally (see the Testing Your Program Section for more details). Each of these test cases has the correct version of the file that your program needs to create. Use these test cases as a starting point for verifying that your program is working correctly. You will get a lot more helpful warnings and errors locally then you will from the Autograder!
As you complete the steps for this project, you can continually submit your file to the autograder for feedback as you work on the project. To receive full credit, you need to submit the file and pass all test cases within a single submission.
The autograder will run a set of public tests - these are the same as the test scripts provided in this project specification. It will give you your score on these tests, as well as feedback on their output.
The autograder also runs a set of hidden tests. These are additional tests of your code (e.g. special cases). You still see your score on these tests, and you will receive some feedback on any cases that your code does not pass.
You are limited to 5 submissions on the Autograder per day. After the 5th submission, you are still able to submit, but all feedback will be hidden other than confirmation that your code was submitted. The autograder will only report a subset of the tests it runs. It is up to you to develop tests to find scenarios where your code might not produce the correct results.
You will receive a score for the autograded portion equal to the score of your best submission.
Your latest submission with the best score will be the code that is style graded. For example, let’s assume that you turned in the following:
| Submission # | 1 | 2 | 3 | 4 |
| Score | 50 | 100 | 100 | 75 |
Then your grade for the autograded portion would be 100 points (the best score of all submissions) and Submission #3 would be style graded since it is the latest submission with the best score.
Here is the breakdown of points for style and commenting (max score of 10 points):
-
2 pts - Each submitted file has Name, Lab Section Number, and Date Submitted included in a comment at the top
-
2 pts - Comments are used appropriately to describe your code (e.g. major steps are explained)
-
2 pts - Indenting and white space are appropriate (including functions are properly formatted)
-
2 pts - Variables are named descriptively
-
2 pts - Other factors (Variable names aren’t all caps, etc…)
Submitting after the project deadline
If you need to submit your project work after the deadline, you can submit to the “Late Submission” project assignment on the Autograder. The late submission assignment includes all of the same test cases as the original assignment, but the points have been adjusted down a small amount per the syllabus’ flexible deadline policy.
Your project score at the end of the semester will be whichever is the higher score between the original project assignment and the late submission assignment. You will never be penalized for submitting to the late submission version of the project.
Autograder Details
Test Case Descriptions and Error Messages
Each of the test cases on the Autograder is testing for specific things about your code. Often, it’s checking to see if your programs can handle “special cases” of data, such as: corrupted data, choosing the correct path when multiple planets are the same distance away, etc.
- Runtime Error -11: likely caused by indexing out-of-bounds when using
[ ]to index into a vector. Check your indexing and vectors to see if there is a line in your code where this may be happening! - Runtime Error -6: likely caused by indexing out-of-bounds when using
.at()to index into a vector. Check your indexing and vectors to see if there is a line in your code where this may be happening!
Debugging out-of-bounds errors. To debug the indexing out-of-bounds errors, use cout statements inside of loops that transverse vectors to print out the index each time you go through it. Look at the last value that prints before the program crashes. Now you know that the next value causes the error. Here are some common situations/observations you may see:
- The index value that causes the crash is wrong: Is your loop going too many times? Check the condition that ends the loop, maybe you have an error there.
- The index value is correct: Is your vector (or string) not long enough? Use additional
coutstatements to check the values of the vector/string when that vector/string is created. Check to make sure all elements are added correctly. - No index values are printed out: This means your vector has a size of
0– it’s empty! Trace back through your code to where the vector/string is created to find out why it’s not being created properly. Additionalcoutstatements will be very useful here!
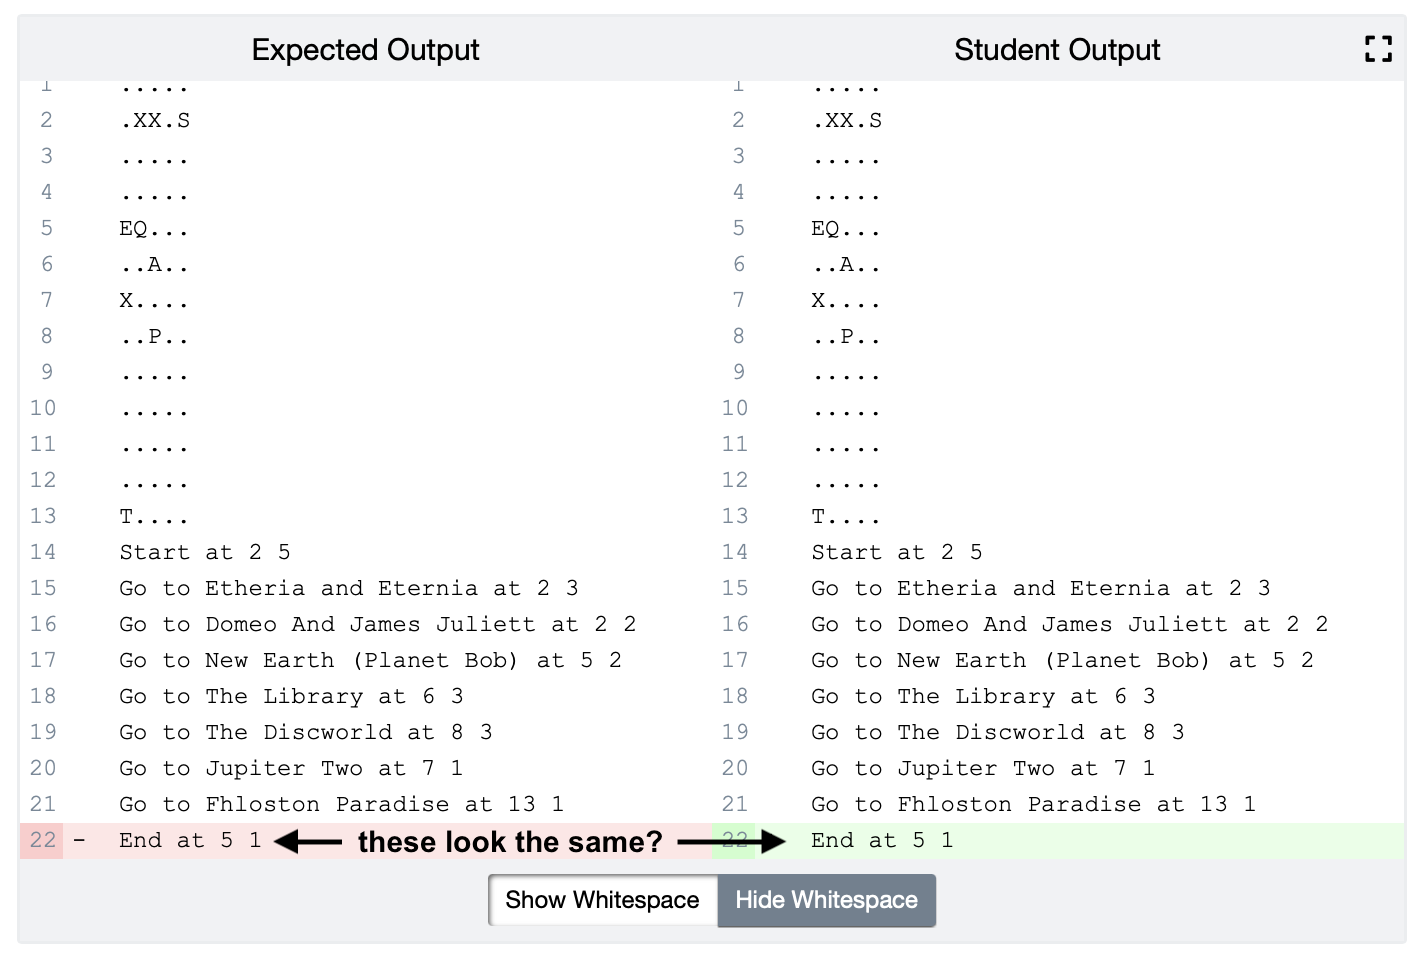
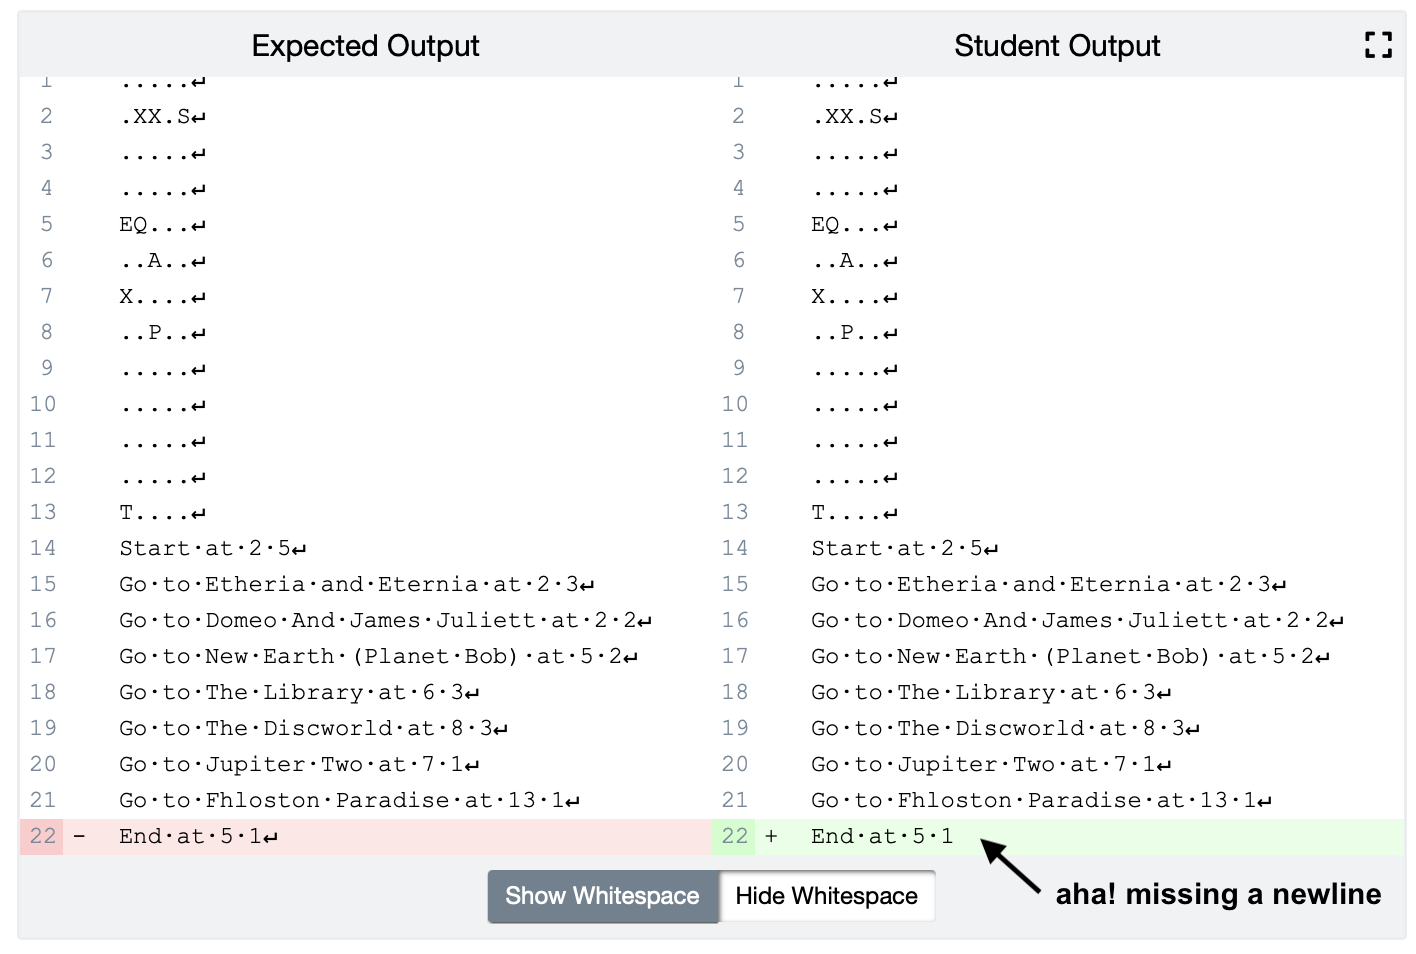
After running the test case, the Autograder will compare your code’s generated journey.txt file to what is expected. Within the Autograder tests, you can click to expand the “Check journey.txt” test and see a window that compares the expected output for the file (on the left) to your output file (on the right).
The Autograder is very particular about having the output match perfectly. This means every character and every whitespace must match – so beyond the map, be sure each word in your file is spelled correctly, has matching spaces and matching newlines. Lines that don’t correspond with the excpected output will be highlighted, and you can click “Show Whitespace” to see the correct spacing and newline placement.
Project Overview
The purpose of this project is to give you practice developing a program by writing your own structs and helper functions and using file input and output streams. It also gives you the opportunity to put together all that you’ve learned about programming in ENGR101 to approach an engineering problem!
Background and Motivation
CEO Uberwine von Lyften is looking to expand the service of the galactic ride-sharing company, gLyft, headquartered on Proxima b. gLyft currently serves three planets (including Proxima b) and the company wants to be able to plan routes between many more planets once their service is expanded to other nearby planets (Fig. 2).
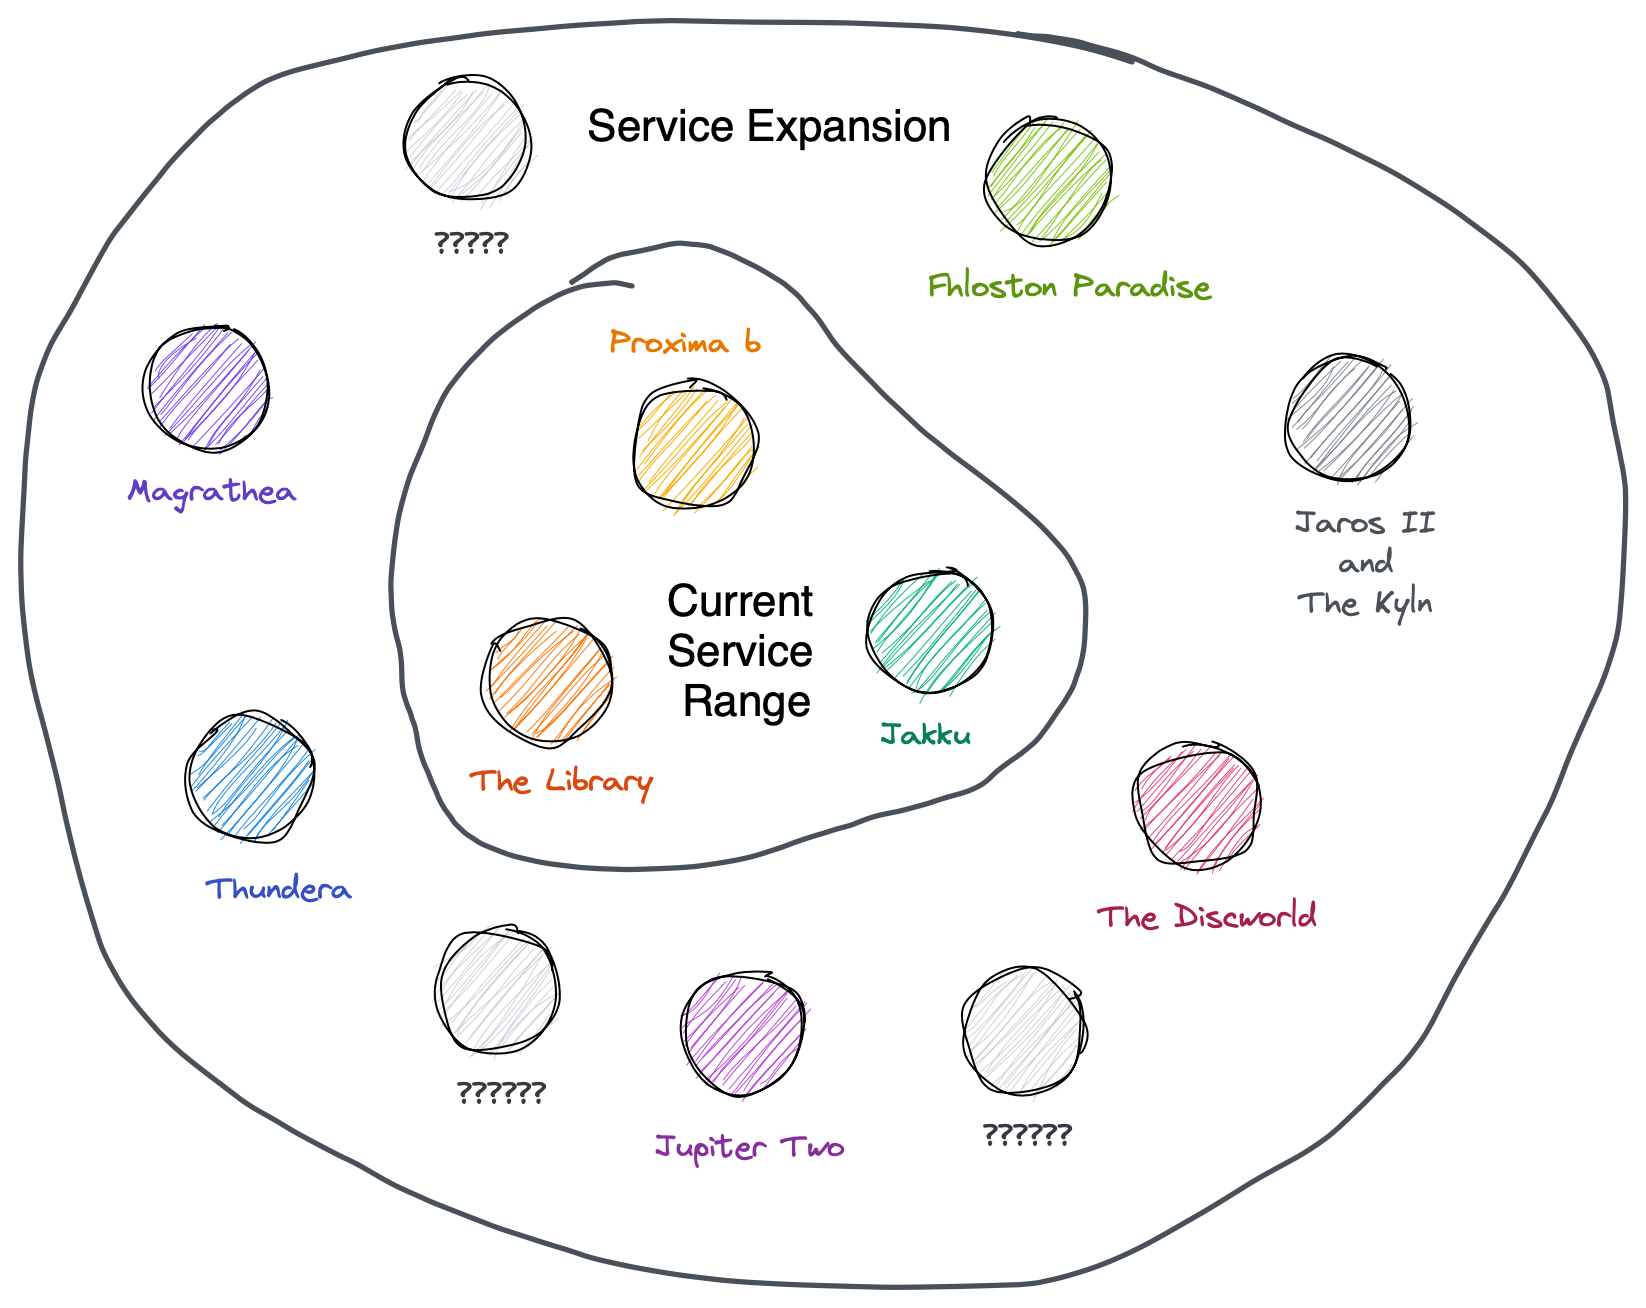
Figure 2. A sketch of the current planets that gLyft serves and how many planets they want to expand their service to.
The original service range of three planets wasn’t too difficult to schedule routes through; there just aren’t that many different paths one can take between three locations. But with the proposed service expansion to many different planets, gLyft needs a more advanced route planning algorithm and program.
Your Job
In this project, your job is to find a recommended path from each planet to the next within your gLyft driver’s range.
Data Sources/Files
These sections describe the different sets of data you have available for implementing and testing your programs for this project. Make sure you understand the different formats and layouts of the data in the data files before you start to work with the data itself.
There are two data files that your code needs to read data from:
- A file containing the locations your gLyft driver is required to visit
- A file containing the names of the planets with their ID numbers
Note: The actual names of these data files will be entered by the user via the terminal, but you can assume that any locations and names files that are used will follow the same format. The next sections of the project specifications will document the general format of the locations and names files.
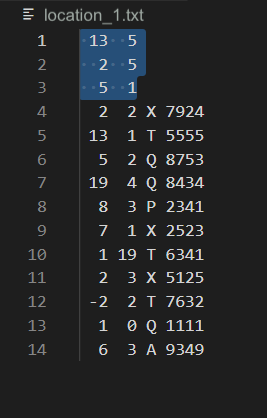
Location File
Each gLyft driver has a given range that they cover. The range is represented as a grid with a given number of rows and columns. If a planet is located within the driver’s range (i.e. the planet’s row and column are each within the driver’s grid), then the driver can take passengers to that planet.
The locations file contains information about the locations that the gLyft driver is assigned to visit. Here are two sample locations files (click the filenames to download):
Download these files and open them up to see what they look like. Compare the contents of the files to the description of the contents below.
The file first lists information specific to the driver:
- Their driving range (a number of rows and a number of columns)
- Their starting position (a row and a column)
- Their ending position (a row and a column)
The file then lists all of the planets that the driver is supposed to take gLyft customers to:
- Planet 1’s row, column, map symbol, ID
- Planet 2’s row, column, map symbol, ID
- Planet 3’s row, column, map symbol, ID
- Planet 4’s row, column, map symbol, ID
- etc.
Here is a schematic of what a locations text file will look like:
<Number of Grid Rows> <Number of Grid Columns>
<Starting Row> <Starting Column>
<Ending Row> <Ending Column>
<Planet 1 Row> <Planet 1 Column> <Planet 1 Symbol> <Planet 1 ID>
<Planet 2 Row> <Planet 2 Column> <Planet 2 Symbol> <Planet 2 ID>
<Planet 3 Row> <Planet 3 Column> <Planet 3 Symbol> <Planet 3 ID>
...
Here is a description for each of the fields in the schematic:
| field | description |
<Number of Grid Rows> |
the number of rows there are in your grid |
<Number of Grid Columns> |
the number of columns there are in your grid |
<Starting Row> |
the starting point’s row number (not index number) |
<Starting Column> |
the starting point’s column number (not index number) |
<Ending Row> |
the ending point’s row number |
<Ending Column> |
the ending point’s column number |
<Planet Row> |
the planet’s row number |
<Planet Column> |
the planet’s column number |
<Planet Symbol> |
the symbol associated with the planet’s surcharge type (this will always be one character in length) |
<Planet ID> |
a unique integer ID that is associated with the planet |
Read in all of the information in the file, no matter how many planets there are, and store the data in variables so you can use the information later.
Heads Up! Some planets will have coordinates that lie outside the driver’s grid, which means that the driver can’t take passengers to those planets. You’ll need to handle these cases specially: see the Get Planet Information section of the program algorithm for more details on what to do with out-of-range planets.
Names File
The locations that the gLyft driver needs to visit need to be cross-listed against a planet names file in order to look up the name of the planets that the driver is going to. The names file contains a database-type list of planet IDs and their corresponding planet names. Here are two sample names files (click the filenames to download):
Download these files and open them up to see what they look like. Compare the contents of the files to the description of the contents below.
The names file will contain the planet IDs that are in the locations file (e.g. locations_1.txt). However, the names file is a totally separate listing of information about the planets so the planets listed in the names file are not necessarily in the same order as the planets listed in the locations file… and there may be more planet IDs in the names file than in the locations file.
Here is a schematic of what a names text file will look like:
<Planet 1 ID> <Planet 1 Name>
<Planet 2 ID> <Planet 2 Name>
...
Here is a description for each of the fields in the schematic:
| field | description |
<Planet ID> |
a unique ID that is associated with the planet |
<Planet Name> |
a name that is a contiguous set of characters (i.e. no spaces) |
You are guaranteed that all of the planet IDs in the locations file will be present in the names file, and each planet ID will have a corresponding planet name. The names file may have planet IDs and planet names that you don’t need for a given route, and that just means that information won’t be used for that route (which is totally fine).
The names file is particularly susceptible to data corruption and the gLyft team can’t figure out why. Unfortunately, the names of each of the planets need to be corrected after they are read into the program. There are two types of corruption that happen:
- Pairs of
Xs can be inserted into various locations in the planet’s name - Any spaces in the planet’s name get converted to underscores (
_)
To correct the data, any double XXs need to be removed from the planet name, and the underscores (_) need to be replaced with spaces.
Deliverables
This project has three deliverables:
| File | Description |
route.h |
a C++ header file for the Route library module that contains the function prototypes for all the helper functions in the library |
route.cpp |
a C++ file that contains all of the helper functions used in the project |
planRoute.cpp |
a C++ file that contains your main() function and is the driver program file. |
Starter Code and Test Programs
The starter code files contain some comments to help set up the grading of your code, however there is no starter code beyond this initial setup. You will write the rest of the code needed to implement the tasks described in the Project Task Description section. The starter code files have _starter appended to the file’s name so that if you want to download a fresh copy of the starter code, you won’t accidentally overwrite an existing version of the file that may have some code you have written in it. Remember to remove the _starter part of the filename so that your program will run correctly!
Click the filename to download the starter code:
There are no test scripts/programs for this project. See the Testing Your Program section for information on how to use the data sources/files to test your program.
Compiling and Running the Program
To compile the program, use the following g++ compile command:
$ g++ -std=c++11 -Wall -pedantic planRoute.cpp route.cpp -o planRoute
Notes about compiling this program:
- Some of our common methods and patterns use features only available in C++11 (a more modern version of the language) or later, so we need the
-std=c++11flag. - The
-Wallflag includes all warnings from the compiler; this will help you catch bugs. Warnings are diagnostic messages that report things in your code that are not inherently erroneous but that are risky or suggest there may have been an error (or may cause an error later on when you run the program). - The
-pedanticflag tells the compiler to look for anything that you did that might not work on other people’s computer (including the autograder). Mostly, this will check to see if you forgot to initialize a variable because this may cause you to fail a test case on the Autograder.
Once compiled, the program can be run from the terminal by typing ./planRoute like this:
$ ./planRoute
Project Task Description
The gLyft driver needs two things before they start their route:
- a “map” of their service range that includes symbols for the planets that they’re going to
- a list of their stops in order: the starting location, each of the planets (as determined by the nearest neighbor algorithm), and the ending location
This project needs to create a journey.txt file that contains this information for the gLyft driver. An example of what a journey.txt file looks like is shown in Fig. 3.
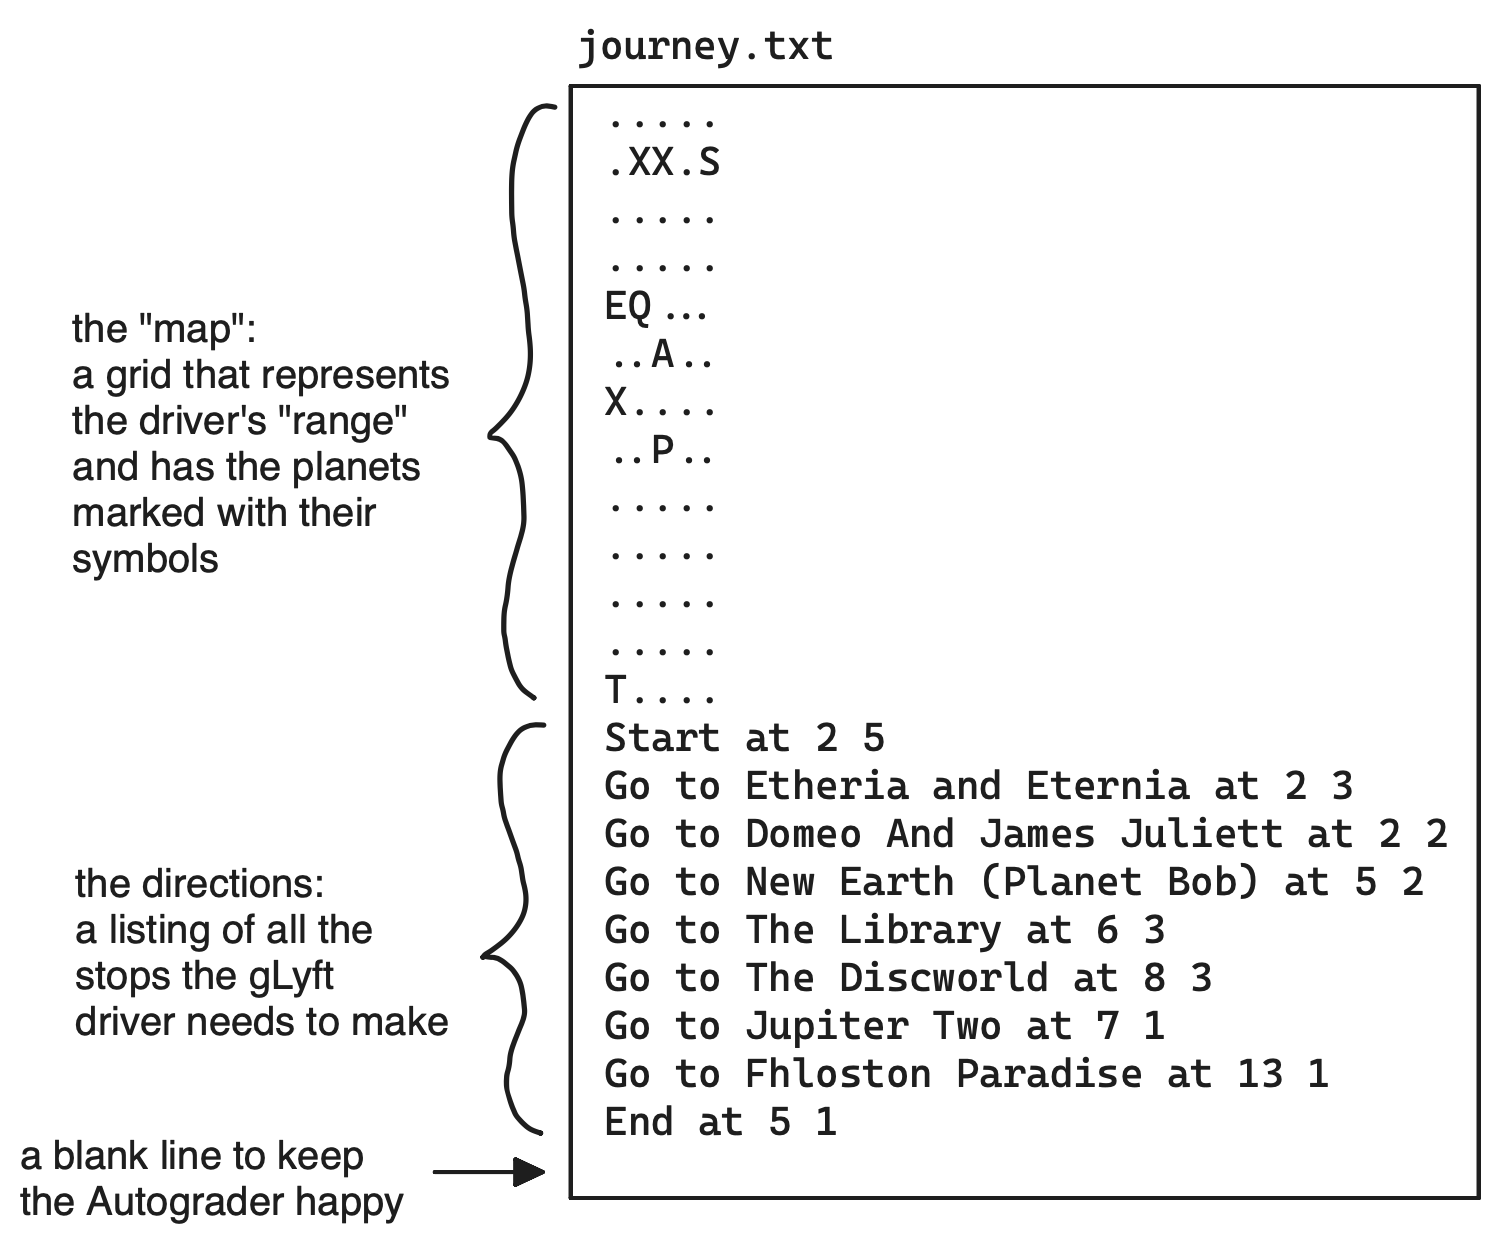
Figure 3. An example of the journey.txt file with the "map" section and the "directions" sections labeled.
Description of route.h, route.cpp, and planRoute.cpp
There are no required helper functions for this project but you are strongly recommended to create your own helper functions to help abstract away some of the complexity of this project.
All helper functions will go in the Route library: struct definitions and function prototypes go in the route.h file and function definitions go in the route.cpp file. The driver program will be the main function in the planRoute.cpp file.
Make sure to have any #include statements necessary for your program!
Algorithm
For this project, you will need to determine a route for your gLyft driver using the nearest neighbor algorithm. The route begins at a given starting point, proceeds to the customers’ planets, and ends at a given endpoint. You will need to correctly read data from input files, determine the route, and create an output file with a “map” of the planets and the route the gLyft driver needs to take to travel from the starting point to the end point. These high level steps are detailed in the next sections.
Read in Planet Data
Your program needs to read in the planet location data and name data. To do this properly, you will need to:
- Get the filenames for each file from the user
- Open the files (gracefully exit the program if either/both of the files cannot be opened)
- Read in the information in the locations file
- If a planet is outside the driver’s range (the “grid”), print a message to the user and do not include that planet in your route planning
- Read in the information in the names file
- Correct any data corruption in the planet names
The locations and names files are described in the Data Sources/Files Section. The sections below describe these steps in a little more detail.
Get Filenames
Your program should prompt the user for the names of the two files with the planet data. Asking for the filenames, rather than hardcoding the filenames, makes the program flexible – the person writing the files may name them whatever they want.
Ask the user for the locations file first using the following prompt:
Enter Locations Filename:
The user will then enter a filename (e.g. locations_1.txt or locations_2.txt).
Next, ask the user for the names file using the following prompt:
Enter Names Filename:
The user will then enter a filename (e.g. names_1.txt or names_2.txt).
Open Files
Once both input filenames have been entered by the user, the program should open the files for reading. If either of the input files is not found or cannot be opened for reading, the program shoud output this message to the terminal:
Input file could not be opened
Include a newline after the message is printed. After printing this message, the program should exit with code return 1;.
Note: You do not need to print or determine which file caused the failure; simply print the above message and exit the program.
Note: The provided test cases do not test the error handling of input files. You should generate your own test case to ensure compliance. Do not submit your test case, just ensure your code satisfies this important required project specification.
Get Planet Information and Correct Data Corruption
After the two files have been opened, read in the data from the files to your program. You can store the data in whatever types of data structures you think is best.
We strongly recommend that you use a vector of structs to store the planetary data. See the Rover Mission and Containerships programs for coding inspiration.
As you check each planet in the file, you need to check that the planet is in the driver’s range (their “grid”). If a planet’s row or column lies outside the rows and columns that define the driver’s grid, then that planet is out of range. If a planet is out of range, print a message to the terminal:
<Planet ID> out of range - ignoring
where <Planet ID> is the ID of the planet whose coordinates are not within the grid. For example, if a planet with ID 3092 is not in the driver’s range, then this message would be printed to the terminal:
3092 out of range - ignoring
Any out of range planets can be removed (or otherwise ignored) prior to using the nearest neighbor algorithm when planning the driver’s route.
The messages for the out of range planets should be printed to the terminal in the same order as the planets appear in the locations file.
The planet names will need to have their data corruption corrected as well. For each planet that is in the driver’s route, you will need to correct any errors in the planet’s name by:
- Finding and erasing all occurrences of
XXfrom each name. - Finding and replacing all underscore characters (
_) with spaces (
The corrections to the planet names should happen to the data stored in variables within your program; you should not modify the input files.
Create Location Grid
The gLyft driver needs a map of where they are supposed to be taking passengers. So, your program needs to create a grid of characters representing the “map” of locations within your gLyft driver’s range. The locations file indicates the number of rows and columns in the grid. The locations file also contains 1-character symbols representing each planet.
To create the grid that is the “map”:
- Place each planet’s symbol at its corresponding grid location (row, column)
- Place an
Sat the starting point and anEat the ending point - Place a period (
.) at any grid point that is not part of the route (planet location or starting/ending point)
Watch your indexing!
For your grid that represents the map, the locations of the route (planets and starting/ending point) are all defined as row/column values starting at 1. For example, a starting point may be at the 3rd row and the 5th column.
The row numbers increase from the top row to the bottom row and column numbers increase from the left column to the right column. In other words, the upper left corner of the grid map corresponds to (row 1, column 1).
If you store your map in a vector of vectors, remember that C++ vector indices begin with index 0. Check, then double check your indexing!!
Determine the Route
To schedule the gLyft driver’s route, implement the nearest neighbor algorithm. The nearest neighbor algorithm will need to calculate which planet is “closest” to the current location. We will assume that the planets all lie in the (x,y) galactic plane and that we can use the following formula for distance:
\[distance = \sqrt{(x_{current}-x_{potential})^2+(y_{current}-y_{potential})^2}\]where \(x_{current}\) and \(y_{current}\) are the coordinates of the current location and \(x_{potential}\) and \(y_{potential}\) are the coordinates of the location of a potential candidate that we wish to visit.
Here is the algorithm for implementing the nearest neighbor algorithm to determine the route for the gLyft driver:
- The first location in the route is the starting point (row and column provided by the locations file)
- The first location is now the current location
- The next location is the planet closest to the current location. To find the next location:
- Go through each of the planets that have not already been visited; these are the potential candidates for the next location
- Calculate the distance between the current location and each potential location using the distance formula defined above
- Determine which potential location is the shortest distance from the current location and select that potential location
- If two planets are the same distance from the current location, select the planet with the lower planet ID value
- The selected potential location becomes the next location
- Mark the planet at the next location as “visited” (so that you don’t accidentally go there again)
- “Move” to the next location by updating the row/column of the current location to be the row/column of the next location
- Continue selecting the next location until all planets have been visited
- The last location in the route is the ending point (row and column provided by the locations file)
Recommendation: Nested Loops
To establish the driver’s route, we strongly recommend that you use two nested loops:
-
The inner loop iterates through all the locations that have not yet been visited to determine which planet is the closest to the current location, based on the nearest neighbor algorithm.
-
The outer loop iterates while there are planets that have not yet been visited. This outer loop is also a good place to print the route information to the
journey.txtfile. See the Create a File to Document the Driver’s Journey and the Testing Your Program sections for examples and inspiration on how to print the information needed for thejourney.txtfile.
Create a File to Document the Driver’s Journey
Your program needs to create a file named journey.txt that contains all the information that the gLyft driver needs for their route. This file contains a grid map of the route and a list of all the planets to go to in the correct order based on the algorithm described in the Determine the Route Section.
Here is a schematic of what a journey.txt file will look like:
<Map>
Start at <Starting Row> <Starting Column>
Go to <Planet Name> at <Planet Row> <Planet Column>
...
End at <Ending Row> <Ending Column>
Here is a description for each of the fields in the schematic:
| field | description |
<Map> |
the grid with all of the "in range" planets' symbols on it, as well as the starting and ending points |
<Starting Row> |
the starting point’s row number (not index number) |
<Starting Column> |
the starting point’s column number (not index number) |
<Planet Name> |
the planet's name (with data corruption corrected) |
<Planet Row> |
the planet's row number |
<Planet Column> |
the planet's column number |
<Ending Row> |
the ending point's row number |
<Ending Column> |
the ending point's column number |
Note: There should be a newline after the information about the ending point so that there is a blank line at the end of the file.
Testing Your Program
The two locations and names files provided in Data Sources/Files can be used to create two test cases.
Test Case 1
This test case uses the locations_1.txt and names_1.txt files. Run Test Case 1 like this:
$ g++ -std=c++11 planRoute.cpp route.cpp -o planRoute
$ ./planRoute
Enter Locations Filename: locations_1.txt
Enter Names Filename: names_1.txt
8434 out of range - ignoring
6341 out of range - ignoring
7632 out of range - ignoring
1111 out of range - ignoring
$
If your program works correctly, your journey.txt file should look like this:
.....
.XX.S
.....
.....
EQ...
..A..
X....
..P..
.....
.....
.....
.....
T....
Start at 2 5
Go to Etheria and Eternia at 2 3
Go to Domeo And James Juliett at 2 2
Go to New Earth (Planet Bob) at 5 2
Go to The Library at 6 3
Go to The Discworld at 8 3
Go to Jupiter Two at 7 1
Go to Fhloston Paradise at 13 1
End at 5 1
Here is a copy of Test Case #1’s journey.txt file saved as journey_1.txt so that you can can compare the correct version to your version without VS Code complaining that there are two files with the same name.
Test Case 2
This test case uses the locations_2.txt and names_2.txt files. Run Test Case #2 like this:
$ g++ -std=c++11 planRoute.cpp route.cpp -o planRoute
$ ./planRoute
Enter Locations Filename: locations_2.txt
Enter Names Filename: names_2.txt
1231 out of range - ignoring
$
If your program works correctly, your journey.txt file should look like this:
.E......Q...
............
............
..........T.
..A.........
............
............
............
............
............
............
..........T.
..P.......S.
..........T.
Start at 13 11
Go to Magrathea at 14 11
Go to Thundera at 12 11
Go to SupercalifragilisticeXpialidocious at 4 11
Go to LittleBigPlanet at 1 9
Go to Gethen at 5 3
Go to Jakku at 13 3
End at 1 2
Here is a copy of Test Case #2’s journey.txt file saved as journey_2.txt so that you can can compare the correct version to your version without VS Code complaining that there are two files with the same name.
FAQs
Here are frequently asked questions about this project. If you are stuck on something, start here!
General FAQs
We know it's a busy time of the semester, but this project is a true opportunity to really deepen your programming skills. Each semester, students say that they learn the most through doing the projects. We hope that you will do the same.
If restarting VS Code and restarting your computer didn't fix this issue, try these steps:
- Window users: make sure you are connected to WSL.
- If already connected, make sure you have included the necessary library headers.
- Mac users: follow Step 2.
out_of_range error or a segmentation fault (aka seg fault)!
.at() for your indexing, then .at() is telling you that you are indexing out of range. If you are using [] for your indexing, it can be a little harder to find track down where the indexing out of range is happening, but you can still do it.
In general, you likely have one of these situations going on somewhere in your code:
- You could have an index variable that is negative. For example, if
iis-1, and then you have a statement with a vector that includes.at(i), that would cause this error. - You could have an index variable that is 0, but the vector is empty. For example, if
iis0, and then you have a statement with a vector that includes.at(i), that would cause this error. Make sure your vector has elements before trying to index. - You could have an index value that is too high. For example, if
iis23but your vector only has 19 elements, and you have a statement with a vector that includes.at(i), that would cause this error. Double check if you want the loop’s condition to have<or<=based on your looping method.
cout statements with messages like, "About to call helper function XXX...." or "This is line XX". After you save, compile, and run your program, you will see your messages print to the terminal. Eventually, you will see that "out of range" error. You can look to see what was the last message to print, and then you know that your out of range indexing is somewhere between the last message that printed and the next message (that did NOT print).
cout statement" to debug something?
cout statement (along with any useful context) can help you figure out exactly where / why things are going wrong in your code. For example, if your program is stopping unexpectedly and you're not sure why, you can put "checkpoint" cout statements in your code like this:
// some code here

cout << "Checkpoint 1" << endl;

// some more code

cout << "Checkpoint 2" << endl;

// even more code
This way, if you run your code, and you only see
Checkpoint 1 in your terminal, you know the issue is somewhere in the lines of code between between those checkpoints. This helps you narrow down where any possible issues could be. This is very helpful with making sure if statements or loops run correctly!
See the lectures on debugging for more examples of using
cout statements to debug errors.
Getting Started
Next, write some pseudocode (or make a detailed outline or flowchart) for how to read in all the individual pieces of data. We have a lot of common patterns and lecture/lab exercises that you can use as templates for your code. If you're not sure which examples from class are most appropriate, check out the FAQs here about reading in the data.
At this point, if you feel pretty good about what you have planned, then you should start turning your pseudocode into actual code (if you don't feel good, come to office hours!). Stay focused just on getting your data into your program and verifying that you are doing that correctly. For example, if you are storing data in a vector of structs, print out the values of the vector of structs right after you read in the data to make sure that everything is working correctly. You can comment out this part later once you know everything is being read in correctly and you don't need to print out the values anymore.
Now, you probably have a good idea about how all the data is respresnted in your program and you can start thinking about the rest of the program. Take it step by step, referring often to the algorithm section above. Make sure you try writing pseudocode for the program before you begin actually coding to ensure that you conceptually understand what’s going on.
Reading in Data
loadShips) for an example.
Input streams work sequentially. So, you can start off by reading the individual pieces of data (since you know how many there will be and what format they have), and then start a while loop to read in the rest of the data. The while loop will automatically start reading where you left off, so there is no need to skip data! In other words, you can "manually" read in some elements with one format, then finish off reading with another format.
You can start by reading in the three first lines and then use the "reading until the end" common pattern that is in the homework.
Check out the
processHarvest.cpp program that you created in Lab 10.1 for an example of how to do this!
Printing out Data
Refer to the
printRover and printRovers functions in Homework 21 for some helpful examples!
printVectorOfVectors.cpp in Homework 22 and the Printing a Vector of Vectors question in the Project 4 Overview Lecture Reflection.
Remember that the "outer" vectors (the first index) correspond to the "rows". Each row has an "inner" vector in which the elements (the second index) correspond to “columns” : so indexing occurs in the order of row, column.
Other FAQs
const reference).
.find() and .replace() string functions that are in the string library.
Review the
redactInfo program from the Project 3 Overview to see an example of using .find() and .replace() to change values in a string. The lecture reflection for the Project 4 Overview also has an example of using .find() and .replace().
Remember that a planet name might have multiple instances of
XX and _. Consider what .find() returns when there's no match: how can we take advantage of this to remove multiple instances from a single name?
.erase() function on a VECTOR.
.erase() function for vectors takes in an iterator, not an integer value. We don't really cover iterators officially in this class, so revisit the Erasing Elements from a Vector section in Homework 19 to see examples that you can just use as patterns. You can also take a look at this additional documentation.
A quick summary is: if we have a vector called
vec, then vec.begin() will return an iterator (you can think of an iterator like a variable that "points" to a spot in a vector) to the start of the vector. You then can increment the iterator with normal addition to "move" the iterator to the place you want. For example, if you want to delete the 5th index of a vector, you would do vec.erase(vec.begin() + 5).
Keep in mind what happens to the vector when you erase an element that is not the last element. If we erase the element at position 5, then the element at the old position 6 will move to position 5. How could we handle this so we don't skip any data if we're in a loop?
.erase() function on a STRING.
.erase() function for a string can actually work with different types of arguments; here is some additional reference information.
The String Library Functions section in Homework 18 has an example of using the
.erase() function. The homework example uses the method of calling .erase() that will likely be of most help for you in this particular project: .erase(position, length) where position is the index of the first character to be erased and length is the number of characters to be erased. Here is another example:
string fruit = "blueberry";
fruit.erase(2,3); // start erasing at index 2; erase 3 characters
cout << fruit; // prints blerry to the terminal
containsWord) and the intro slides that go over vectors of structs! It will show you how to look for matching information. You can use this example to help you create a similar approach to match up the names with the rest of the planetary data.
Debugging Test Cases
Enter Locations Filename: locations_1.txt
Enter Names Filename: names_1.txt
8434 out of range - ignoring
6341 out of range - ignoring
7632 out of range - ignoring
You are likely erasing elements of a vector without properly updating your current index.
For example, if you are using a
for for loop to loop through the following vector:
vec: [0 1 2 3]And at
i = 1, you say:
vec.erase(vec.begin() + i);Now, you have
vec: [0 2 3]Notice that all of the elements to the right of the removed element reduce their index by one. So if you continue on in your
for loop to i = 2, vec[2] is now the element that has the value 3. Without including a line to decrease i by 1 after removing an element in a for loop, you effectively skip an element in the vector. Make sure you take the new indices into account in future indexing.
- Make sure you initially set each planet's "visited" status to be
falsebefore you add it to your vector of planets. If you do not, your computer locally might assign a default value of false, but the Autograder does not do that -- the variable will have "memory junk". - Make sure you also initialize any values you are using when comparing distances or checking for IDs that have a lower value.
- Print some extra info to either
coutorjourney.txt, such as:- The location of the current planet you are at
- The distances to all the planets you could go to from there and the names of those potential planets.
- Check that you named your output file correctly: it should be named
journey.txt. - Check that you explicitly defined or initialized all your variables. Don't assume that a variable will default to zero or false! This may work on your computer, but the Autograder does not do this. It's always best to explicitly set a value to a variable before you use it in, for example, a loop condition or the condition for an
ifstatement. - Check for correct whitespace around words (spaces, newlines, etc.). You can toggle the Autograder output to show the whitespace characters to help with this.

- Check for the correct return value from your
main()function. Remember that if a required file cannot be opened, you should be returning a value of1(to indicate an error so the user knows something is wrong). - Double check that you are submitting the correct file! Sometimes, students create a duplicate by accident and submit the duplicate.
- planet names that are one letter long
- planet names that start and/or end with XXs or underscores
- planet names with an odd number of Xs, like JakkuXXX
- planet names that have multiple/lots of underscores and/or XXs next to each
- other combinations of these things in planet names
- planet locations within +/- 1 row or column of the limits of your map
- variable types and the information they hold (double vs. int, string vs. char, that kind of thing)
journey.txt file.
- Look at the way you declare your distances -- should distance be a
doubleor anint? - Look at how you match the planet IDs with the planet names. What happens if you have a lot more names in the names file than you have locations in the locations file? Create a test case for this by adding in a bunch of random planet names and IDs in the middle of the names file, but leave the locations file alone.
- What happens if your gLyft driver isn't very busy? What happens if there's only one or two planets to visit before going to the end location? Create a test case for this situation!