ENGR 101 | University of Michigan
Installation Guide for ENGR 101
Overview
This document is intended to serve as a guide to setting up your computer for ENGR 101. In this course, you will learn to solve engineering problems through computing. You will use two computer programming languages in this course: MATLAB and C++. We assume that our students have no previous programming experience and teach computing starting with the very basics. Whether you have some programming background or have never coded in your life, this class is for you! (If you’ve programmed before, don’t worry: there will be some challenging exercises for you as well!) The following are instructions for setting these up across multiple operating systems as well as the process for installing and using VSCode.
The terminal provides an alternate interface for working with your computer. Essentially, you work by typing commands rather than by clicking icons or working with visual interfaces. Some alternate names for the terminal you may see are “shell”, “console”, and “command prompt”. Using the terminal will feel weird at first, and sometimes can be disorienting. It’s hard to remember all the commands. You don’t always get as much feedback as with a visual interface. But it feels more natural over time, and it will be a powerful addition to your toolset, in particular for programming and other computing tasks. This tutorial will get you started on the right path.
MATLAB in ENGR 101
For the first half of the semester, you will be using a software package called MATLAB. This program is sold by MathWorks and is available to the general public for purchase. BUT, the University of Michigan has negotiated a deal with Mathworks that provides registered students with a FREE COPY of MATLAB – Go Blue!
Installing MATLAB
MATLAB is a cross-platform program, meaning that there are versions for Windows, Mac, and Linux. You download an installer program which then handles installing MATLAB on your computer.
If you have previously installed MATLAB and need to renew your license, you should have received an email from the MathWorks with instructions on how to renew your license. If not, follow the instructions on this webpage:
https://teamdynamix.umich.edu/TDClient/76/Portal/KB/ArticleDet?ID=5448
If you have trouble, contact CAEN.
To install MATLAB on your personal computer, follow the instructions provided on this webpage:
https://www.mathworks.com/academia/tah-portal/university-of-michigan-820543.html
The downloaded installer for MATLAB requires 250 MB space, while the install runtime is about 20 minutes. Once installed, it occupies about 5 GB.
Heads-up if you have a Mac!
- Please make sure that you have updated to the latest OS version before trying to install MATLAB.
- If you have a Mac that has an M chip (meaning, Apple’s own processing chip), you may need to install a Java Runtime Environment, a program that will let MATLAB actually work on your computer. Go to this Mathworks website where you can click a button to install a free Java Runtime Environment called Amazon Corretto 11.
Below is a walk-through for installing MATLAB on your computer.
Scroll down until you see this box, then click on the blue button:
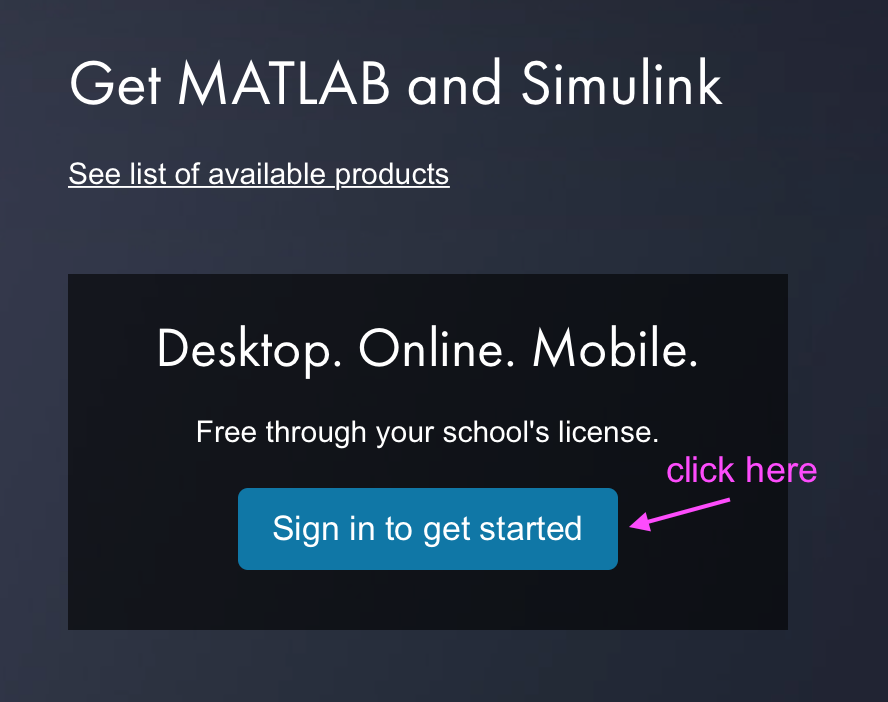
After you click this button, you will be redirected to a U-M weblogin screen. However, if your web browser already knows you are logged in with your umich account (because you logged in to check the course Google drive or to download this .pdf), then the browser will automatically log you in and it will seem like this step is skipped – that’s okay.
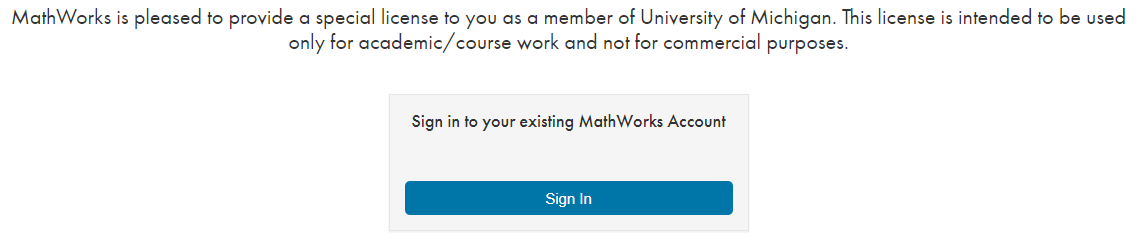
Next, you need to confirm/create a MathWorks account (There is an option to create an account on the sign-in page):

Follow the prompts to download the current version of MATLAB for your computer (Windows, MacOS, Linux).
Once the installer has downloaded, find and launch it (by clicking or double-clicking). Follow the steps in the installer. Here is some info to help you through the installation process:
- Login with your MathWorks account
- Accept the Terms of Service if you want to use MATLAB
- Select a license. If there is more than one choice, choose the one that says either “Student TAH (SSO)” or something like “Academic - Total Headcount”
- Choose the default destination folder unless you have a good reason not to
- Eventually, you will reach the Product Selection part of the installation process:
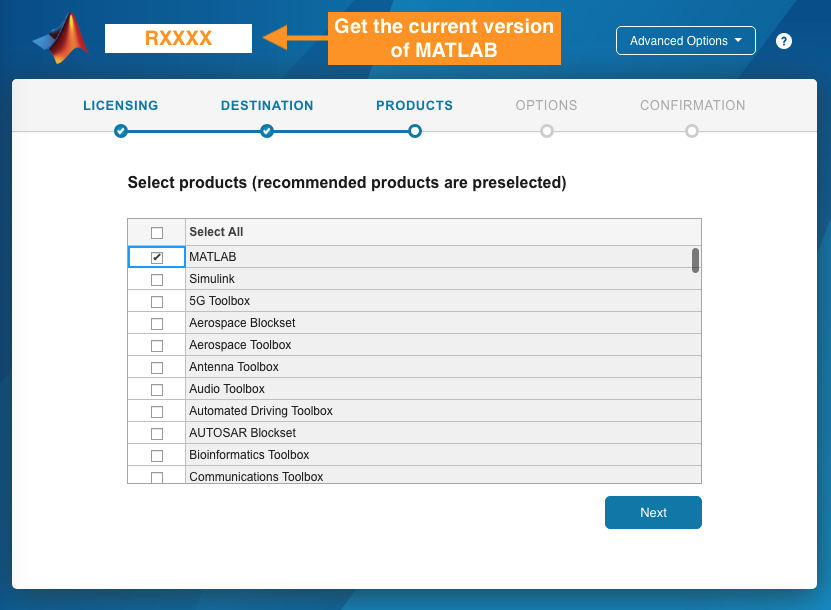
STOP! You DO NOT need to download all of the products associated with MATLAB!
Select MATLAB, scroll down and select the Image Processing Toolbox and the Statistics and Machine Learning Toolbox and carry on with the download. Make sure the rest of the products are not selected (unless you really want one of those products, in which case go for it).
Downloading MATLAB will probably take awhile, so go make a cup of tea, make a post on Piazza, or check in with another class while you wait. You’ll probably have time to do all three!
Configure MATLAB Environment
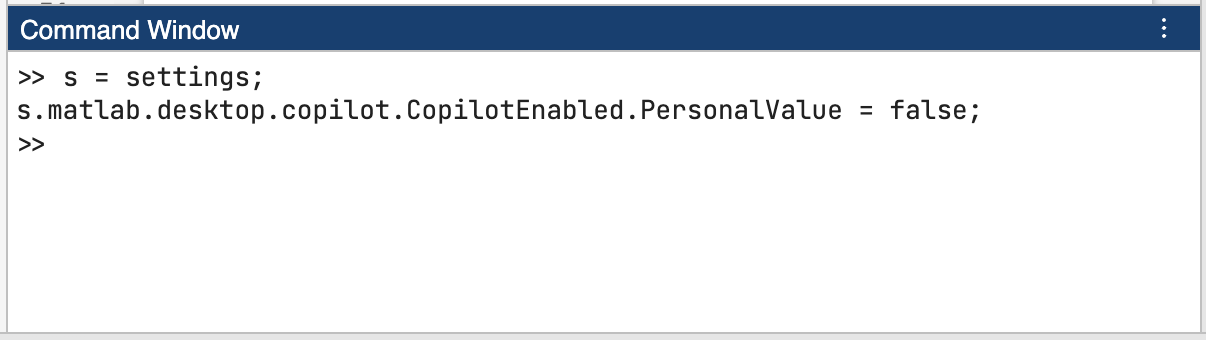
In the Command Window, copy and paste the following two lines:
s = settings;
s.matlab.desktop.copilot.CopilotEnabled.PersonalValue = false;
And then press enter.
Your Command Window should then look like this:
MATLAB Installation Verification
After MATLAB is installed, you should check to make sure that the toolboxes we need were installed correctly:
- In your Documents folder on your computer, create a new folder named ENGR 101 (if you haven’t already).
- Download the
verifyMATLABforENGR101.pfile and move this file into your ENGR 101 folder. - Open MATLAB. Sign in again if it asks you to.
- Change the Current Folder to be your ENGR 101 folder.
- Check to make sure that the
verifyMATLABforENGR101.pfile shows up in the Current Folder window. (Note: Depending on your version of MATLAB, this window may be called the Files window.) - In the Command Window, type:
verifyMATLABforENGR101 - You should have a Figure window pop up with a picture that says the installation was verified. This figure should also be saved as a file named
installVerification.pngin your ENGR 101 folder, since that is the Current Folder in MATLAB. - Right-click on the
installVerification.pngfile in the Current Folder (or Files) window, and select Show in Explorer (Windows) or Show in Finder (Mac). - Your computer should take you back to your ENGR 101 folder.
- Find the
installVerification.pngfile and open it. - You should see the same thing that was in the Figure window in MATLAB! It’s okay if the saved version of the figure is a little bit different shape (e.g. a wider/narrower rectangle, or a shorter/taller rectangle).
- Remember this file! You will submit it as part of a Homework assignment.
Below is a screen recording that shows how to do these steps:
C++ in ENGR 101
In the second half of the semester, we will switch to programming in C++. C++ is a compiled programming language, which means that we need to install a few tools so that we can create C++ programs. We’ll also be using the terminal a lot more in the C++ half of the semester.
The terminal provides an alternate interface for working with your computer. Essentially, you work by typing commands rather than by clicking icons or working with visual interfaces. Some alternate names that you may see for the terminal interface are shell, console, and command prompt.
Using the terminal will feel weird at first, and sometimes can be disorienting. It’s hard to remember all the commands. You don’t always get as much feedback as with a visual interface. But it feels more natural over time, and it will be a powerful addition to your toolset, in particular for programming and other computing tasks. The instructions here will help you get started with using the terminal on your computer.
The installation and setup process for the C++ tools that we need looks a little different for Mac Users vs. Windows Users vs. Linux Users. Use the instructions and tutorials that apply to you.
For MacOS Users
The Mac operating system is built on top of a Linux-style operating system. This means that you’ll just need to install a couple of things and then you’ll be all set!
System Setup
We will be using the g++ program to compile and run our C++ programs. The g++ program is included in Apple’s Xcode Command Line Tools. Here is a description of the Command Line Tools. We’ll be following this installation guide as well, because it’s really quite good and why should we make our own when this already exists?
You do NOT have to have the full Xcode app installed for what we do in ENGR 101! You can install Xcode if you want, but it’s like 40 GB and you might not want to use up that much space for an app you may not really be using at its full capability (because it’s not needed for what we’re doing). We recommend just installing the Xcode Command Line Tools for now.
Follow these instructions to check that you have the Xcode Command Line Tools installed, or to install them if you don’t:
- Open a Terminal
- A terminal interface is already included with macOS. Use spotlight (press command+space) and search for “terminal”.
- Follow these instructions to see if you already have the Command Line Tools installed.
- If you do not have the Command Line Tools installed, follow these instructions to install the Command Line Tools.
- Note: You don’t have to install the “Warp Terminal” that the author says they like better. The built-in MacOS terminal is just fine.
- The linked instructions should work for everyone, but if you have trouble with installing just the Command Line Tools, you may have to install the full Xcode app (instructions for that here). We don’t know why, but sometimes this helps. Please come talk to us in office hours if you’re stuck!
- If you are using macOS Mojave 10.14, please see the error specific to macOS Mojave 10.14 section for instructions that may be helpful if you run into a specific error related to this OS version.
- The
g++program is included in the Xcode Command Line Tools, so check thatg++installed correctly.- Type
g++in the terminal, like this:% g++ - If
g++installed correctly, you will see this error:% g++ clang: error: no input files %The error means that
g++is ready to compile your C++ files, but we didn’t tell it which files to use. So, this error means thatg++installed correctly and is ready for you to use! - If
g++did not install correctly, you will see something like this error:% g++ zsh: command not found: g++ %In this case, please revisit the installation instructions linked above because it’s likely you accidentally missed a step. If you are stuck for more than 15 minutes or so, then please come into office hours so we can help you!
- Type
Opening a Terminal
In general (as you did above), use spotlight (press Command+Space) and search for “terminal”. Once the terminal is open, you can use the cd command to navigate to the folder you want to work with using basic terminal commands.
Using the Terminal
We’ve put together a set of tutorial videos:
Please watch these videos and follow along on your computer to start becoming familiar with how the terminal works.
Optional: Customizing How Your Terminal Looks
If you want to add some color and fanciness to your terminal, you can! One option is to install Oh My Zsh, an open source tool that includes themes that can make it easier to read everything at the terminal. You can install Oh My Zsh by typing this at the terminal prompt ($):
$ sh -c "$(curl -fsSL https://raw.githubusercontent.com/ohmyzsh/ohmyzsh/master/tools/install.sh)"
If you decide you don’t like how this makes your terminal look, that’s okay! Just type this to uninstall Oh My Zsh:
uninstall_oh_my_zsh
Exit your terminal and then open it again and it will go back to your default settings.
Error Specific to macOS Mojave 10.14
If your computer is running macOS Mojave 10.14, you may see the error:
Xcode Tools Install Error (Software Update Server Error)
This error occurs for all users that have updated the OS on their macs to macOS Mojave 10.14. Click the apple icon on the top left of your screen and then About This Mac. You should see a version number under the OS name.
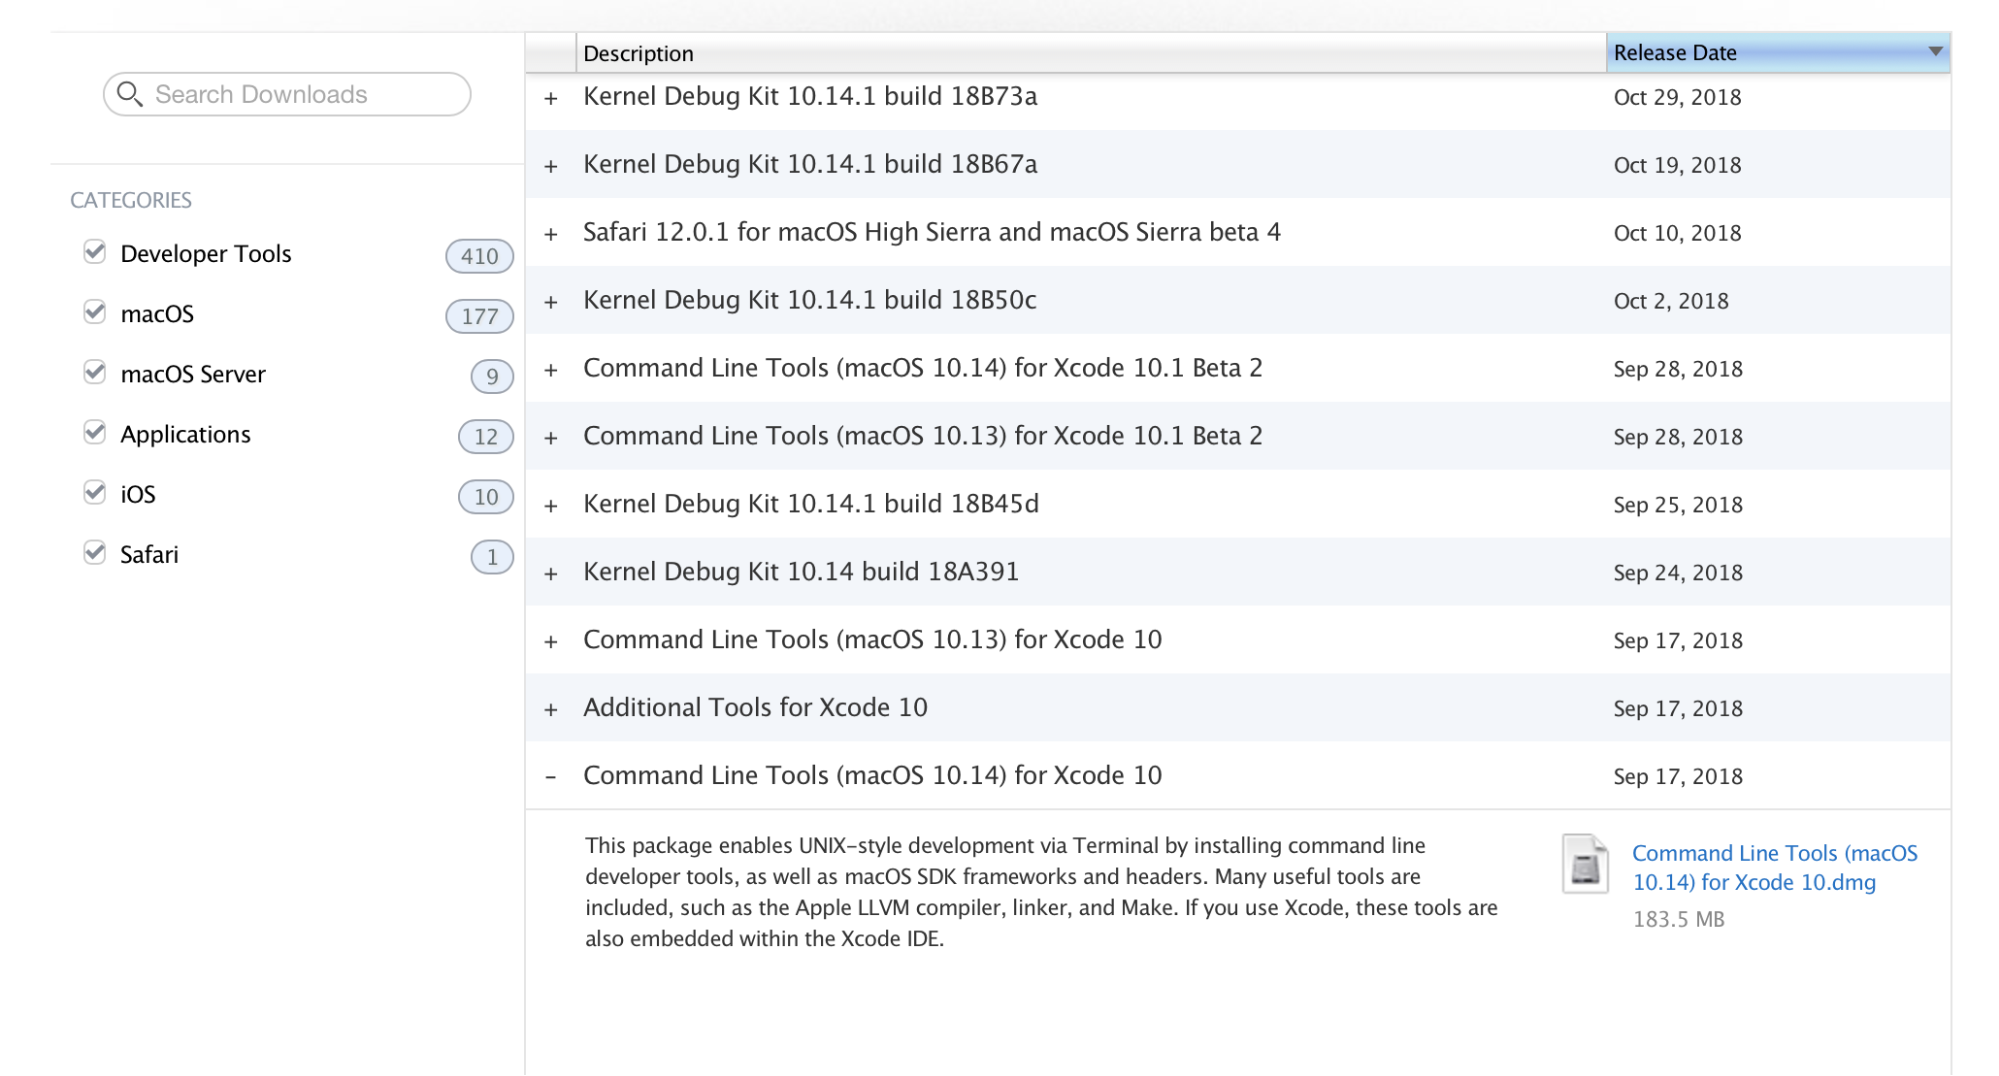
- Sign in to your Apple account: https://developer.apple.com/downloads/index.action?name=for%20Xcode
- Once you’ve signed in, your screen should look similar to the image below. Search for “Command Line Tools (macOS 10.14) for Xcode 10”. Click the + button to the left of the description and download the
.dmgfile.
- Once the
.dmgfile has finished downloading, open the downloads folder in Finder. Double click on the.dmgfile. You should see the following window appear.
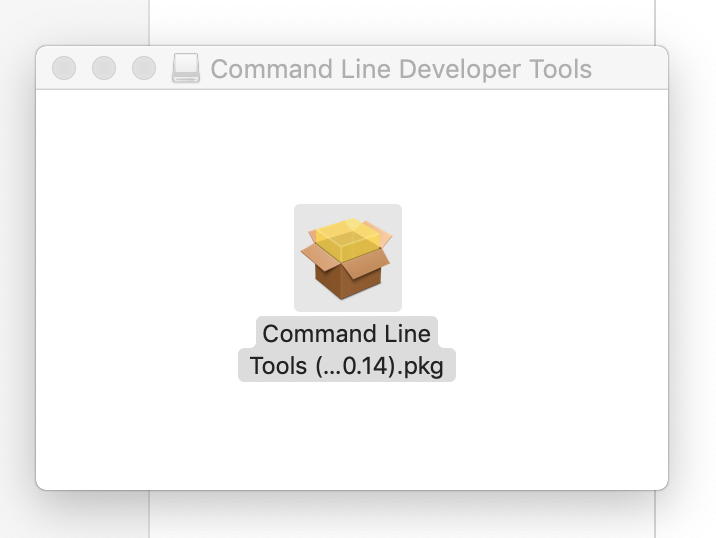
- Double click on the
.pkgicon and follow the instructions on the prompts (accept / agree / install). The command line tools will take up approximately 1 GB of space on your disk.
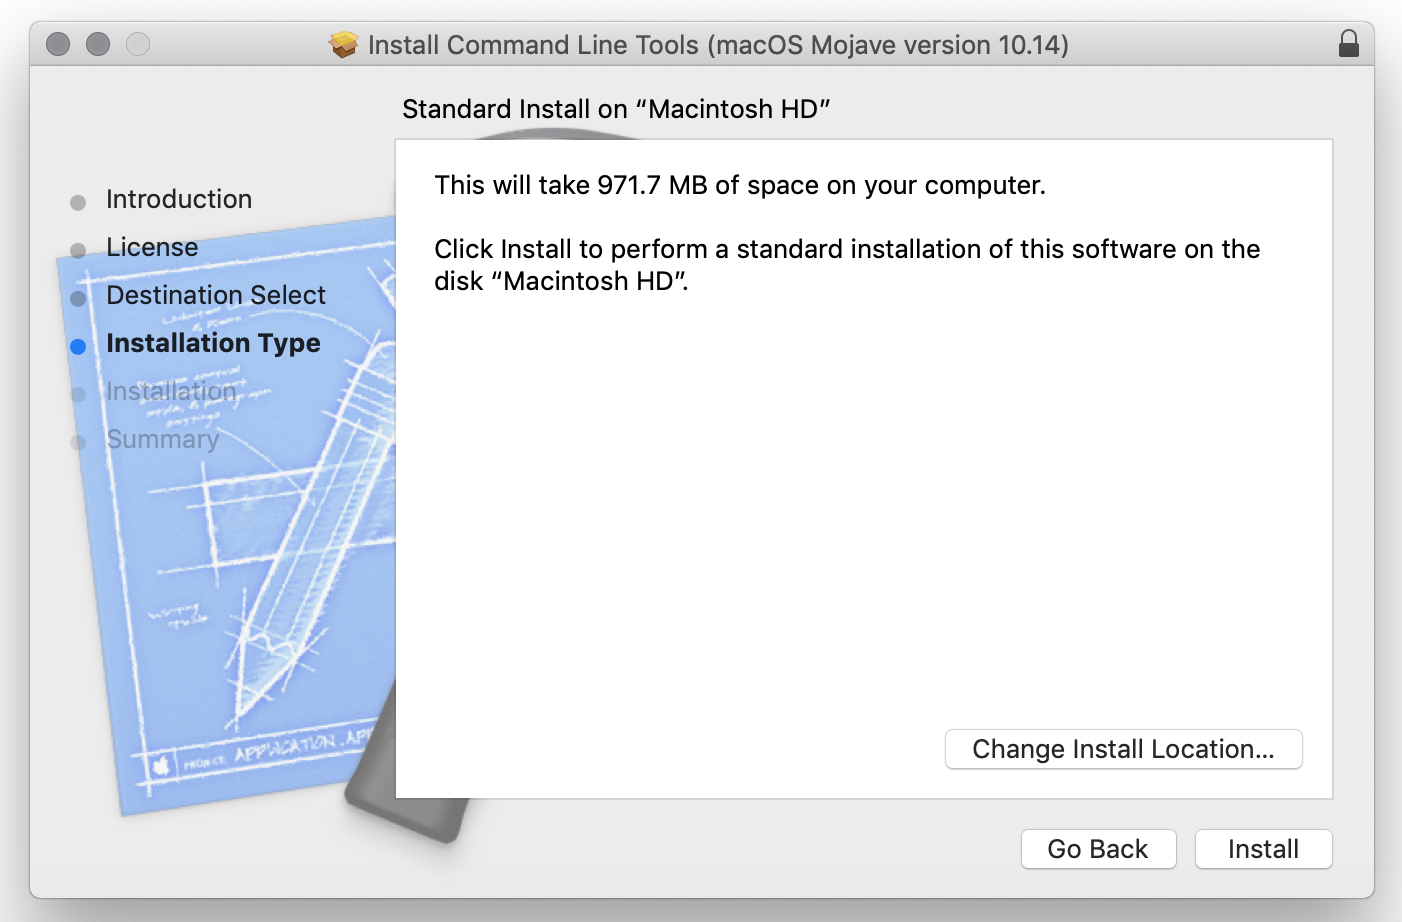
- Once the install has finished, type
g++ --versionat the terminal. You should see a message with a version number. Continue to Step 3 in the main setup instructions.
For Windows Users
This version of the tutorial assumes you are working on a personal computer running Windows 10 or 11.
Unfortunately, ENGR 101 does not provide support for setting up a development environment on older versions of windows, because WSL (Windows Subsystem for Linux) is not available on these systems. Alternatively, other tools exist for C++ development on older versions of Windows, such as Cygwin or MinGW, but again, ENGR 101 does not provide support for these environments.
System Setup
Though Windows has its own terminal interface, it is not compatible with many of the tools we’ll need in ENGR 101. Instead we’ll install Ubuntu (a distribution of the Linux operating system) on top of Windows and use the Linux terminal for C++ development in ENGR 101. Steps 1 through 3 are from the VS Code WSL tutorial. We’ve included pictures below as well.
There are many steps to getting your Windows machine ready to code in C++! In addition to following the steps in this guide, you can watch this walkthrough video and see exactly what you are supposed to do:
Note: This walkthrough video also includes how to get set up with VS Code, as described in the VS Code portion of this guide.
Step 1: Check Compatibility
- If you have Windows 11, skip this step.
- Find and select “System Information” from the search bar.
- Verify that the “OS Name” contains Windows 10.
- Verify that the “Version” contains a build number that is 16215 or higher. (If your build number is too low, install the most recent windows updates and try again.)
Step 2: Enable the Windows Subsystem for Linux (WSL)
- Find and select “Turn Windows features on or off” from the search bar.
- Find and check the boxes “Windows Subsystem for Linux”, “Windows Hypervisor Platform”, and “Virtual Machine Platform”. Click ok.
- Your computer may prompt you for administrator privileges. Allow this.
- You may be required to restart to finish the installation. Go ahead and do this now.
- Check that WSL is installed by typing in “wsl” into your Command Prompt (this is a separate program accessible via the search bar)

Step 3: Install Ubuntu on WSL
- Find and select “Microsoft Store” from the search bar. Search for “Ubuntu”. Select it and then click the “Get” button. This may take a moment.
- You may also see options for “Ubuntu 18.04 LTS” and “Ubuntu 20.04 LTS.” Disregard these. Simply install “Ubuntu.”
- Once the download and install is finished, click “Launch”. This may take another moment.
- A terminal window will open. You’ll be prompted for a username. Type one and hit enter.
- You’ll be prompted for a password. Type one and hit enter. Repeat to confirm the password. (Note that when you type the password, the characters aren’t shown. This is an intentional security feature and does not mean that your terminal is “broken”)
This is the administrator password for the Linux terminal, so be sure to remember this password. We recommend manually adding this password to your favorite password manager app on your phone!
Step 4: Install Packages with apt
aptis a package manager that we use to install and update programs. You can think of it kind of like an “app store”, but for the terminal.- First, update
aptitself by typing the following command at the terminal:sudo apt update - You’ll be prompted for your password. This is because of the
sudo, which runs a command with administrator privileges. Enter the password you chose earlier. - The update may take a bit to run. You’ll see lots of output at the terminal.
- After that, run the following command at the terminal:
sudo apt upgrade - This command will upgrade all of the existing packages to the latest versions. This may take a few minutes.
- Now, use
aptto install several useful packages with the following command:sudo apt install g++ make wget git ssh gdb valgrind tree python3(This installs the necessary development packages for C++. This will take a while.)
- Once the install has finished, type
g++ --versionat the terminal. You should see a message with a version number if the install was successful.
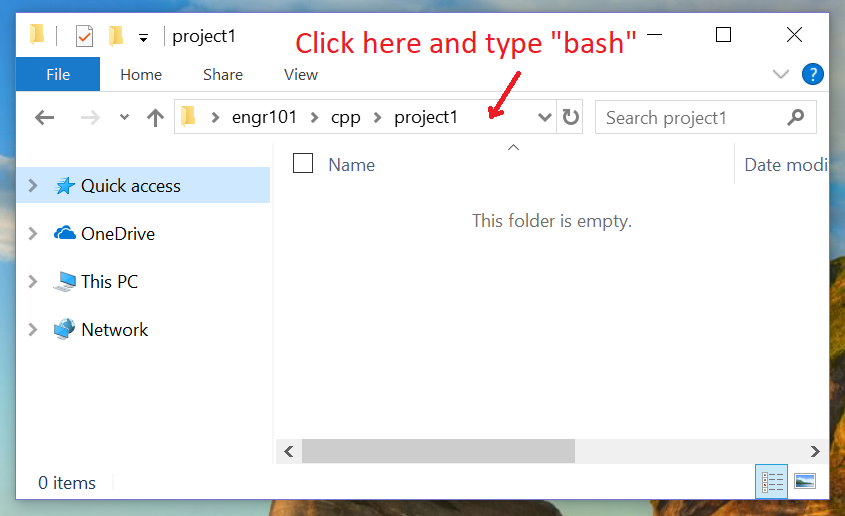
Opening a Terminal
To open a terminal for working in a particular folder, navigate to that folder in the file explorer. Then, click in the white space where the directory is listed and type bash (completely replacing whatever is there initially). This will open a terminal with that folder set as the current directory. Here is an example:
Using the Terminal
We’ve put together a set of tutorial videos:
Please watch these videos and follow along on your computer to start becoming familiar with how the terminal works.
FAQ/Troubleshooting
Check the sections below for help on what to do if you run into one of these somewhat common issues while getting your Windows computer set up for C++.
Error: Temporary failure resolving <url>
If you run into a problem when running sudo apt update, specifically an error stating something along the lines of Temporary failure resolving <url>, it is likely the case that your computer’s firewall is blocking the Ubuntu packages from being received by your computer.
Potential Solutions:
- Preferred Solution: Whitelist Ubuntu on your firewall by creating a program rule to always allow internet traffic to and from Ubuntu.
- Less Preferred Solution: Temporarily pause your firewall until the installation is done to get around this.
Ubuntu/WSL Stalls or Stops Responding to Commands
If you run into an issue with getting Ubuntu/WSL to respond to any commands (i.e., you run the command wsl --shutdown and the command never finishes running), check the Task Manager to see how much of your CPU is being used. If WSL is using your entire CPU to run, you need to set a maximum limit for how much space WSL is allowed to use on your computer.
Why does this happen? Sometimes, WSL gets stuck in an infinite loop. Normally, this can just be fixed by stopping WSL and restarting it, but if WSL is using your entire computer, then there’s no space left to execute the restart command. Fun, huh?
To fix this problem, we will create what’s called a config file. First, navigate to your user profile directory. This should be something like C:\Users\<UserName>. Then, in that directory, create a file and name it .wslconfig (important: it must be exactly this name, including the period before the name begins and with no additional suffixes like .txt). The file should contain only the following two lines:
[wsl2]
memory=3GB
After adding these two lines, save your WSL config file. Then, restart your computer. When your computer restarts, the new WSL settings will automatically be applied and it should prevent the issue from recurring.
I Forgot to Save My Ubuntu Password and I Don’t Know What It Is. What Do I Do?
If this happens to you, the best thing is to completely uninstall Ubuntu/WSL and start over. Follow the steps in the Restarting Your Install section.
Restarting Your Install (If All Else Fails!)
If you are running C++ on Windows (especially Windows 11) and none of the above has worked to resolve them, try following these steps below to restart your WSL install.
The steps are as follows.
In Powershell (as an administrator):
wsl --unregister Ubuntuwsl --shutdownwsl --updatewsl --shutdown(yes, again!)wsl --install -d Ubuntu- Proceed with Onscreen Prompts to finish Ubuntu install.
In Ubuntu:
sudo apt updatesudo apt upgradesudo apt install g++ make wget git ssh gdb valgrind tree python3
If this doesn’t work, come in to office hours– these issues are much easier to resolve in person than online.
For Linux Users
If you use Linux, we’re guessing that you are already pretty familiar with the terminal and that you probably already have the g++ compiler installed. If you have any questions about your setup, please come to office hours.
Visual Studio Code (VS Code)
An Integrated Development Environment (IDE) is a tool that provides an editor and a complementary set of features that make your life easier when writing code. Think of it like a word processor, but for writing programs. For example, just as a word processor might provide a spellchecker, an IDE can underline compilation errors in your code as you’re writing it.
For writing C++ programs in ENGR 101, we recommend Visual Studio Code (VS Code). Although you are welcome to try other IDEs if you like, we only officially support VS Code (e.g. in office hours). Some common alternatives are Visual Studio for Windows (yes, this is different from Visual Studio Code) and Xcode for macOS.
Installing VS Code
Follow the instructions below for your operating system. (And skip the ones that don’t apply.)
These installation instructions assume you have already completed the C++ setup for your personal Operating System (OS) as described above. If you have not done this, please go back and do the system setup before installing VS Code.
Windows
If you have a Windows machine, you will need to do a bit of extra set up. The steps below are also included in the Windows C++ Setup Walkthrough Video from earlier in the guide, so follow along with the video as well as the instructions below.
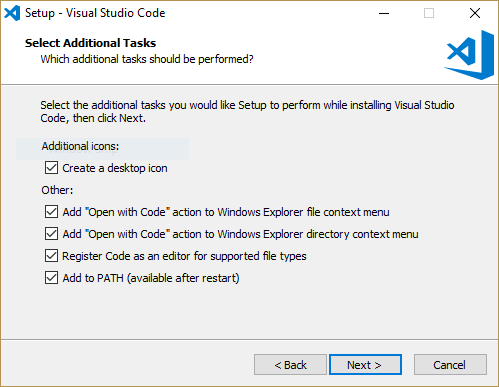
Step 1: Install
Follow the VS Code installation instructions for Windows. When you run the installer, make sure the following options are checked:
Step 2: Install the WSL Extension
- Open VS Code.
- Click the extensions button on the left side.
- Search for “remote wsl” and select the WSL extension.
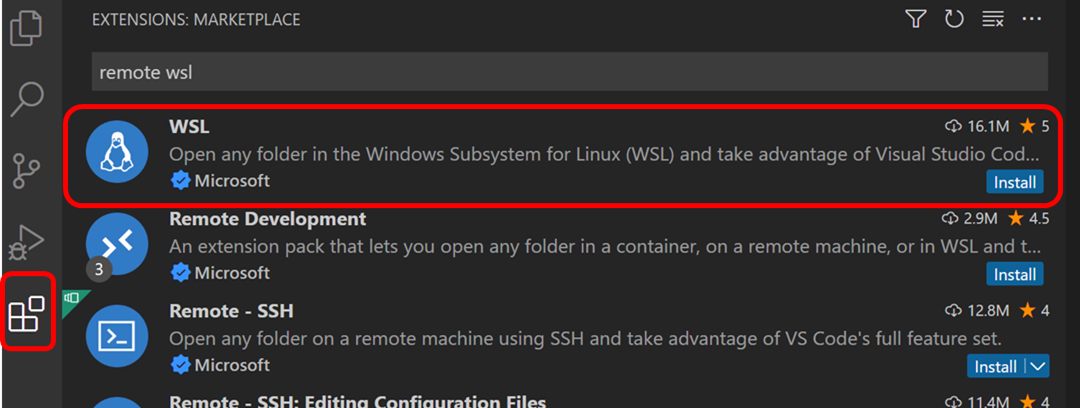
- Click “Install”. This may take a couple of minutes.
- You may also need to click “Reload to Activate”.
Check out the article Remote Development in WSL from Microsoft to get some more information on how to interface with WSL in VS Code. You won’t need all of the sections, but this will walk you through some quick steps on how to create a remote connection to your Linux subsystem.
Step 3: Configure Your Environment
- Press CTRL+shift+p to open the command palette.
- Search for and select the “Open User Settings (JSON)” command.
- If there is a
>prompt inside a window at the top of the command palette, type in the command:preferencesand it should bring up Preferences: Open User Settings (JSON) as an option to click on
- If there is a
- VS Code should open a
.jsonfile. In this file, copy/paste the following:{ "terminal.integrated.shell.windows": "C:/Windows/System32/wsl.exe", "C_Cpp.clang_format_fallbackStyle": "Google", "C_Cpp.default.intelliSenseMode": "gcc-x64", "C_Cpp.default.compilerPath": "/usr/bin/gcc", "C_Cpp.default.includePath": [ "${workspaceFolder}/**" ], "C_Cpp.default.cppStandard": "c++11", "editor.inlineSuggest.enabled": false, "C_Cpp.copilotHover": "disabled", "chat.agent.maxRequests": 0, "chat.disableAIFeatures": true, "files.autoSave": "afterDelay", "editor.formatOnSave": true } - Press CTRL+shift+s to save the settings (replace the file if need be, that’s fine). You may now close the settings
.jsonfile.
Step 4: Verifying Settings
Once you have gone through steps 1 to 3, you should be all set to develop code in Windows! However, if you are not using the proper setting, you will have issues getting code to run.
- Verify that you are properly using Remote - WSL. On the bottom of your VS Code window, you should see something like this on the bottom left corner:

- If you see something like this:

Click on the green status button, and select “Connect to WSL” in the dropdown menu that appears.
- In the new window that opens, open up a new Terminal by pressing CTRL+shift+` , or by going to “Terminal” -> “New Terminal.” Ensure that the terminal that opens is a Bash terminal by verifying the following on the top right of the Terminal that just opened:
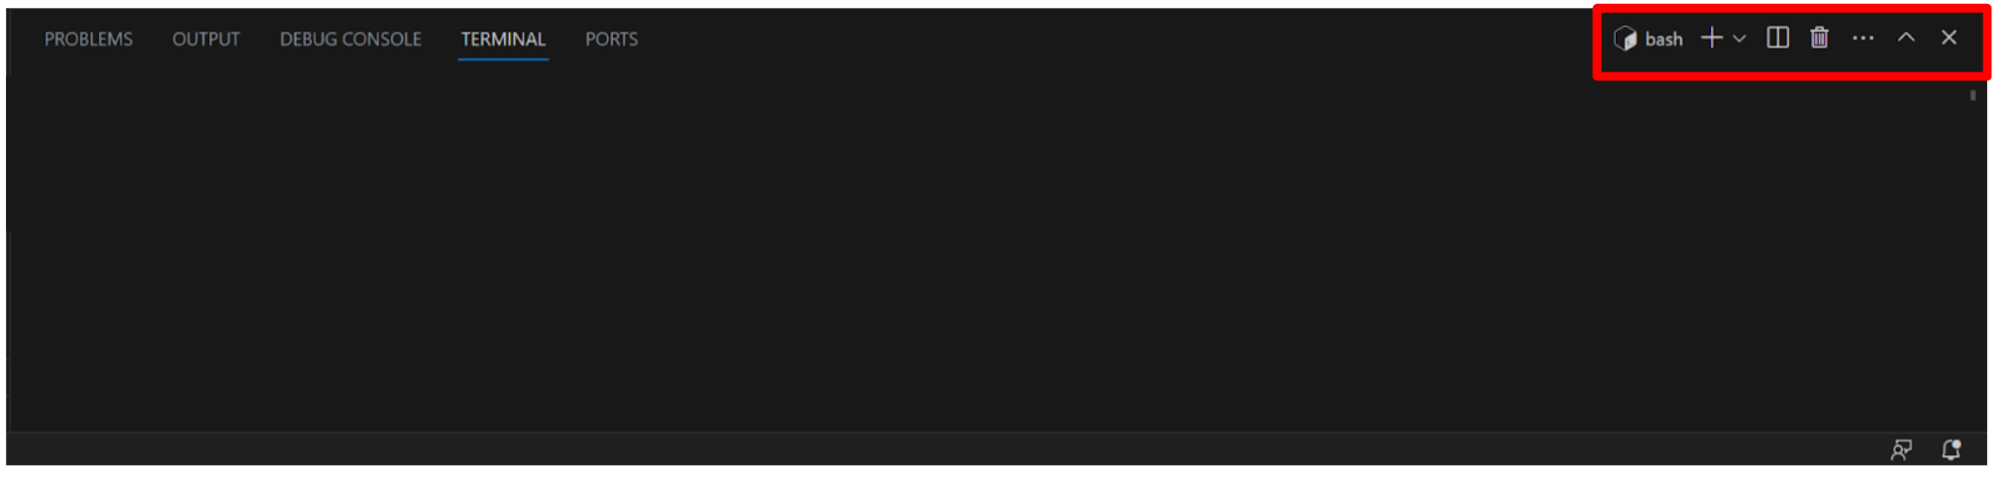
- If you do not see “Bash,” and see something else (such as “PowerShell” for example) click on the down arrow next to the + symbol and select “Bash” on the menu that appears. Your menu options may be different.
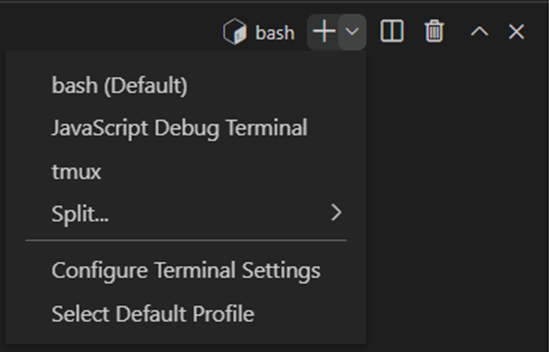
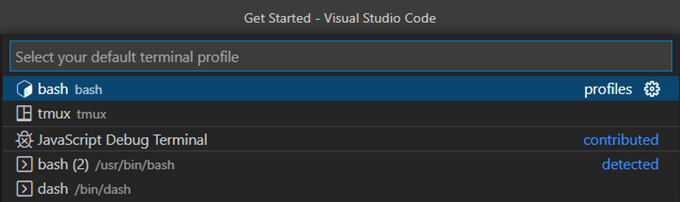
- Pro Tip: To ensure that a bash terminal opens every time, click on the down arrow next to the + and click on “Select Default Profile” on the menu that appears. Select “Bash” in the subsequent dropdown menu. Your options may be different, but you will have a bash option. Select this.
MacOS
If you have a Mac, the instructions to get VS Code all set up are fairly straightforward. Follow the steps below.
Step 1: Install
Follow the VS Code installation instructions for Mac. You only need to perform the basic installation (Step 1).
Step 2: Configure Your Environment
- Press ⌘+shift+p to open the command palette.
- Search for and select the “Open User Settings (JSON)” command.
- If there is a
>prompt inside a window at the top of the command palette, type in the command:preferencesand it should bring up Preferences: Open User Settings (JSON) as an option to click on
- If there is a
- VS Code should open a
.jsonfile. In this file, copy/paste the following:{ "editor.inlineSuggest.enabled": false, "C_Cpp.default.cppStandard": "c++11", "C_Cpp.copilotHover": "disabled", "chat.agent.maxRequests": 0, "chat.disableAIFeatures": true, "editor.formatOnSave": true } - Press ⌘+s to save the settings (replace the file if need be, that’s fine). You may now close the settings
.jsonfile.
CAEN Linux
VS Code should already be present on CAEN Linux. Find it in the Applications > Programming menu.
Linux (on a personal computer)
Follow the VS Code installation instructions for Linux.
Installing the C/C++ Extension
- Open VS Code if it is not already open.
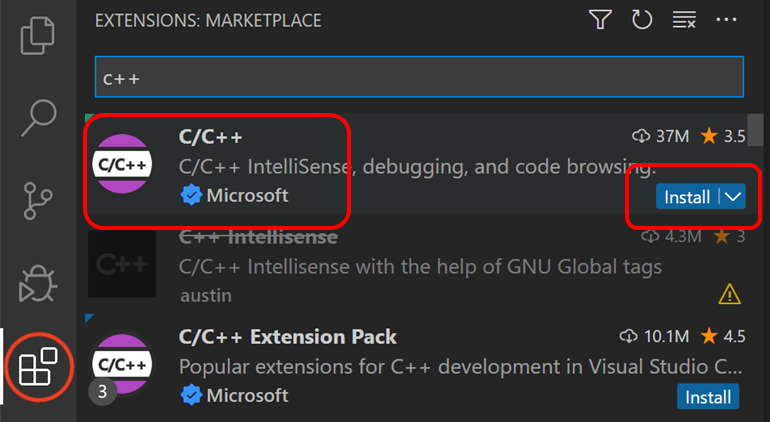
- Click the extensions button on the left side.
- Search for “c++” and select the C/C++ extension
- Click “Install”. This may take a couple of minutes. When finished, you will see a “Thank you for installing the C/C++ extension” message.
- You may also need to click “Reload to Activate”.
Creating an ENGR 101 Folder That Will Be Synced to the Cloud
It’s always important to make sure your ENGR 101 work is automatically backed up somewhere. Take a moment now to check that you ENGR 101 folder is in a location on your computer that is automatically backed up to the cloud.
Mac Users
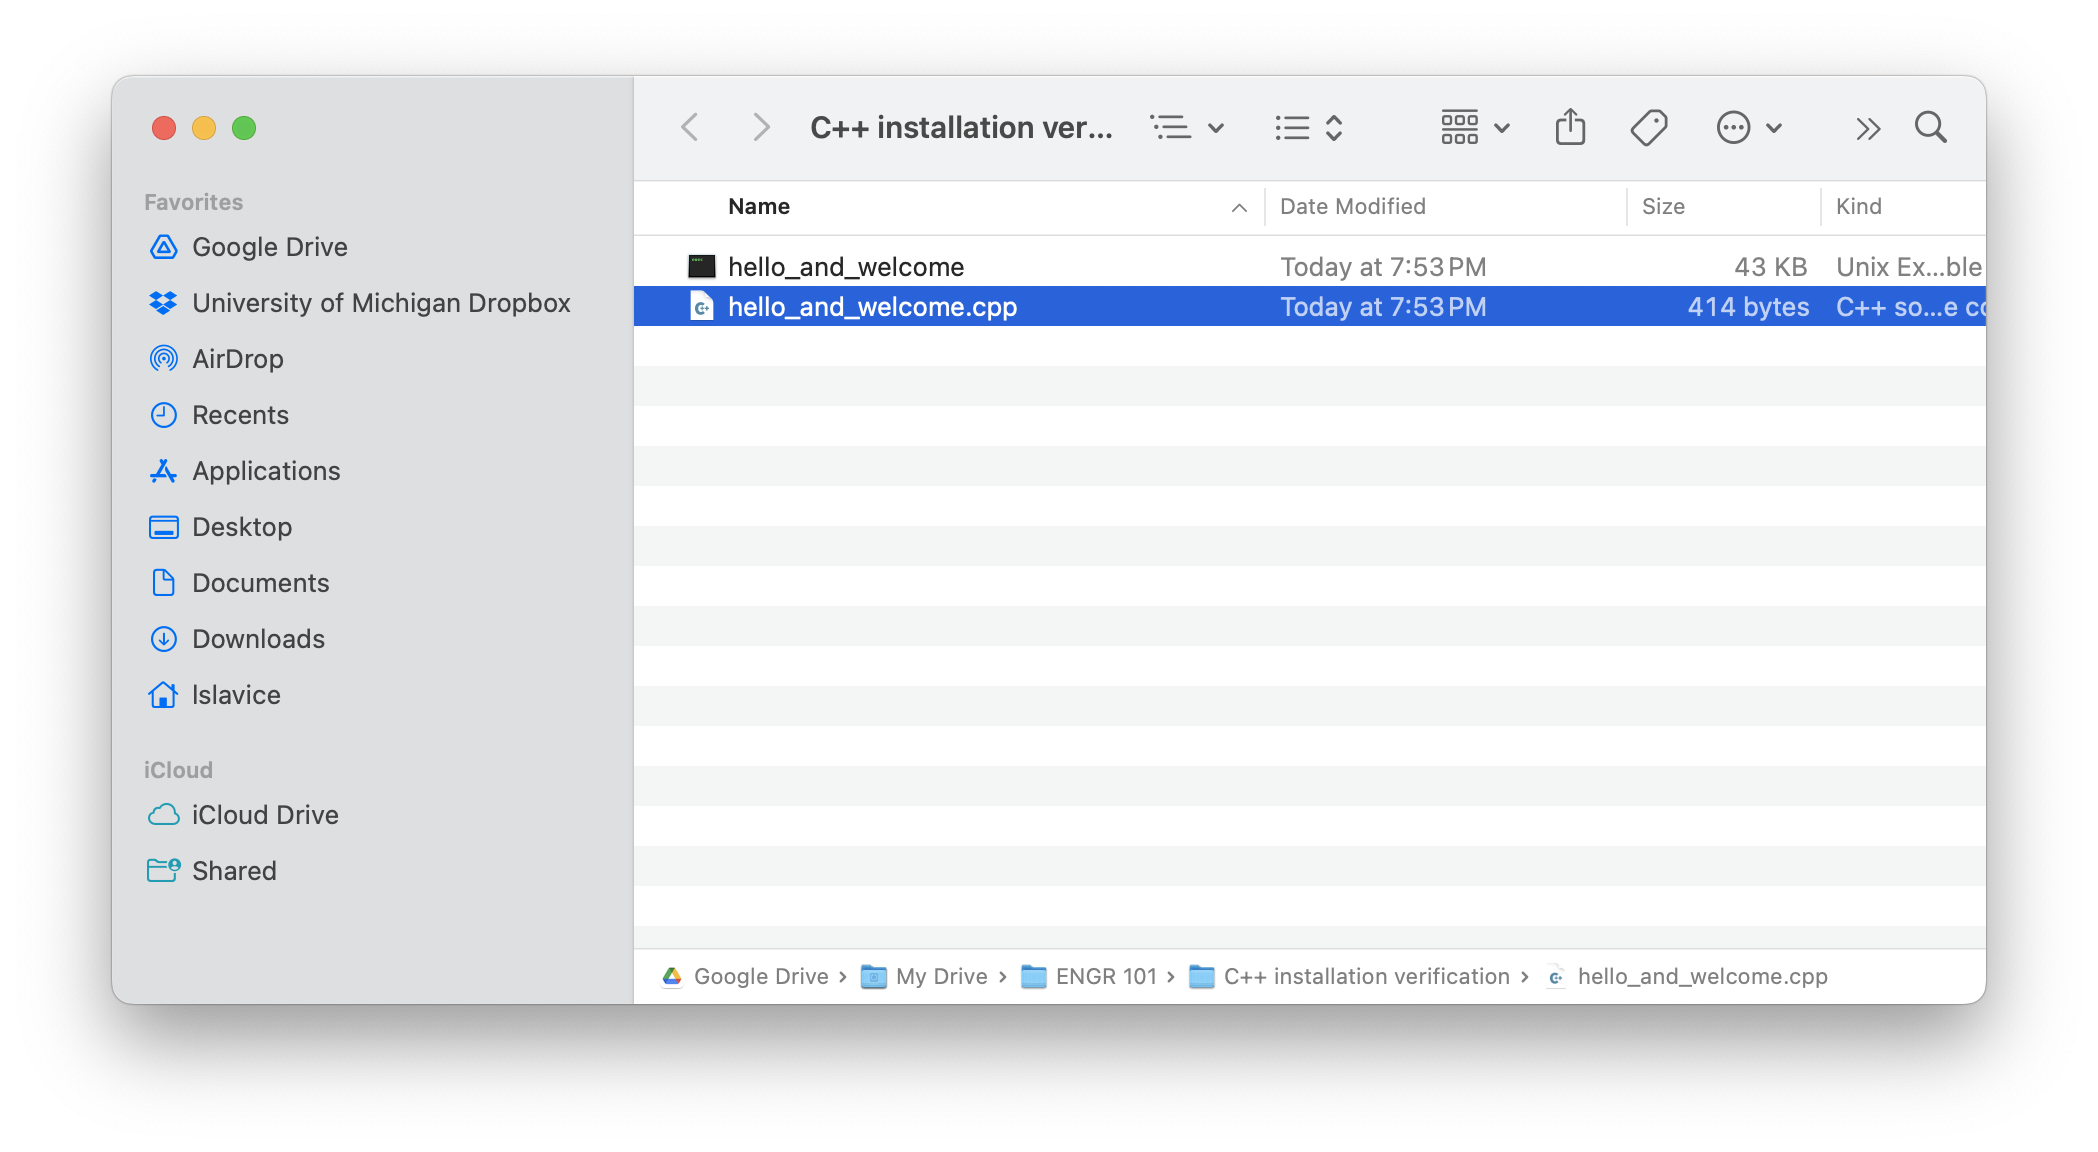
Your U-M account will give you access to a large amount of cloud storage via Google Drive. If you install the Google Drive application on your computer, it will create a folder on your computer that syncs to your Google Drive. VS Code can use the Google Drive folder on your computer just like it would if you stored files in your Documents folder. For example, if you create your ENGR 101 folder in the Google Drive folder, you can save your C++ files like this:
And here, you can see that you can compile and run a C++ program in VS Code from that Google Drive folder:
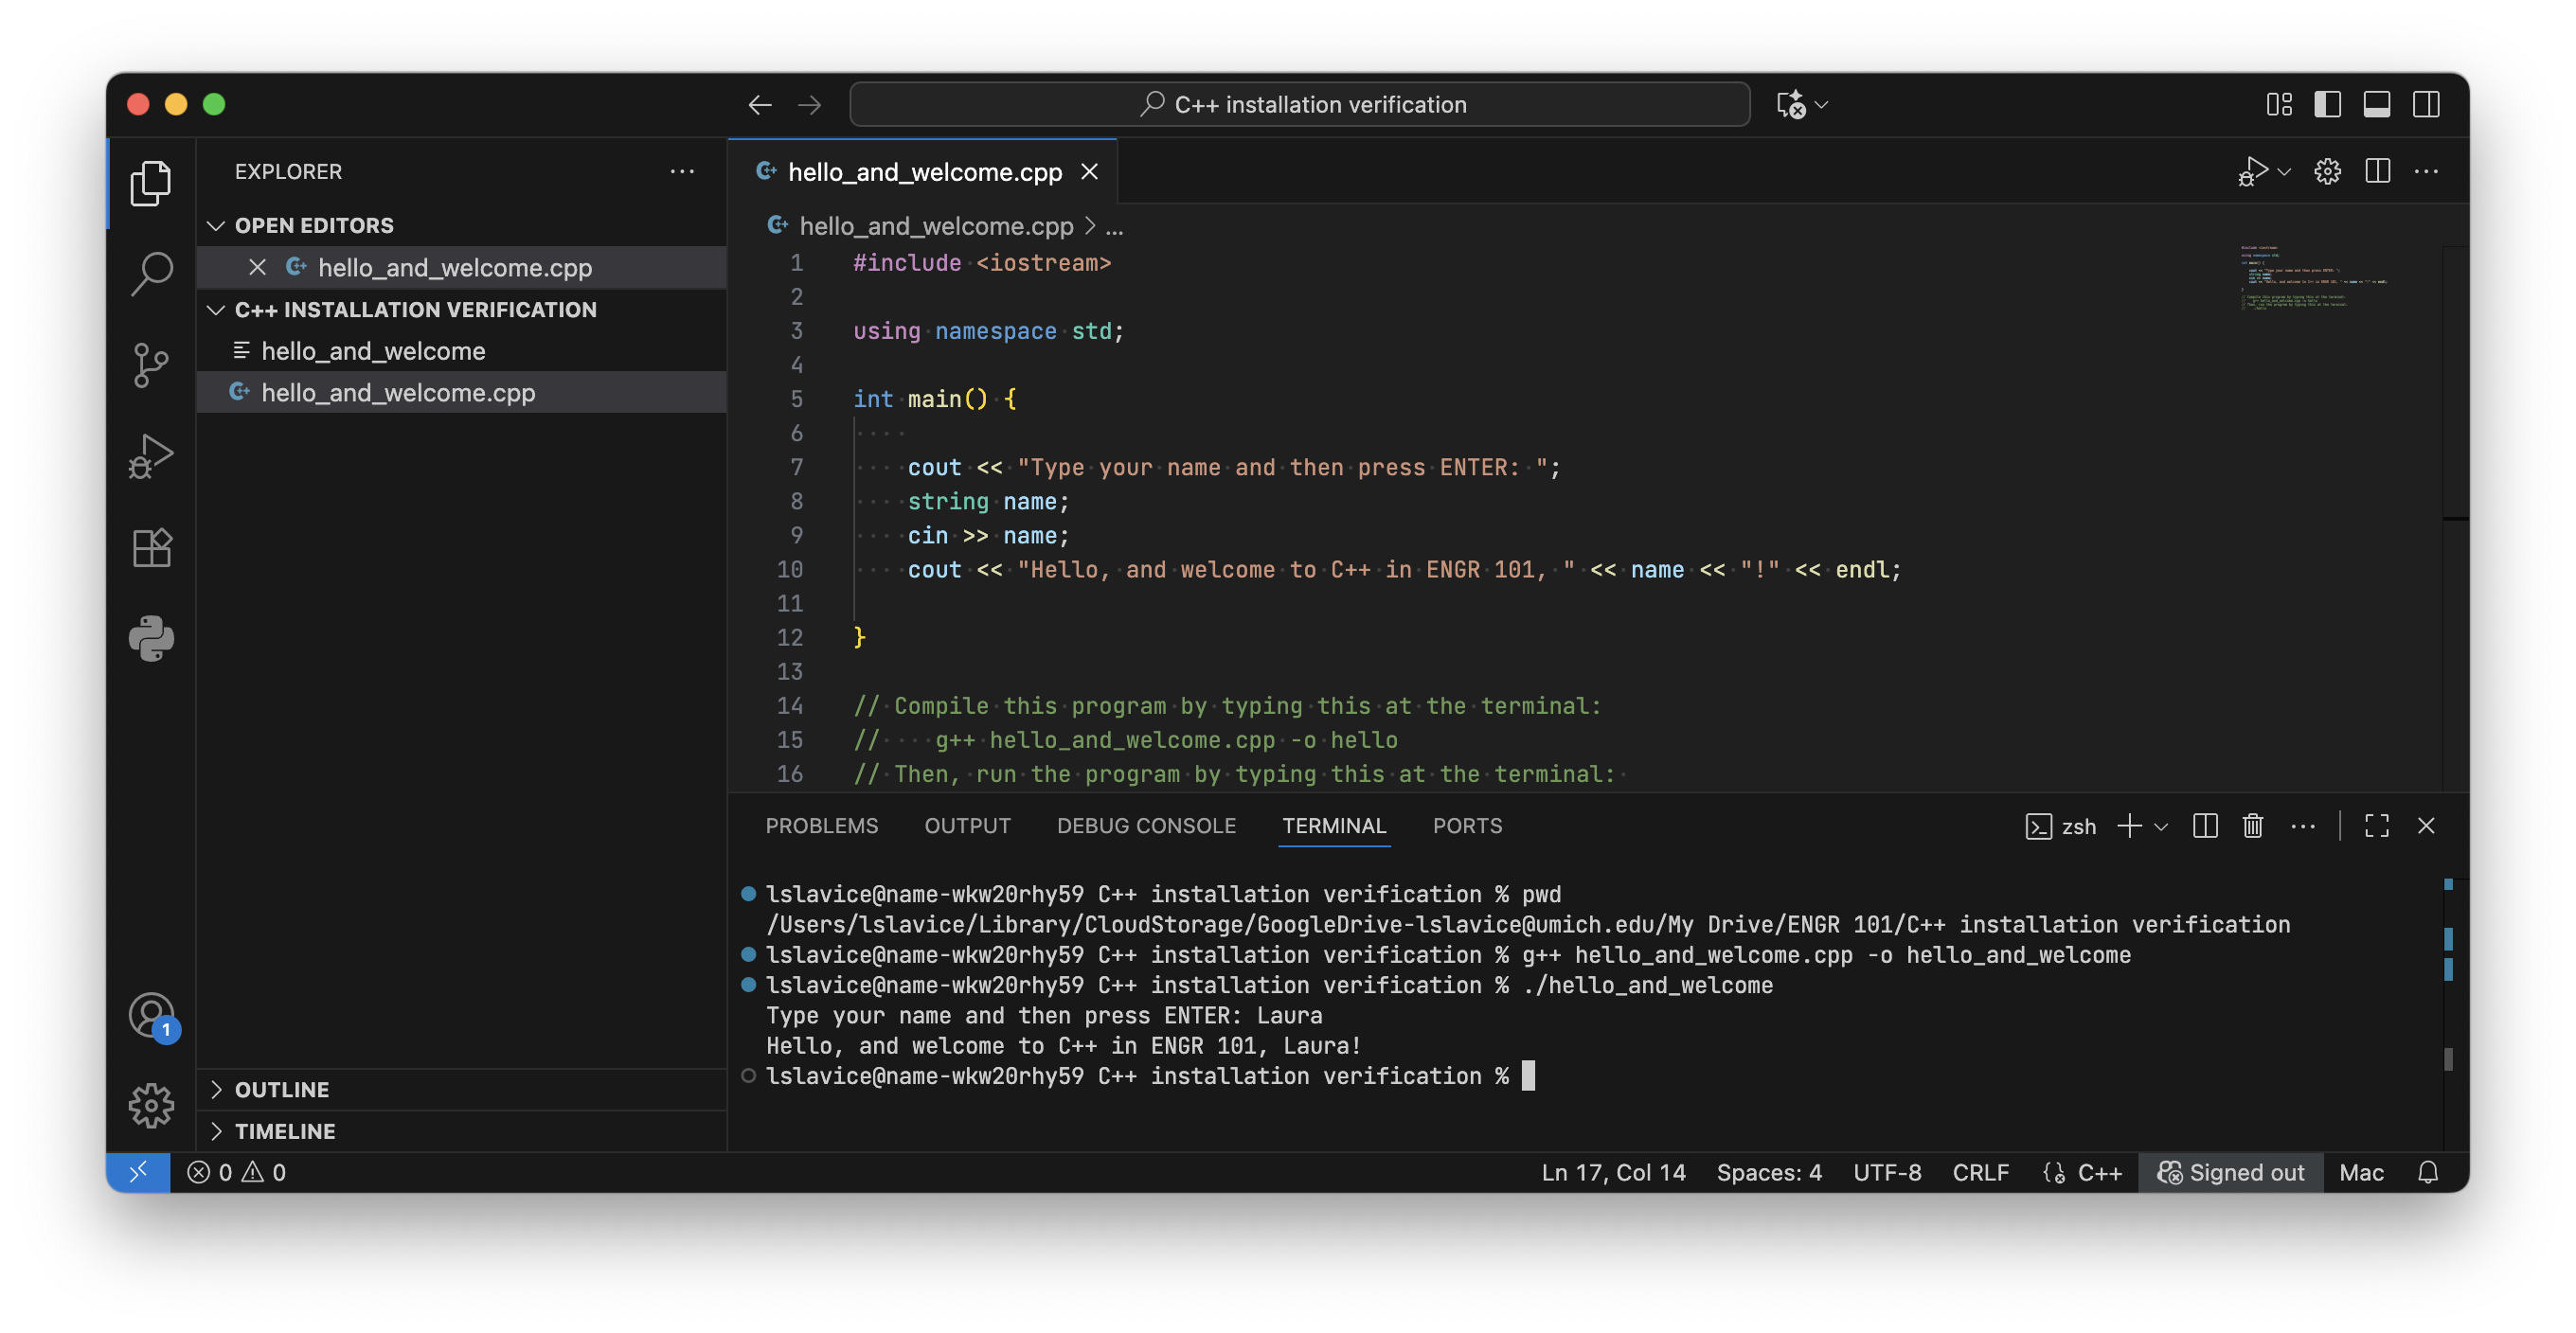
All the ENGR 101 files will automatically be backed up to your U-M Google Drive account.
Windows Users
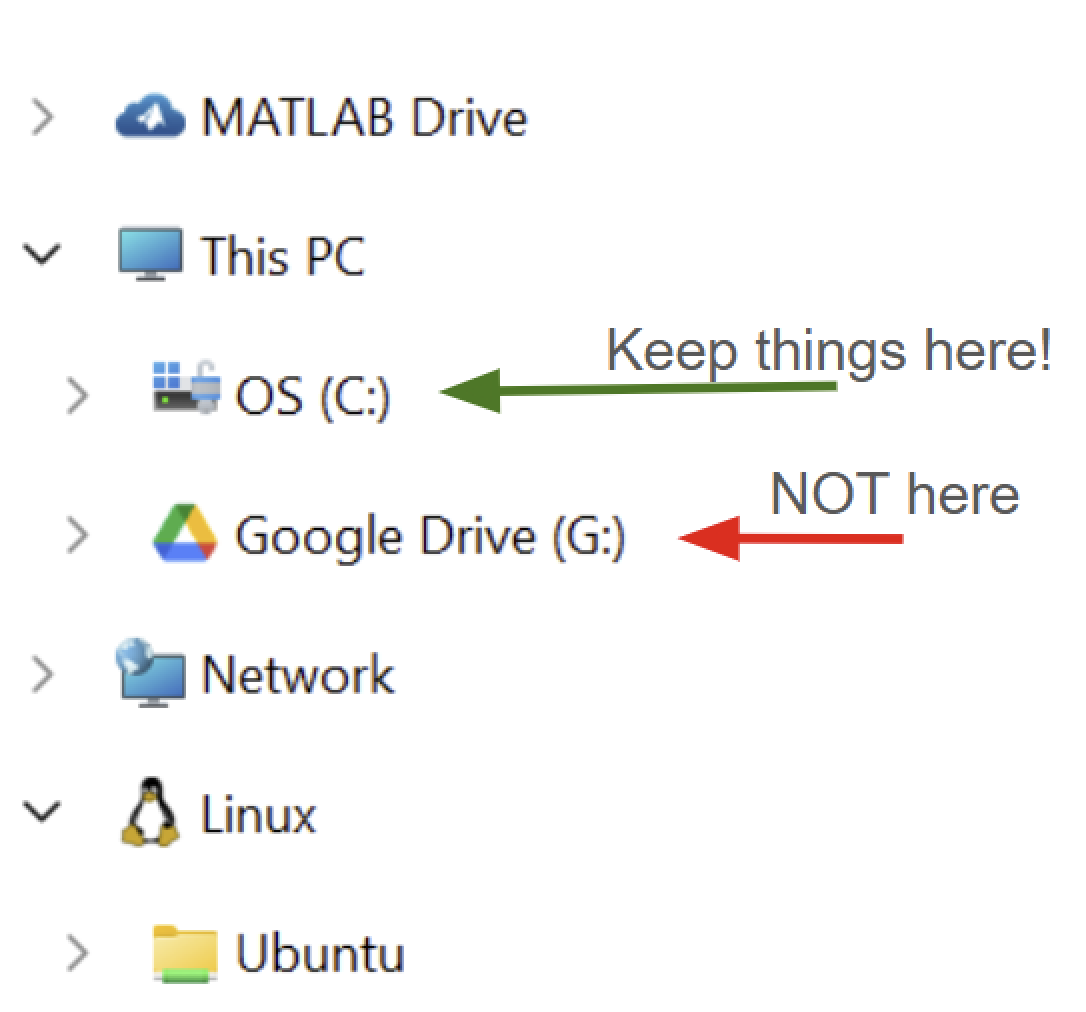
Your U-M account will give you access to a large amount of cloud storage via Google Drive. However, if you install the Google Drive application on your computer, it will create a new network mounted drive, which is a fine place to store your Word and Powerpoint files, but VS Code will not be able to (easily) access this drive.
Instead, we recommend that you create an ENGR 101 folder in your C: drive, not your Google Drive:
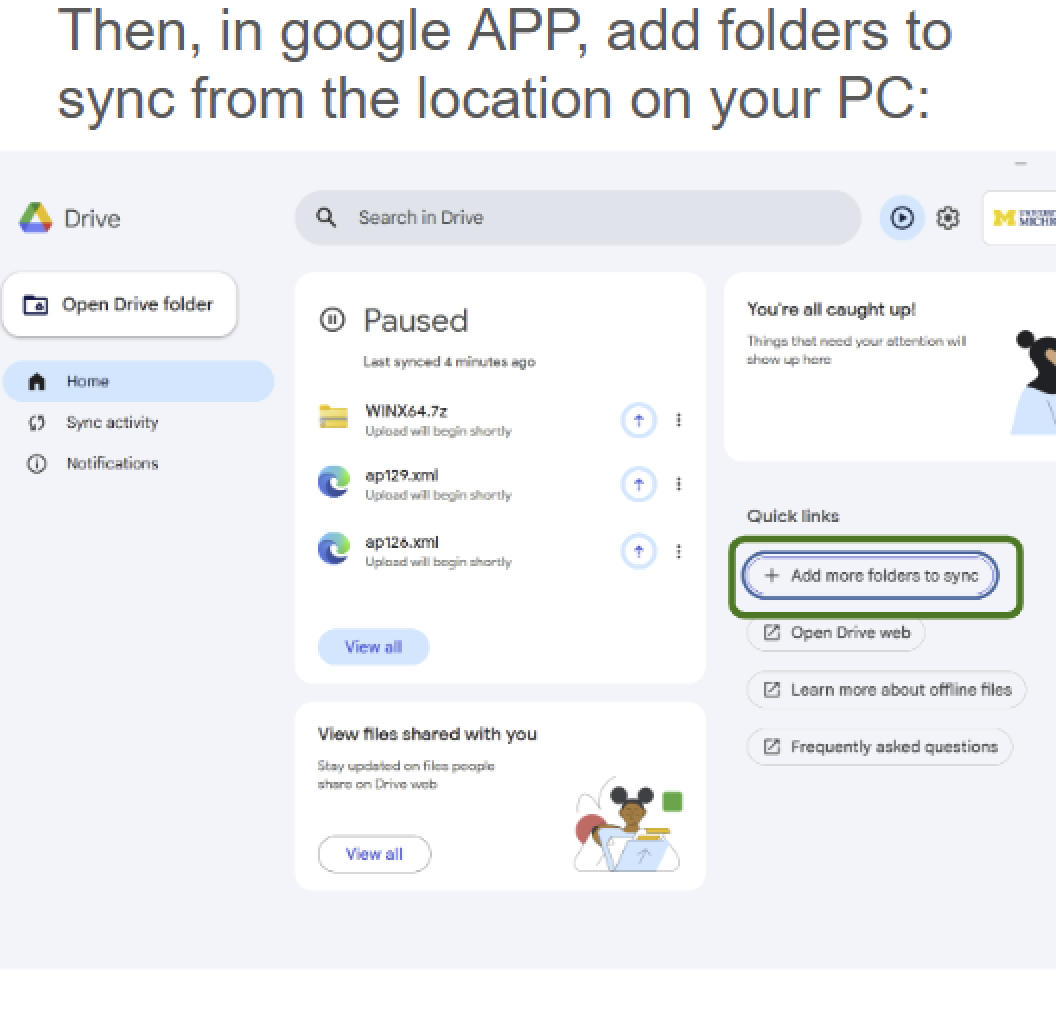
Then, if the folders in your C: drive are not already backed up to the cloud via your OneDrive account, you can open the Google Drive application on your computer and add your ENGR 101 folder from your C: drive to the list of folders that are synced to your Google Drive:
And here, you can see that you can compile and run a C++ program in VS Code from your C: drive (assuming you have VS Code open in WSL):
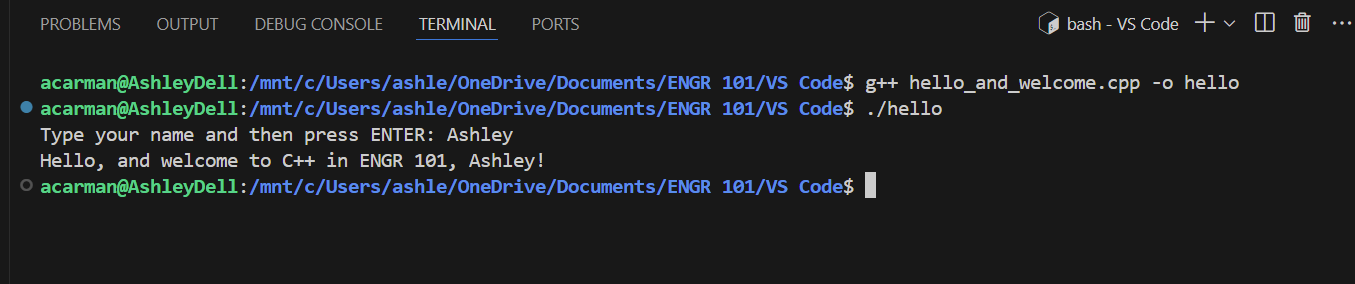
All the ENGR 101 files will automatically be backed up to either your OneDrive account or your U-M Google Drive account because you added the ENGR 101 folder to the list of folders to be synced.
C++ Installation Verification
After you have installed g++ and VS Code, and you have your ENGR 101 ready to go, you should check to make sure that everything was installed correctly:
- Download the
hello_and_welcome.cppfile and move this file into your ENGR 101 folder on your computer. - Open VS Code.
- In VS Code, open your ENGR 101 folder.
WINDOWS USERS
If you are a Windows user, make sure that you have opened the folder in WSL. Check if you see this in the lower left-hand corner:
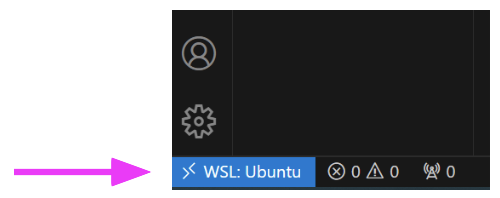
If you do not see the "WSL: Ubuntu" words in the bottom left corner of VS Code, you need to re-open folder in WSL by doing this:
View > Command Palette (or type ctrl + shift + p).
Search for and select "WSL: Reopen Folder in WSL". (Watch the video below for a demonstration of needing to re-open a folder in WSL.)
- Check to make sure that the
hello_and_welcome.cppfile shows up in the Explorer window. - Open a new terminal in VS Code. Go to Terminal > New Terminal.
- In the terminal, type this command to compile the program:
g++ hello_and_welcome.cpp -o hello
- Then type this to run the program:
./hello
- When prompted by the program, enter your name and press Enter.
- The program will print a welcome message to you at the terminal and then end.
- Take a screenshot of the terminal to document that you successfully compiled and ran the program. Save the screenshot as a file named
installVerificationCPP.png. - Remember this file! You will submit it as part of a Homework assignment.
Below is a screen recording that shows how to do these steps:
Note: This screen recording was done on a Mac. If you are on a Windows machine, it will look a little differently, but the steps are the same – don’t forget to be in WSL!
Using VS Code - Basics
You will get a lot of practice working with VS code as you write programs for ENGR 101. This guide demonstrates the general workflow that we’ll be using in class.
Opening a Folder to Work In
We recommend that you create new and separate folders for each project/lab in ENGR 101 on your computer. For example, use your computer to create a folder named test00. To work on a project/lab in VS Code, you’ll first need to select that folder. Do this from the File > Open Folder menu by searching for that folder and then hit the Select Folder button.
Editing Source Files
Along the left side, you’ll find the Explorer, which shows you all files in your current folder. Of course, you may not have any yet. If you hover your mouse over the Explorer, you’ll find a button to create a new file (go ahead and try it, creating a new file named hello.cpp). When you create files in your folder, they will all appear here. Double click the hello.cpp file in the Explorer, and VS Code will open the file in an editor window. Type the following C++ code in the hello.cpp file:
#include <iostream>
using namespace std;

int main() {
   cout << "Hello World" << endl;
}
Save the file either using the File > Save menu or a keyboard shortcut like ctrl+S on Windows/Linux or ⌘+S on macOS. Note that files with unsaved changes show a circle following the file name in the code editor. This will disappear once you save the file.
Opening a Terminal in VS Code
You can open a terminal directly inside VS Code! Use the Terminal menu button in the top row and select “New Terminal”. This is the VS Code terminal and it works exactly the same as any other terminal. (If you’re on Windows, note that “step 2: configure settings” from the setup instructions is required for the terminal to work correctly!)
Once your terminal appears VS Code window, type:
g++ hello.cpp -o hello
This will compile your code, and if free of errors, create the file hello. To run your code, type:
./hello
In your terminal window, you will be rewarded with the output:
Hello World
Congratulations, you have successfully written, compiled, and run a C++ program with VS Code.
You can use the VS Code terminal for more than just compiling code. All the regular commands will work. Try these out:
cp hello.cpp File_01.cpp
cp hello.cpp helloV2.cpp
You should see the extra files show up in the VS Code Explorer. You can have several files open in your editor at one time. Try opening your new files. There are two ways to open files in VS Code:
- Single click to open the file in the current editor. Clicking another file will replace it.
- Double click to open the file in its own editor, which will stay open until you close it.
Using VS Code - Tips and Tricks
As you get more familiar with VS Code, you might want to try out some advanced features that can make it easier to write your programs. Here are some things that we find particularly helpful!
C++ Compilation Support
VS Code will show many compiler errors/warnings inline as you type your code. This is invaluable when working on a large coding project, and it helps you fix compile errors as you work, rather than saving up dozens of them for once you finally get around to running g++.
Auto-Format
Has your formatting/indentation gotten a bit disorganized? Right click and select Format Document or just press Alt-Shift-F to have VS Code automatically format your code. There are options for configuring the formatter to fit your individual style. (Also note that the formatter may have a hard time doing this if you have syntax errors in your code.)
Change All Occurrences
Regretting a poor choice of variable name, but not looking forward to retyping it everywhere? Just right click the variable in your code and select Change All Occurrences. VS Code will highlight all uses of that variable, so that when you type a new name, they will all get updated!
Multiple Cursors
Want to type in multiple places at once to impress all your friends? Hold down the “Alt” key while clicking your cursor somewhere to add an extra cursor rather than moving the current one. Now when you type, you insert characters at every cursor!
Jump to Definition
Can’t remember where you declared a variable? Want to see the code for a function? Just Ctrl-Click on a variable or function name and VS Code will jump to the part of your code where it’s defined.
Enable Auto Save
Nothing changed after you compiled your code? You probably forgot to save your file. To avoid having to save your filter after every change, enable Auto Save! Just click on “File” -> “Auto Save,” and every change that you make in all of your files will be automatically saved. You’ll know if Auto Save is active if there’s a check mark next to it in the File menu.
Live Share (Online, Collaborative Functionality)
Live Share is a VS Code extension that allow multiple people to edit the same code file at the same time (similar to how you can do that in google doc)
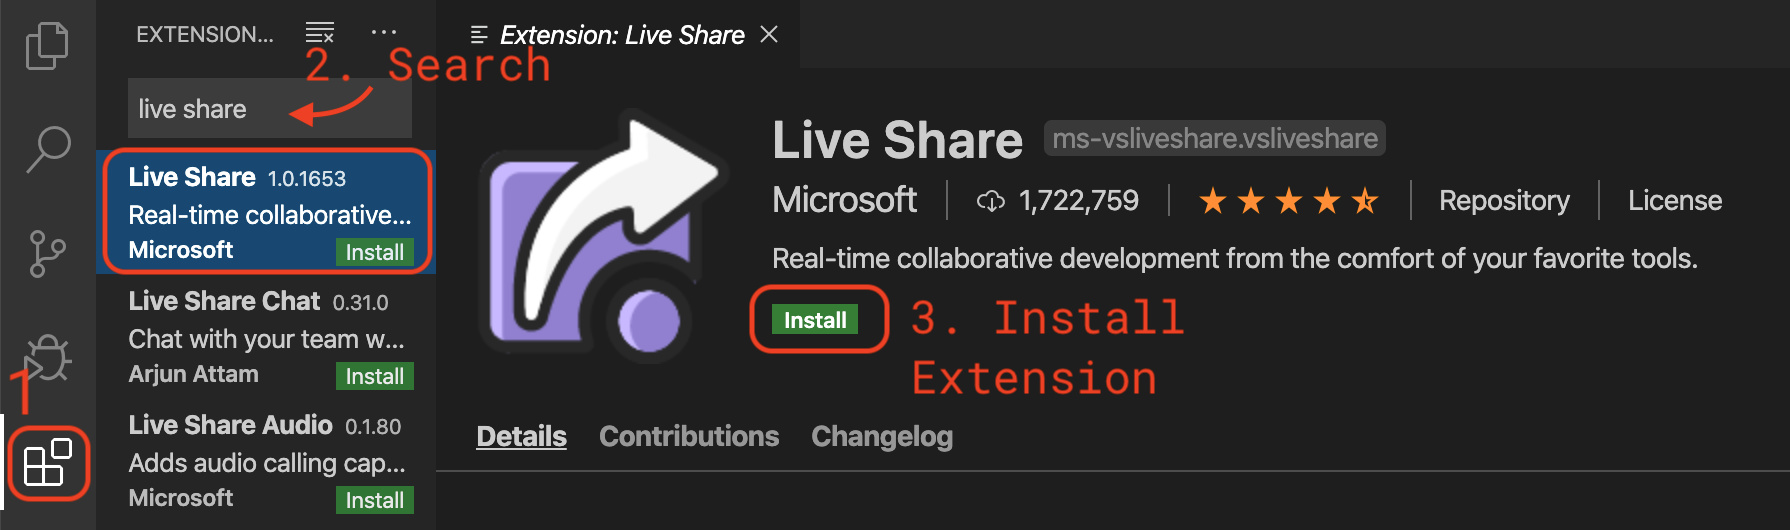
Installation
Similar to how you installed the C/C++ extension, search the Live Share extension and click the green install button.
Using Live Share
Once you have installed the extension, you will see a Live Share button on the left side. Once you click on the button, you will have the option to join or start a collaboration session. Here is more information about Live Share.
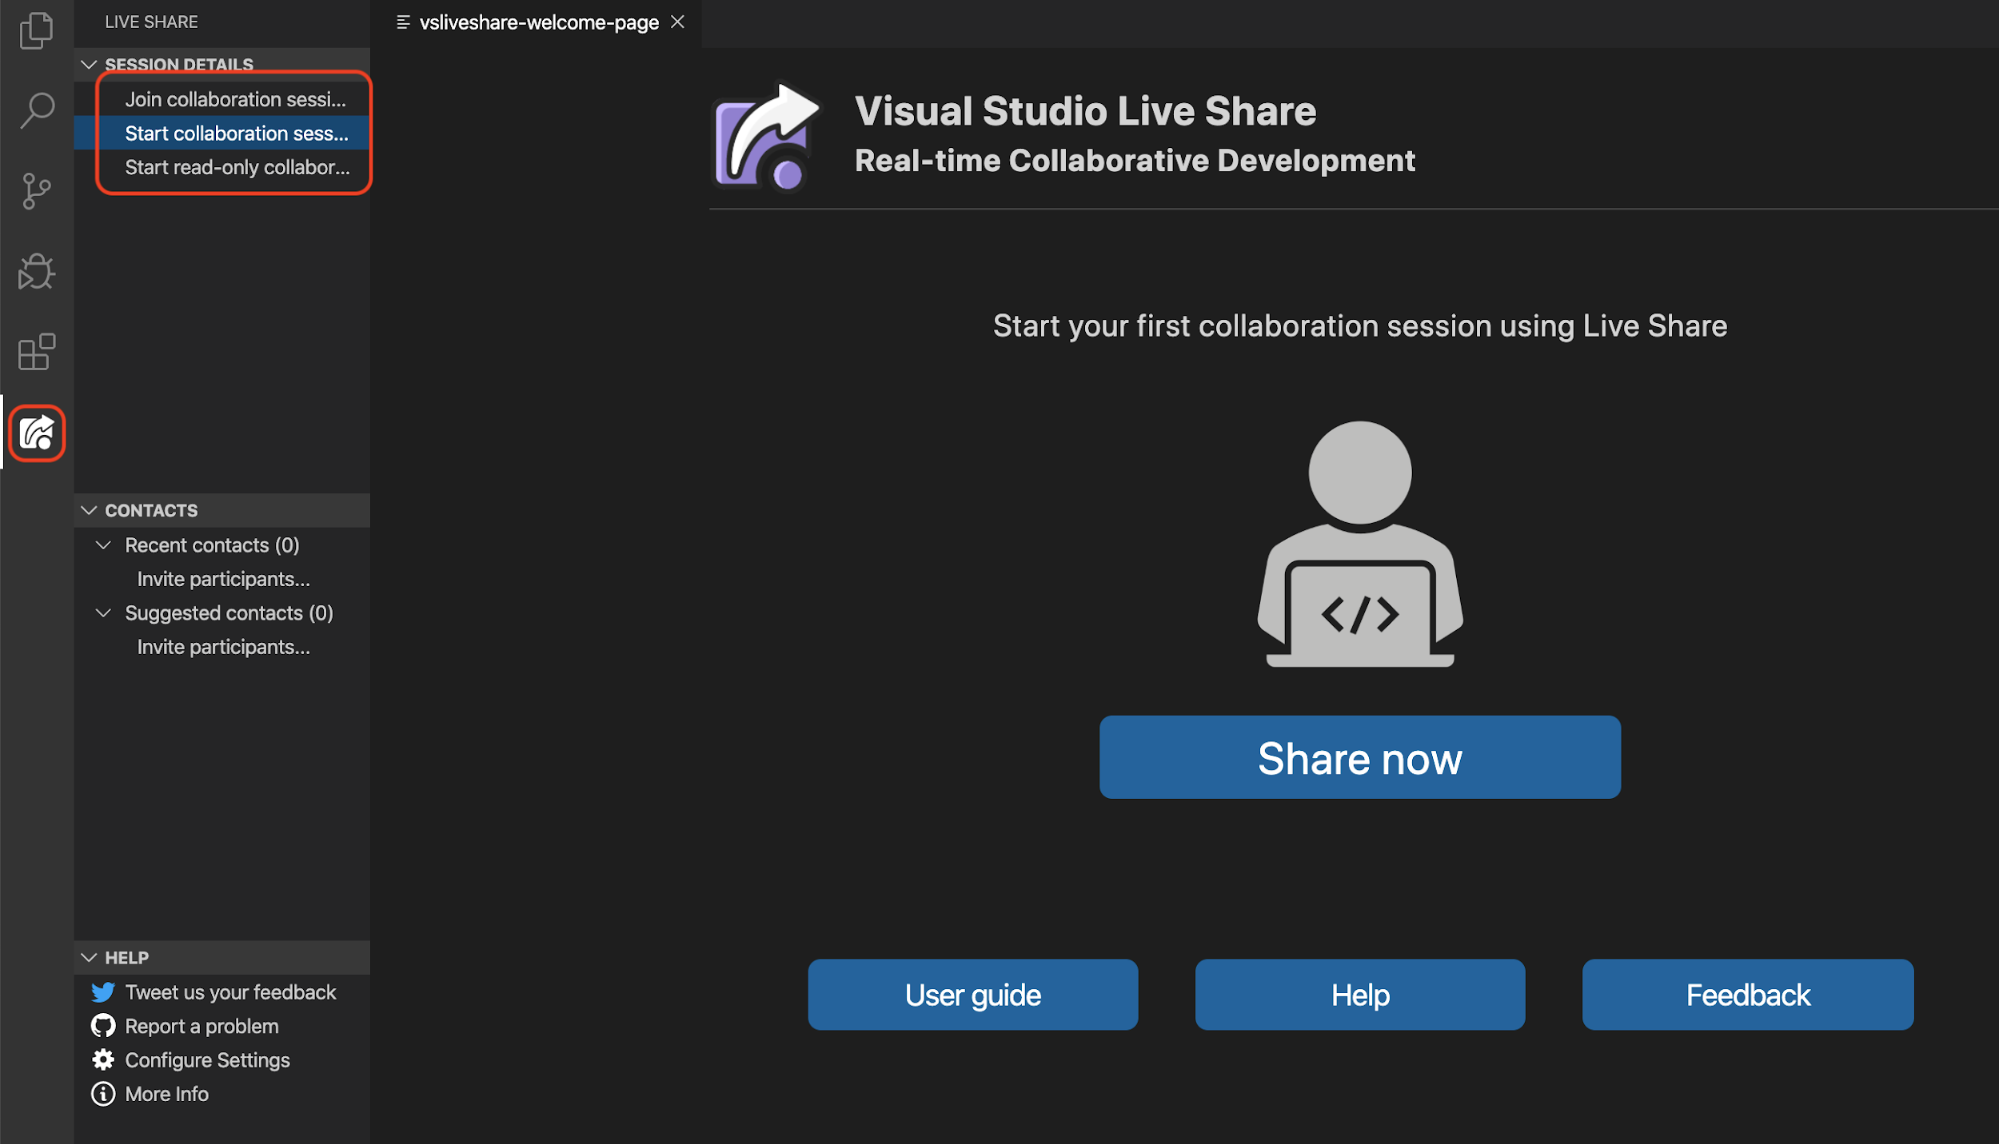
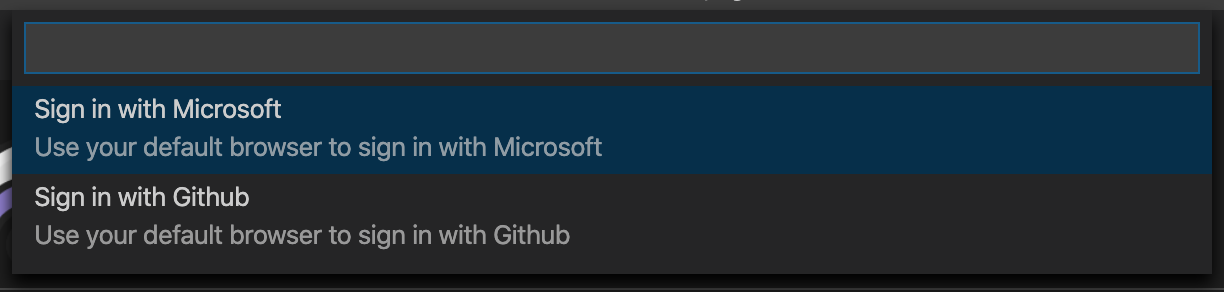
Before you can use the feature, you need to log in using a Microsoft or Github account. VS code will prompt you to log in once you click the share now button. If you plan on taking other computer science courses at Michigan, we recommend that you create a GitHub account.
Once you click one of these buttons, you will be directed to Microsoft or GitHub Login page. Follow the instructions on the web page to sign in, and you will be able to collaborate with your teammates once it is complete.