ENGR 101 | University of Michigan

Guide to the Autograder

What is this guide for?

This guide is intended to document how to use the Autograder. The guide will describe how to register a partnership, how to submit file to the Autograder, how to interpret the feedback from the Autograder, and possible errors and pitfalls.

The Autograder works best with the latest version of the Google Chrome web browser. The Autograder may or may not work with a different browser. If you come across something which says “Something very very bad happened”, it’s probably because you are not using Chrome.

Registering a Partnership

If you choose to work with a partner in ENGR 101, you’ll need to register with them on the Autograder. We may provide you with a deadline by which you need to complete that registration. These deadlines ensure that partners work on their projects together from start to finish, rather than partnering up at the last-minute and likely not getting as good of a learning experience – or as good of a grade!

Partnerships must be registered for every new project in ENGR 101. This gives you flexibility to change up whether you work with yourself, a partner, or a different partner from one project to another. For each project that you choose to work with a partner on, you’ll need to complete these steps.

These steps are written for Project 4 (Late Submission) in Winter 2024. Replace the project number and semester with the one that applies to you!

Step 1

One person in your partnership should navigate to the Autograder and select the course you are enrolled in:

A screen capture of the Autograder web page displaying the courses a student can select from.

Step 2

Select the project that you would like to register with a partner on. (You will most likely have fewer projects on this list than we do!). Note that you will only be registering your partnership for the project you click on, NOT for the whole semester. See the intro paragraphs for more on that.

A screen capture of the Autograder web page displaying the listing of projects that a student in ENGR 101 will complete.

Step 3

You’ll land on the Group Registration page. To invite your partner, click Send group invitation.

A screen capture of the Group Registration page. There are two buttons on the page. The first is green and says 'I am working alone' and the second is purple and says 'Send group invitation'.

Step 4

In the Users to Invite box, type your partner’s umich email address and then click Send Invitation. (We only have groups of 2 in this class so you don’t need to worry about the “Add Member” feature).

A screen capture of the Autograder web page with a pop-up box labeled 'Send invitation'. There is an entry field below this labeled 'Users to invite:'. The box has been filled in with an example umich email address. Underneath the entry field is an option labeled 'Add Member'.

Step 5

You should see this page that confirms that your invitation was sent to your partner.

A screen capture of the Group Registration confirmation page. There is a blue box labeled 'Invitation sent' containing a white box with the example partner's email address and a Status of Pending.

Step 6

Tell your partner that you sent them an invitation to be partners on the project. The Autograder does NOT notify your partner about this invitation, so *YOU need to do that!* The next few steps are intended for your partner to follow.

Step 7

Your partner should navigate to (the Autograder)[https://autograder.io] and select the course they are in:

A screen capture of the Autograder web page displaying the courses a student can select from.

Step 8

Your partner should select the project that you sent them an invitation for. (They will most likely have fewer projects on this list than we do!)

A screen capture of the Autograder web page displaying the listing of projects that a student in ENGR 101 will complete.

Step 9

Your partner should see this Group Registration page. If they do not, double check the umich email address that you sent the invitation to. If you’re sure that it’s right, then stop here, post your issue on Piazza, and/or come to office hours. We’ll get you sorted out there. But hopefully your partner sees this page. They should click Accept.

A screen capture of the Autograder web page displaying the courses a student can select from.

Step 10

The Autograder will ask your partner to confirm the acceptance. They should click Accept.

A screen capture of the Autograder web page displaying the courses a student can select from.

Step 11

If both partners see this screen below, then you’ve successfully registered your partnership for this project on the autograder! If not, try refreshing your screens. If you STILL don’t see this screen, then post your issue on Piazza and/or come to office hours. We’ll get you sorted out there.

A screen capture of the Autograder web page displaying the courses a student can select from.

Submitting Your Files

The required file and file format for each project is clearly specified in each project specification. The file(s) need to be named exactly the same as the Project specification. If any of your files are not named correctly or you haven’t uploaded all the files that are expected, the Autograder will warn you with a dialog box:

Dialog box showing which files are missing.

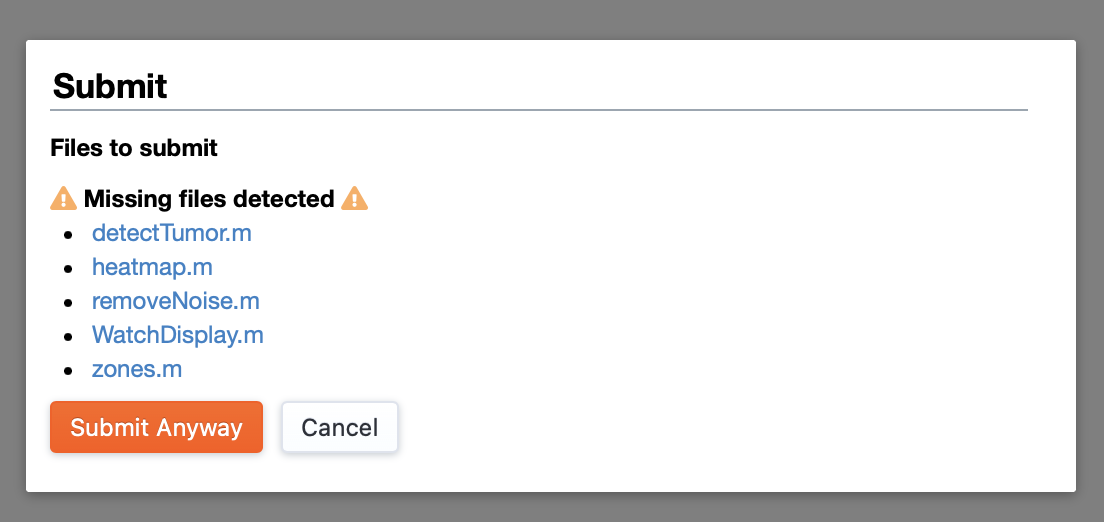
If you choose to submit despite the warning, the Autograder will delete any files that are not named correctly to protect the Autograder from malicious files, but it will still count as a submission.

You can always make a submission to the Autograder with only some of your files uploaded. Some of our projects have multiple files that are required for the complete project to work correctly, but you can submit files as you go to verify that your helper functions work correctly before moving on to your driver program.

Interpreting Feedback from the Autograder

The Autograder will run your code against a variety of test cases and give you feedback on whether your code has the intended behavior and/or produces the correct output. The Autograder looks primarily for:

  1. Exit status. This just means that the program ran without any errors.
  2. Output. This can include return values from functions, information printed to a file, or images created. The Autograder compares your output to the expected output and checks to see if they match.

Here is an example of what you will see if your code passes all the test cases:

A screen capture of the Autograder web page with each test case box shaded a light blue; this color indicates the code passed the test case.

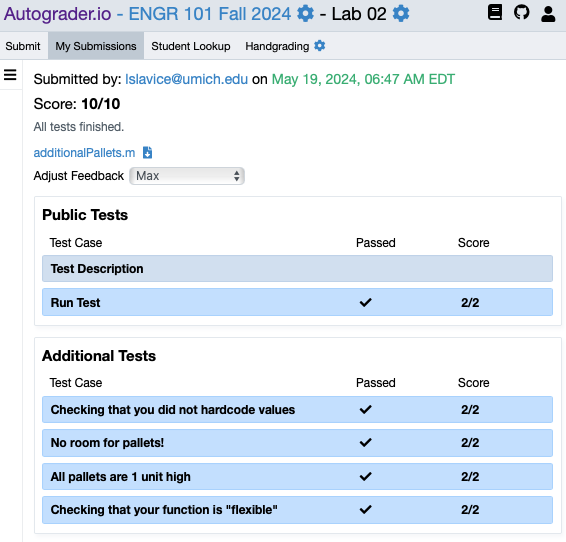
The light blue color means that your code behaved correctly for all the parts of the test case. If you click on the title of a test case, you’ll see detailed feedback:

A checkmark shows that the test case passed. Nothing else is really shown for this test case.

The feedback for a test case that passed is perhaps not all that interesting to you; it just verifies that the program works correctly for this case.

Here is an example of what you will see if your code does not pass all the parts of a test case:

Some parts of the test case passed (shown in light blue), some parts did not (shown in red)

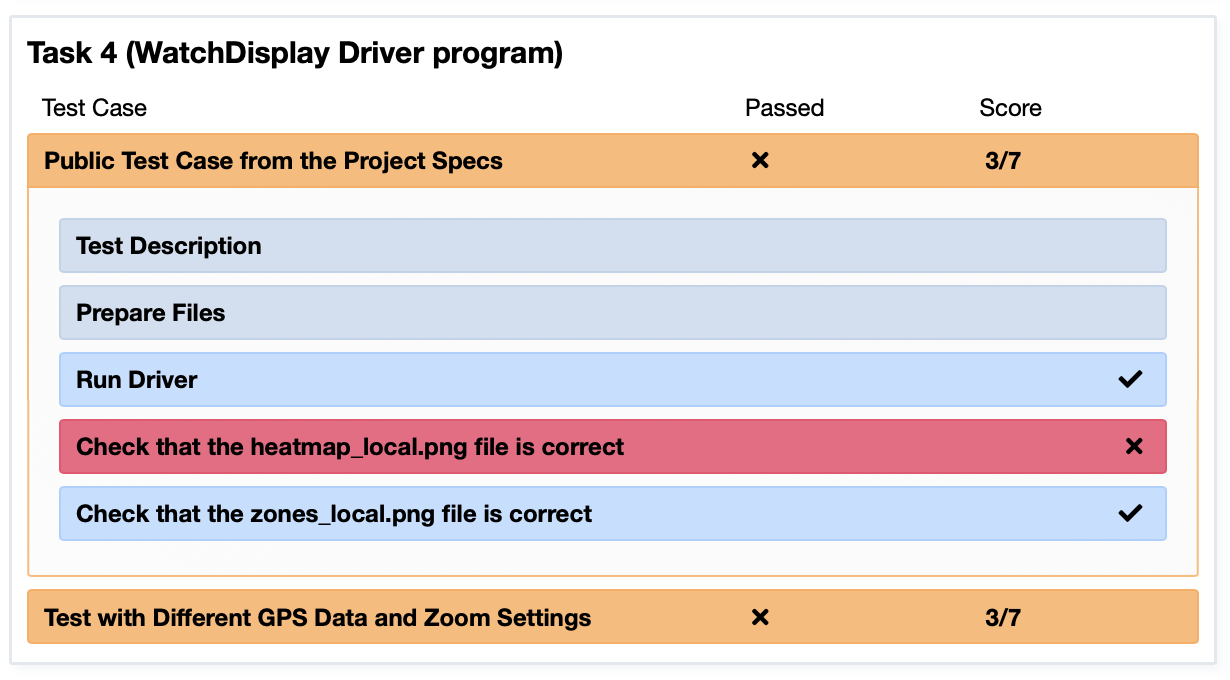
The red color indicates a part of the test case in which your code did not behave as expected. If you click on the title of the part that failed, you will see the feedback for that part of the test case:

A checkmark shows that the test case passed. Nothing else is really shown for this test case.

We’ve tried to make this feedback useful, but you should also refer to the Project FAQs for additional guidance on what to look for when your code doesn’t pass a test case.

If you come across something strange that says program fails at Line number XX, and your program doesn’t even contain a Line number XX, it’s because the autograder is not talking about the line number on your program but on the test program on our end. Ignore the Line number and try to read the rest of the message and use that to debug your code.

Watch for Whitespace Differences!

The Autograder does a literal comparison of what your code creates and what the expected output is, whether that is text or an image. One particular nuance with text is when and where are newlines placed (a newline is when a line of text ends and you go to a new line).

Here is example of feedback for a test case that failed:

A checkmark shows that the test case passed. Nothing else is really shown for this test case.

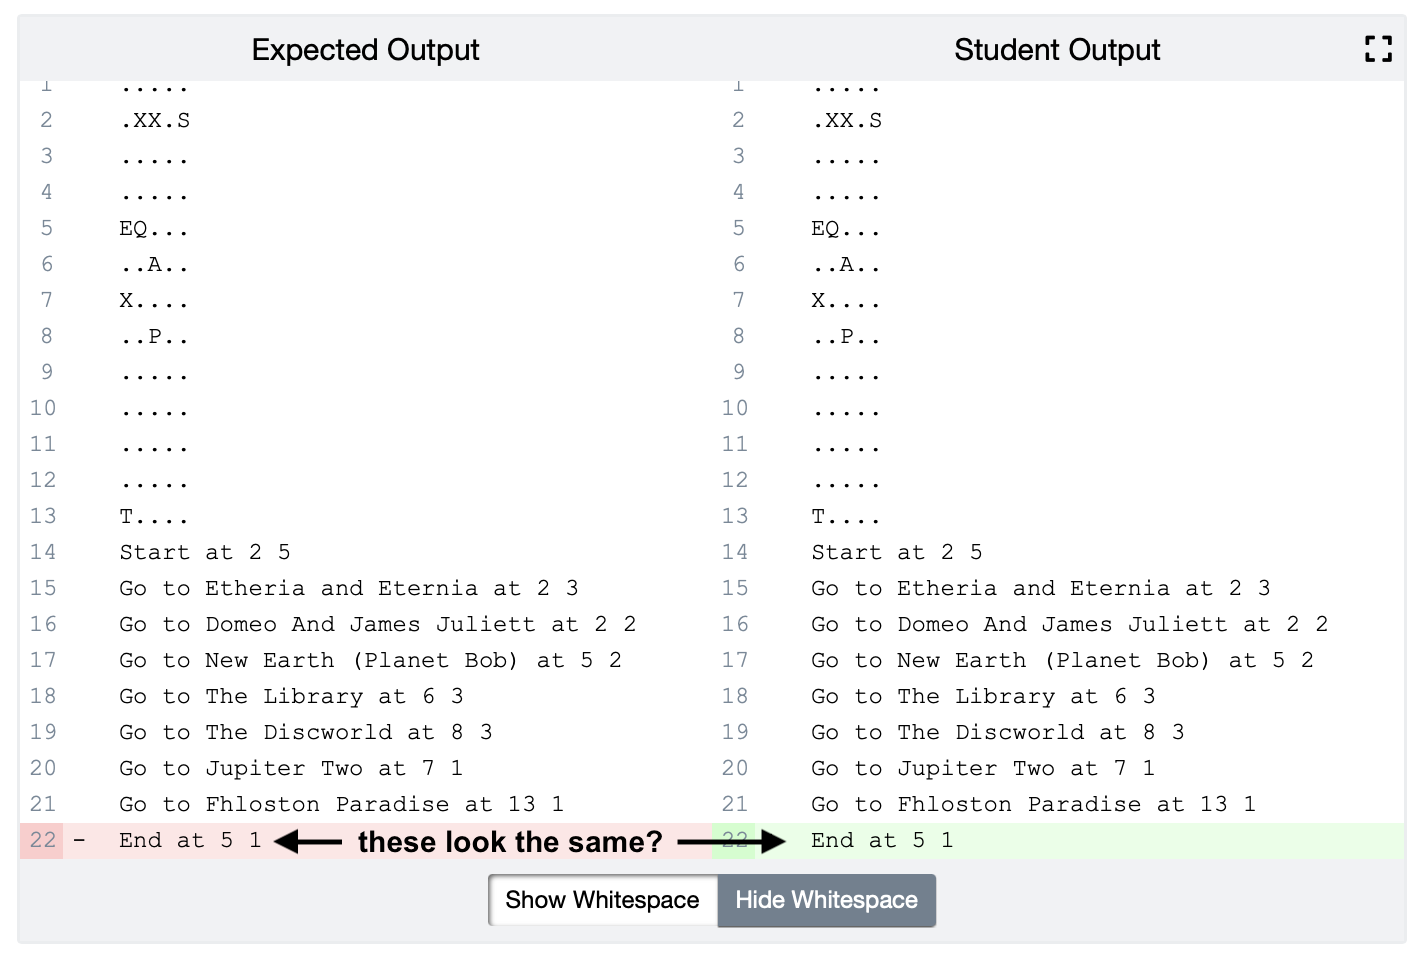
The Autograder says that the expected output doesn’t match the student output (meaning, your output), but the two sets of text look exactly the same… don’t they? Almost! Click the “Show Whitespace” option:

A checkmark shows that the test case passed. Nothing else is really shown for this test case.

And then the output comparison will update to show spaces, tabs, and newlines:

A checkmark shows that the test case passed. Nothing else is really shown for this test case.

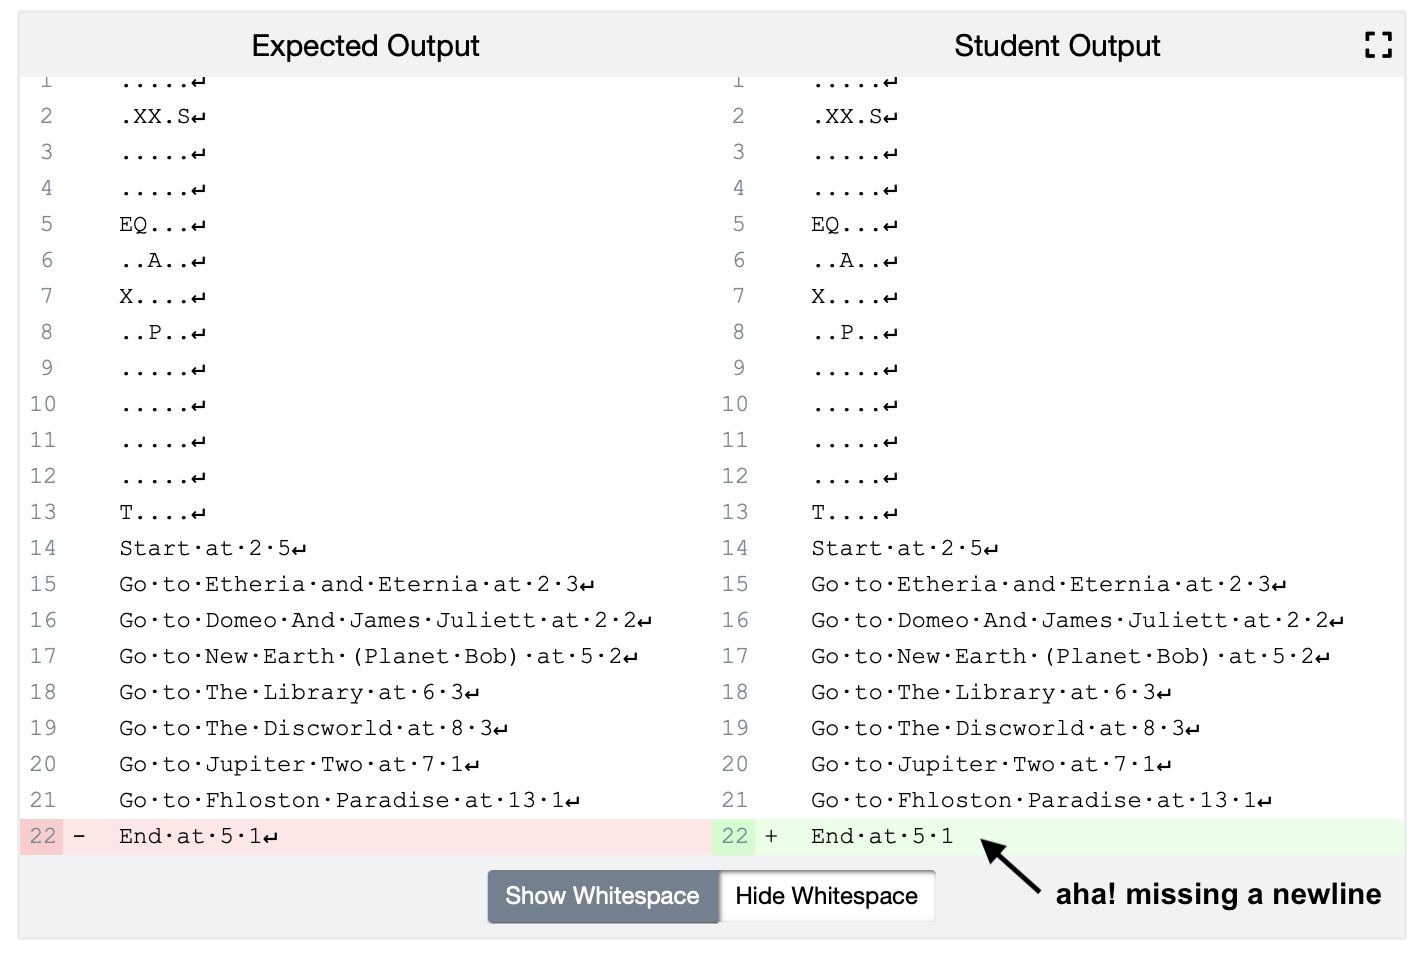
AHA! Now we can see the difference: The student version is missing a newline character at the very end of what their program created. They can now go back and revise their program to print out this missing whitespace.

Sometimes the Autograder Runs Slow

The autograder is sometimes (rarely) very strangely slow. If this problem arises try again after 15 minutes. Sometimes if a lot of students are trying to submit at the same time the queue may be very long. This will happen very rarely because ENGR 101 has a relatively simple grading scheme and it shouldn’t take too long for the autograder to provide feedback for the students. Please do not freak out if it is slow.

Who to contact when Autograder is going wrong?

It’s unlikely that the Autograder will have issues, but it does happen on rare occassions. If you feel like you are following all the steps to correctly submit your code and it’s just not working correctly, please post on Piazza so we can figure out what is going on!

Updates

This document will be updated often, so please check here if you have a strange error.