ENGR 100-600 | University of Michigan
ROV Showcase Run-Through
Objectives
The showcase run-thru at the MHL has two components; each component is approximately 1 hour (the remainder of the time is used for safety training and transitions). The objectives for each component are listed here:
- ROV testing in the towing tank (otherwise known as the Physical Modeling Basin)
- Determine the final flotation/ballast configuration of your ROV
- Confirm your control systems work
- Practice driving your ROV
- Get three official speed measurements for each direction you are reporting on
- Practice finding sectors on the practice targets
- Prototype Review Presentation working meeting
- Do final numbers check with Laura
- Get feedback on overall flow and tone of presentation
- Work on any outstanding tasks for the presentation
Safety Procedures and Rules
We are extremely fortunate to have a world-class testing facility to use for testing our ROVs. You will receive a safety talk prior to testing your ROVs, but know and follow these rules when at the MHL:
- Absolutely no running
- Absolutely no yelling or screaming
- Always move deliberately and with purpose, watching your hands and feet, especially when entering and exiting the towing tank area where we will be testing
- Use only our equipment – do not touch any of the equipment in the hallways
- Stay only within our designated areas – you are not cleared to go wandering through the MHL; if there is something you would like to see closer, ask Laura to show you
- Treat all MHL staff members with courtesy and respect – we want to be able to use the MHL next semester
The Aaron Friedman Marine Hydrodynamics Laboratory (MHL) is a working lab. Failure to conduct yourself in a safe manner WILL result in a ban from the MHL and possible failure of the course.
Live-Streaming Cameras
The MHL will have several live-streaming cameras set up to showcase our testing to the world. This is very exciting and is an opportunity to reach many future engineers across the world (feel free to share the link!). If, for any reason at all, you would prefer to NOT be on the live stream, please tell Laura and she will tell the MHL staff to temporarily turn off the applicable cameras. This is NOT a big deal, and you do NOT have to give any explanation for this request.
Where to Go
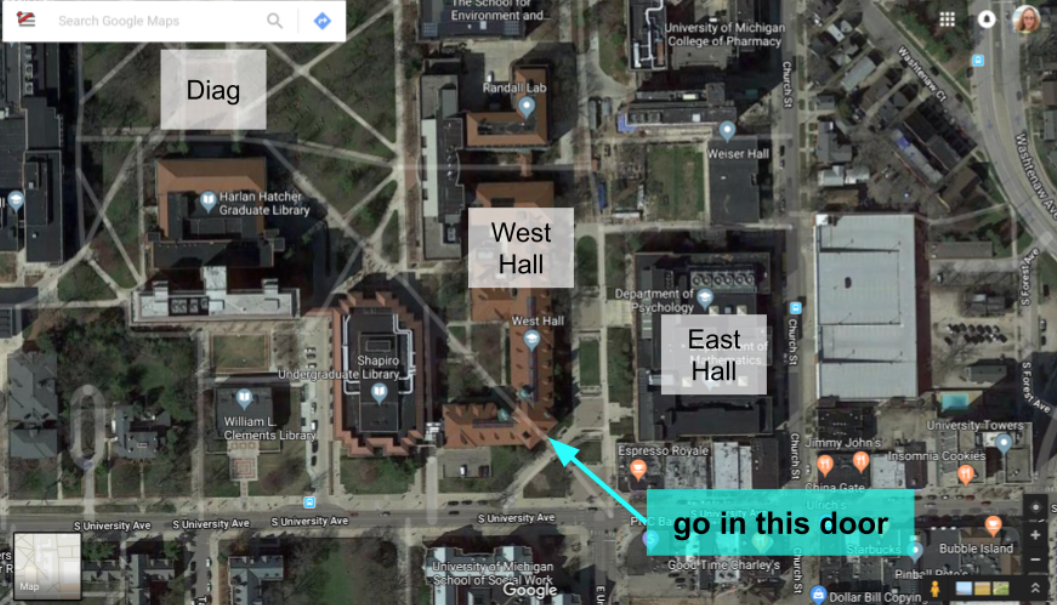
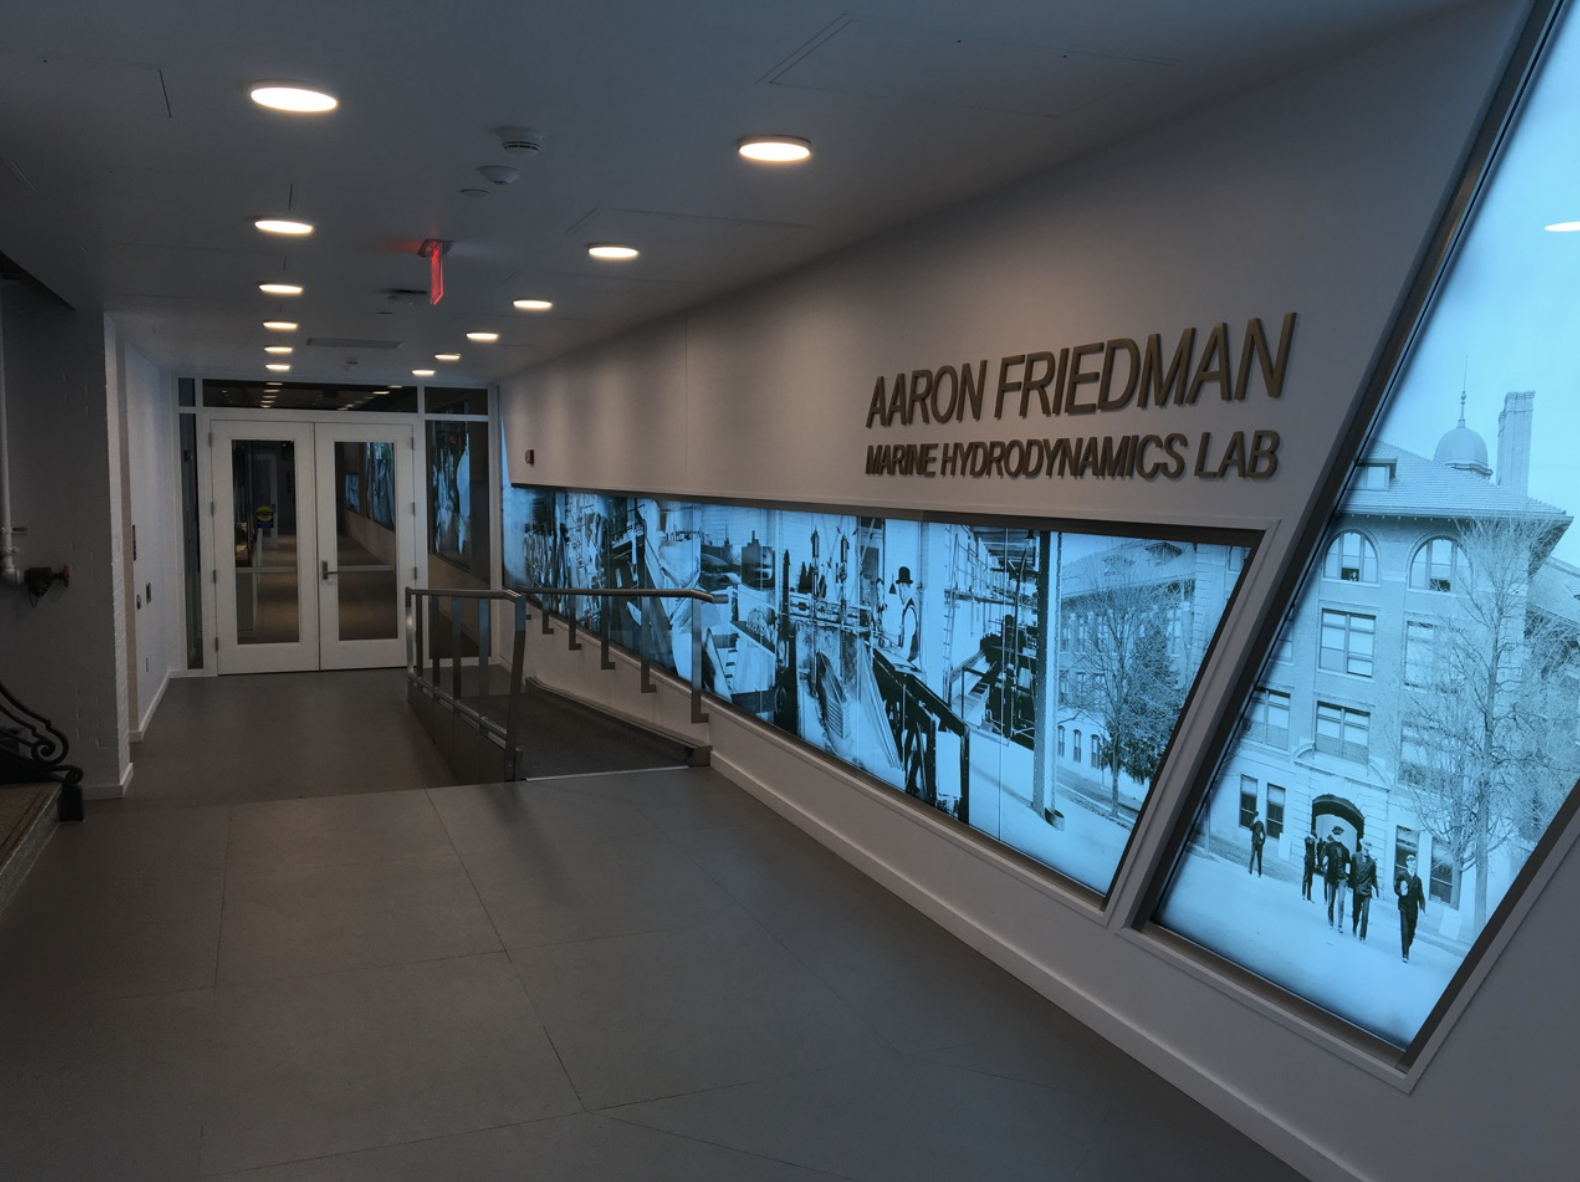
The Marine Hydrodynamics Laboratory (MHL) is located on the first floor of West Hall on Central Campus. Go to the Engineering Arch off the Southeast side of the Diag (Fig), and go in the doors where you can see “Aaron Friedman Marine Hydrodynamics Lab” (Fig).


Once you go in the door and go through the double doors, go down the hallway until you get to another set of double doors; these doors have a card reader. One of us (Laura/IA/Justin) will meet you here and take you back to the lab part of the MHL and show you where to go.
Procedure for Getting in the Water
- Gather with Justin and your IA for a safety talk before entering the towing tank area
- We will split you into two groups: one will be testing and one will continue the working meeting for the presentation that is due on Friday. When your team is told to get ready to test…
- Work with your IA/Justin to have a payload prepared for your ROV
- Assemble your ROV in the designated area of the MHL & check that all seals, ballast, and zip ties are secure – but remember not to pull the payload wires too tight!
- Have your IA or Justin double check your payload and attach the tether.
- DO NOT MESS WITH THE PAYLOAD ITSELF. AT ALL.
- Go to the area of the tank (either on the carriage at mid-tank or on the subcarriage by the beach) that you are assigned as your testing area
- Check your ballast & control surfaces then gently lower your ROV in the water using a boat hook. DO NOT TOSS YOUR ROV IN THE WATER
IMPORTANT
DO NOT DROP ANYTHING IN THE TOWING TANK!!!
OR THROW YOUR ROV INTO THE WATER!!!
OR THROW YOUR TEAMMATES INTO THE WATER!!!
Remember: If you ever see a conductivity reading (a number other than zero), GET YOUR ROV OUT OF THE WATER IMMEDIATELY! There is a leak in the payload!
Preliminary Testing
After your ROV is in the water, drive it around some to see how it behaves in deep water. Some things to observe and document:
- Does your control system work correctly?
- Is the ballast/flotation correct? If not, make adjustments
- Who is comfortable driving the ROV? Make sure everyone gets a chance to drive it!
- How maneuverable is your ROV? (Does it turn the way you design it to? Does it move forward/backward/up/down/etc. the way you intended?)
- Where are the targets? What do they look like? How are the sectors arranged?
Follow these rules and guidelines when testing in the towing tank:
- Do not drive more than 10 feet past the ROV targets, otherwise you will interfere with the teams testing on the other end of the tank.
- The video transmitter is STRICTLY LINE-OF-SIGHT. If you stand between the antenna and the ROV, you will lose video.
- As you drive your ROV around, your battery will (slowly) deplete. We recommend that you do your official speed trials as soon as you are reasonably comfortable with driving your ROV
- IF YOU ARE LOSING BUOYANCY – pull your ROV out of the water immediately! The payload is probably leaking.
IF YOU ARE LOSING BUOYANCY or if you SEE A CONDUCTIVITY READING (a number other than zero), GET YOUR ROV OUT OF THE WATER IMMEDIATELY! There is a leak in the payload!
Procedures for Speed Measurements
When you are comfortable with your ROV’s ballast and control systems, tell your peer mentor you are ready to start your speed measurements (if your peer mentor isn’t there, tell your IA).
Longitudinal (Forward/Backward) Speed
Follow these procedures if you are measuring forward or backward speed:
- Have your peer mentor walk out to the designated finish line (30 feet from the starting line)
- Position the front (or back, if you are going backwards) of your ROV at the starting line, which is the front edge of the platform you are using for testing.
- When your peer mentor says, “Go”, travel forward.
- Your time ends when your ROV crosses the finish line at the peer mentor’s location.
- Your peer mentor will record your official times for you, and then report them to the instructional staff.
- You may do as many trials as you want, but you must have AT LEAST 3 qualified trials.
- Your top speed will be calculated by your single fastest time trial.
Vertical Speed
Follow these procedures if you are measuring speed going up:
- Put your ROV all the way at the bottom of the trench (you’ll see the trench along the bottom of the towing tank); position the ROV so that it is “facing forward”, i.e. in its normal driving attitude.
- When your peer mentor says, “Go”, travel upwards in whatever fashion your ROV ascends.
- Your time ends when your ROV breaks the surface of the water AND is “facing forward”, i.e. its normal driving attitude.
- Your peer mentor will record your official times for you, and then report them to the instructional staff.
- You may do as many trials as you want, but you must have AT LEAST 3 qualified trials.
- Your top speed will be calculated by your single fastest time trial; we will provide you with a depth measurement.
Follow these procedures if you are measuring speed going down:
- Put the top of the ROV at the water’s surface; position the ROV so that it is “facing forward”, i.e. in its normal driving attitude.
- When your peer mentor says, “Go”, travel downwards in whatever fashion your ROV descends.
- Your time ends when your ROV hits the bottom of the trench AND is “facing forward”, i.e. its normal driving attitude.
- Your peer mentor will record your official times for you, and then report them to the instructional staff.
- You may do as many trials as you want, but you must have AT LEAST 3 qualified trials.
- Your top speed will be calculated by your single fastest time trial; we will provide you with a depth measurement.
Lateral Speed
Follow these procedures if you are measuring lateral (left/right) speed:
- Position your ROV with one side of the ROV touching one of the walls of the towing tank; position the ROV so that it is “facing forward”, i.e. its normal driving attitude.
- Have your peer mentor walk out to a location that is directly across from your ROV
- When your peer mentor says, “Go”, travel across the tank in whatever fashion your ROV can get across the tank.
- Your time ends when the side of your ROV touches the wall at the peer mentor’s location AND is “facing forward”, i.e. its normal driving attitude.
- Your peer mentor will record your official times for you, and then report them to the instructional staff.
- You may do as many trials as you want, but you must have AT LEAST 3 qualified trials.
- Your top speed will be calculated by your single fastest time trial; the tank is 6.7 meters (22 feet) across.
Additional ROV Testing
When you are finished with your time trials, if there is still time remaining in lab, you may continue testing your ROV. We recommend doing dry (or should we say “wet”??) runs for the showcase. Pick sets of random sectors and practice inspecting them for damage.
When You Are Finished Testing
When you are finished with your ROV (or when it is time to clean up), pack everything up, clean up your testing station, get your IA to check your testing station.
THROW AWAY ALL OF THE GARBAGE!! ESPECIALLY THE ZIPTIES!!!
Check out with your IA and once they are happy with your clean up, you are free to leave.