ENGR 100-600 | University of Michigan
ROV Performance Evaluation
Objectives and Schedule
The performance evaluation at the Marine Hydrodynamics Laboratory (MHL) has several components:
- Ballast your ROV
- Practice driving it around
- Measure your ROV’s speed and practice the riser inspection task
- Perform the riser inspection task
- Work on your final presentation slides and final report
- See the MHL!
We have combined discussion and lab to give us time to get through all this, but the schedule is going to be pretty tight! There are 170 minutes available for us to use for each discussion/lab section. Here’s the schedule that we’re going to try very hard to keep to:
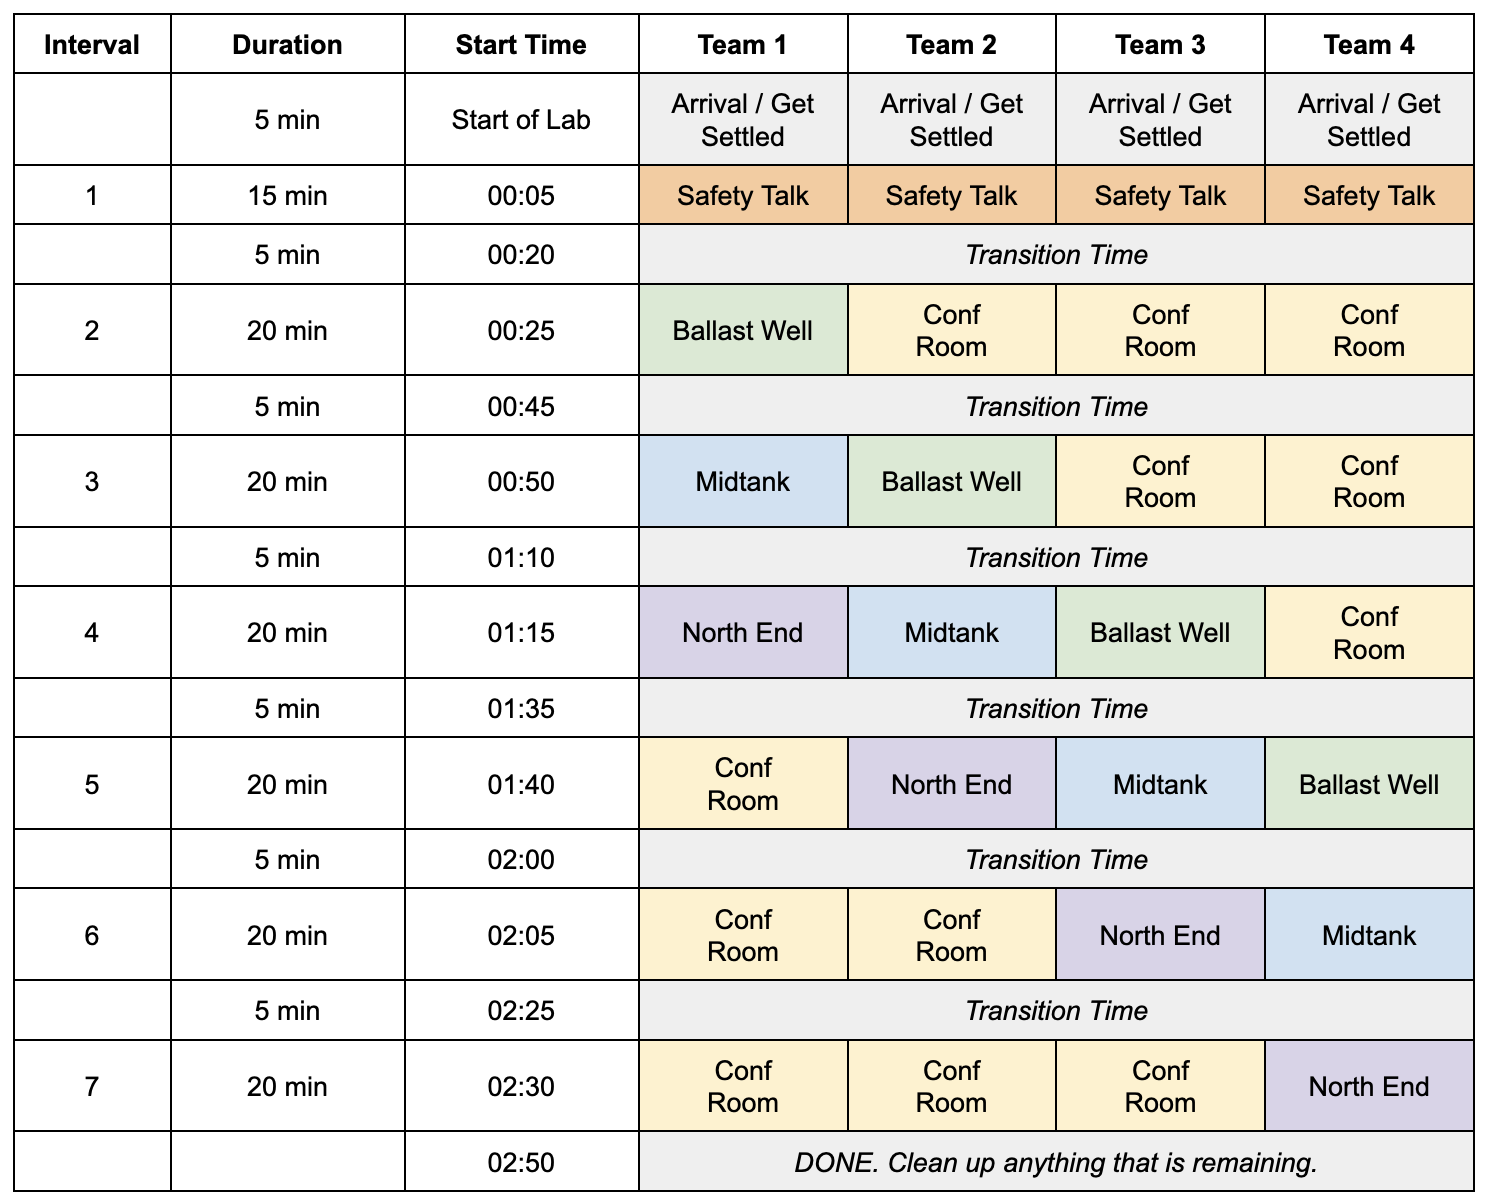
Each team will have approximately one hour of “tank time” in the towing tank (otherwise known as the Physical Modeling Basin) where the ROV is in the water and approximately one hour of team time to work on project deliverables. The remainder of the time is used for safety training and transitions. Read on for more information about what your team will do at each of the “stations”: Ballast Well, Midtank, North End, and Conference Room.
PLEASE BE ON TIME
This is a very tight schedule, and we need to start on time. The safety talk cannot begin until everyone in the lab is there. If anyone is late, that will cause the safety talk to be delayed, which then pushes back the entire schedule.
If your team is the cause of the delay because people were late, your team will be the last team to begin working in the towing tank. This may mean that you will run out of time for your riser inspection task.
So again, PLEASE BE ON TIME.
General Safety Procedures and Rules
We are extremely fortunate to have a world-class testing facility to use for testing our ROVs. You will receive a safety talk prior to testing your ROVs, but know and follow these rules when at the MHL:
- This is a working laboratory, please act accordingly
- Absolutely no running
- Absolutely no yelling or screaming
- Listen to all instructions from your IAs, Instructors, and the MHL Staff
- Wear appropriate lab attire, including close-toed shoes
- Leave all bags and excess outerwear in the Conference Room
- Always move deliberately and with purpose, watching your hands and feet, especially when entering and exiting the towing tank area where we will be testing
- Use only our equipment – do not touch any of the equipment in the hallways
- Stay only within our designated areas – you are not cleared to go wandering through the MHL; if there is something you would like to see closer, ask Laura to show you
- Treat all MHL staff members with courtesy and respect – we want to be able to use the MHL next semester
The Aaron Friedman Marine Hydrodynamics Laboratory (MHL) is a working lab. Failure to conduct yourself in a safe manner WILL result in a ban from the MHL and possible failure of the course.
Live-Streaming Cameras
The MHL will have several live-streaming cameras set up to showcase our testing to the world. This is very exciting and is an opportunity to reach many future engineers across the world (feel free to share the link!). If, for any reason at all, you would prefer to NOT be on the live stream, please tell Laura and she will tell the MHL staff to temporarily turn off the applicable cameras. This is NOT a big deal, and you do NOT have to give any explanation for this request.
How To Get to The MHL
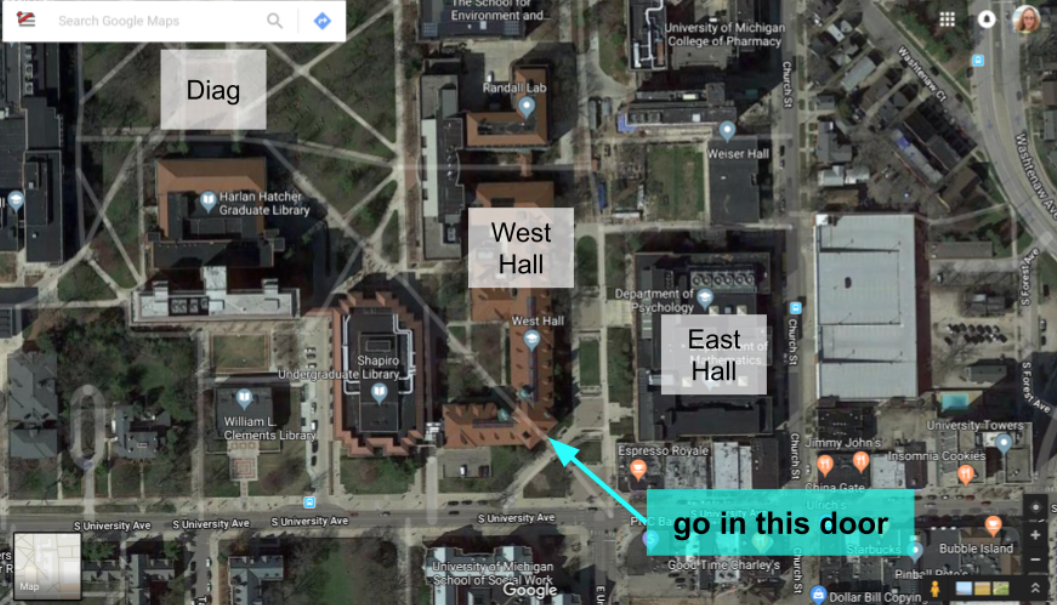
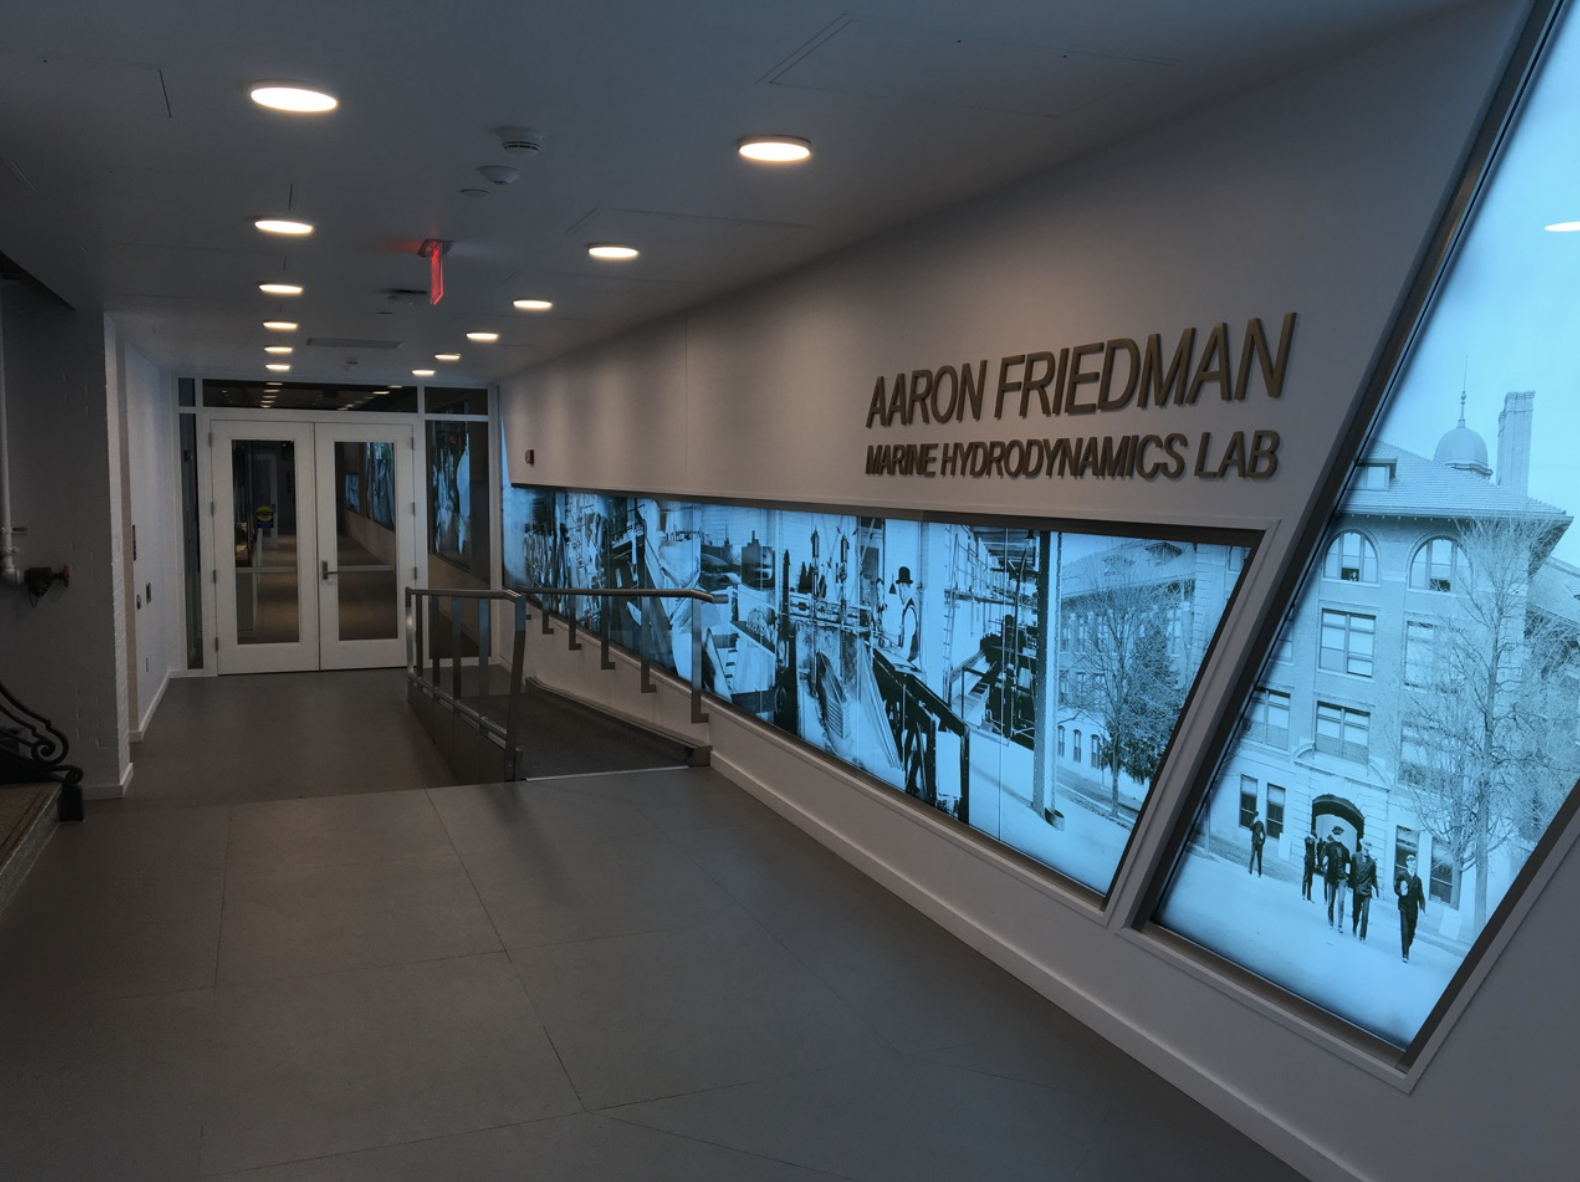
The Marine Hydrodynamics Laboratory (MHL) is located on the first floor of West Hall on Central Campus. Go to the Engineering Arch off the Southeast side of the Diag (Fig), and go in the doors where you can see “Aaron Friedman Marine Hydrodynamics Lab” (Fig).
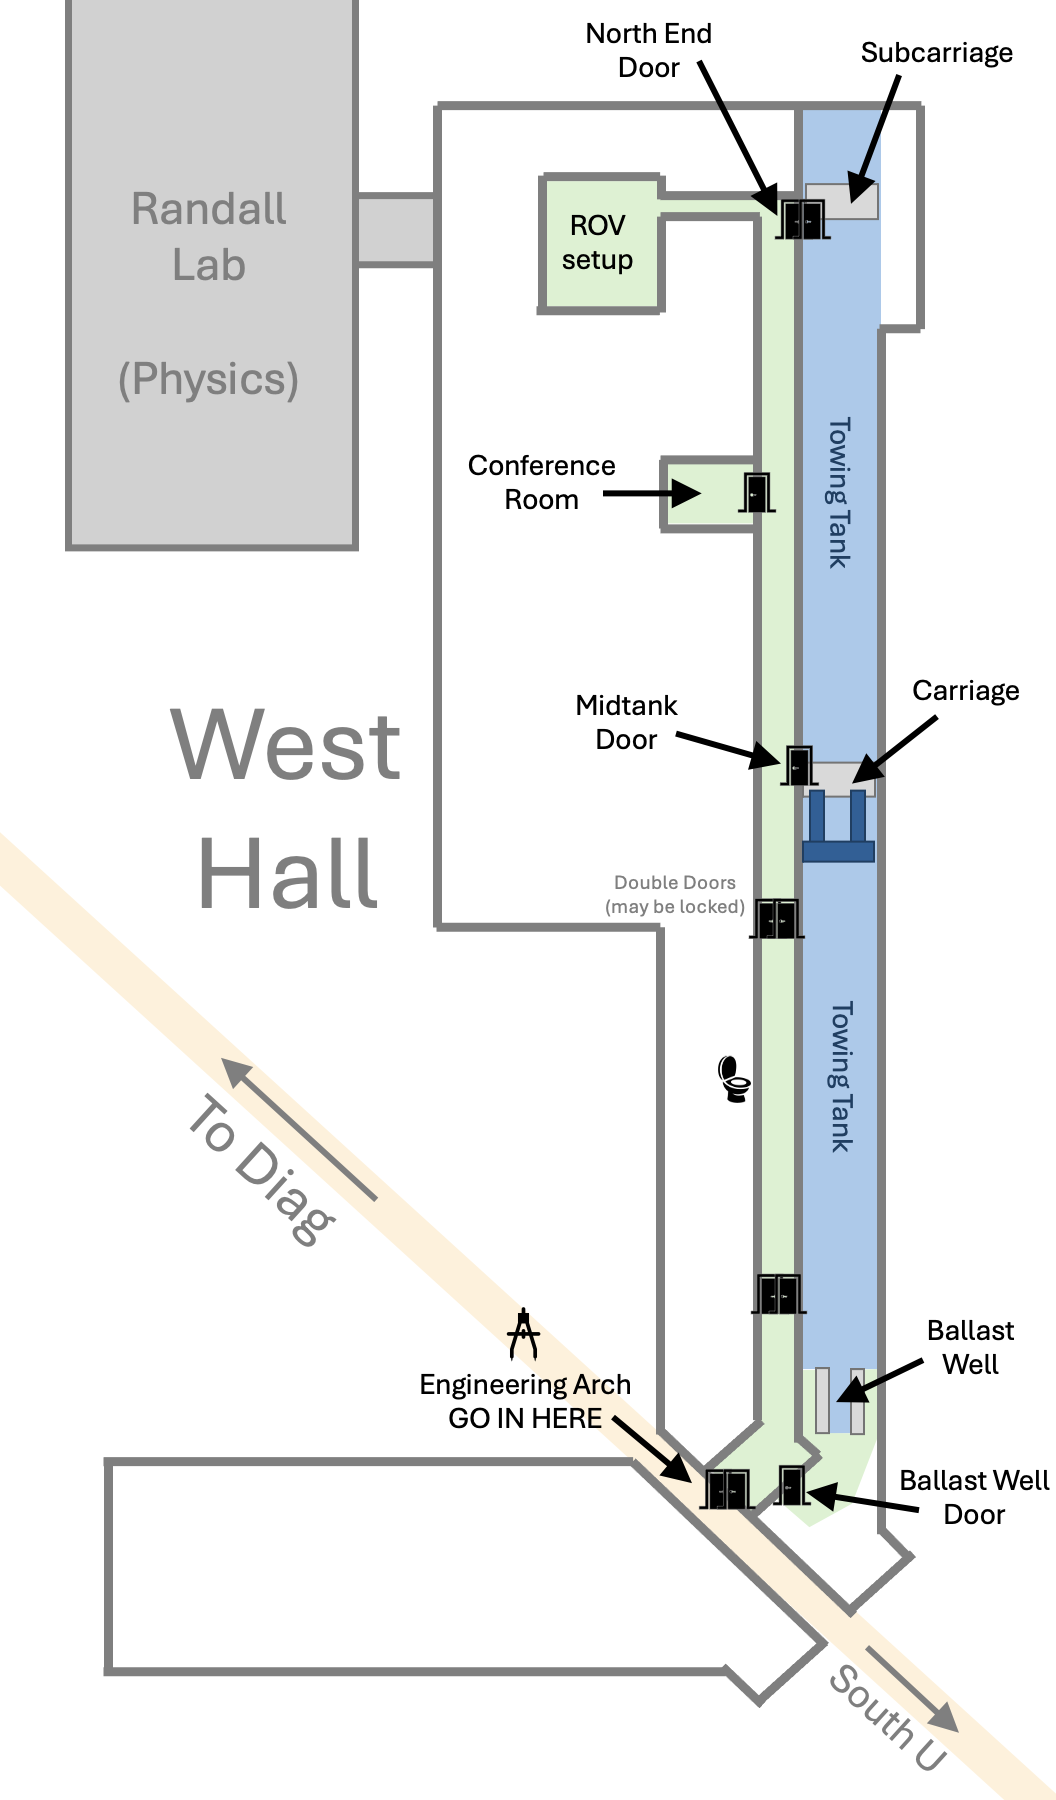
Once you go in the door and go through the double doors, go down the hallway until you get to another set of double doors; these doors have a card reader. Someone will meet you here to let you through. You should first go to the conference room. Fig shows the layout of the parts of the MHL that we will be working in.
Tips for Working at the MHL
Here are some general tips for working at the MHL:
- Bring your safety glasses
- Wear pants and closed toed shoes
- You will get dirty (it’s a working lab), so don’t wear anything you care about
- It’s humid and warm, so wearing a t-shirt (or dressing in layers) is a good idea
- Be on time
- Bring a notebook and writing utensil to record data
- Make sure you know your plan (getting data, how to visually inspect sectors, etc.)
Station 1: Ballast Well (20 minutes)
The ballast well is located at the south end of the towing tank. The ballast well is a shallow part of the towing tank that is used for ballasting ship models before attaching them to the carriage for testing. A picture of the ballast well is shown in Fig.
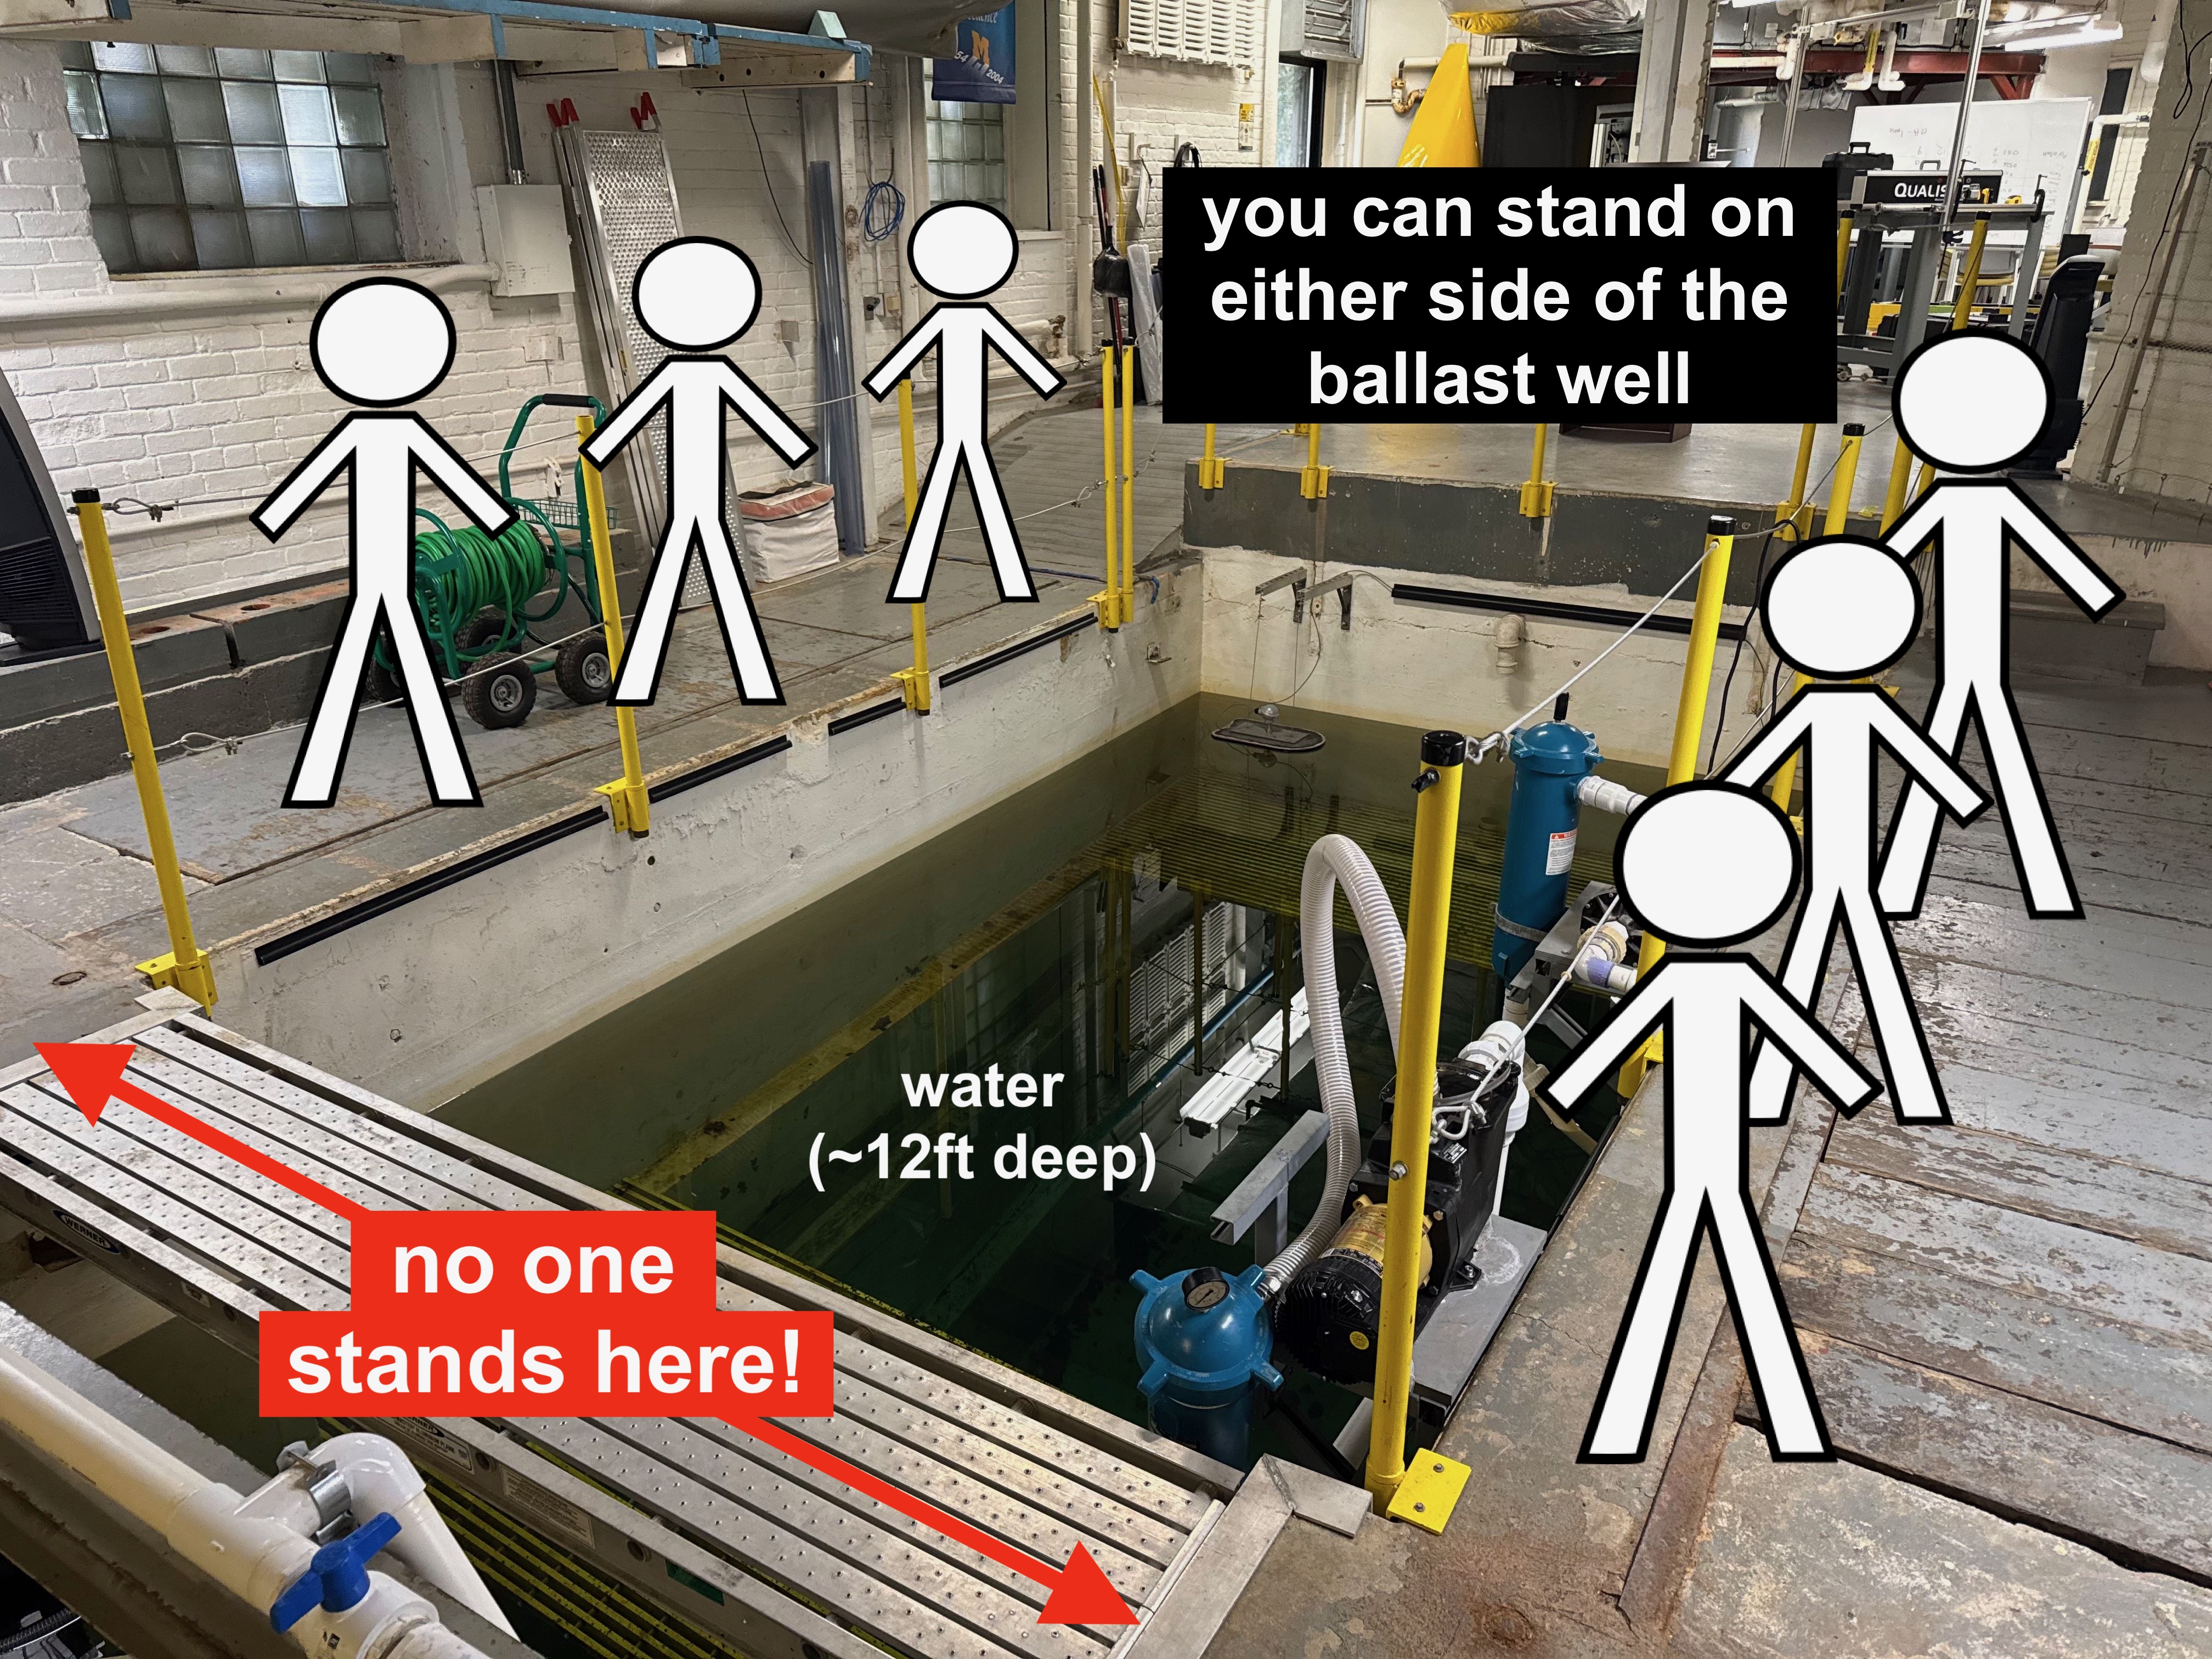
The ballast well is an ideal location to get your ROV in the water and do some preliminary practice with driving and checking your ballast.
Safety Information for the Ballast Well Area
- Do not use any of the tables that look like wood as a workbench, these are for paperwork and computer work only
- Be careful around the steps down to the Ballast Well
- Do not put any amount of weight onto the safety poles or wires, as they are visual warnings not physical barriers
- Be very cautious of the overhead power rails (orange bars on the outside-wall ceiling); these are 480 Volts, 3 Phase and can kill you if you make contact with them with any electrically conductive material
- Work with your ROV from the sides of the ballast well, not the platform that goes across the tank
- Do not walk the rails! Only IAs, Instructors and MHL Staff are permitted to do so
- Do not walk on the Wave Maker
- Please communicate using an indoor voice; shouting is for emergencies only
- If you drop something do not lunge for it, simply let it go. Lunging for a dropped item may end up with you falling in or knocking someone else in
- If someone falls into the tank do not get in yourself! An IA, Instructor, or MHL Staff will address this incident
- Do not handle or disturb any of the equipment or materials in the room; these are for NA&ME laboratory classes and/or funded research
- When in doubt ask an IA, Instructor, or MHL Staff member
Procedure for Getting in the Water
When it is time for your team to begin its ROV test time, we will bring your team to the “shop area” where we will have all the ROV equipment.
- Work with your IA/Justin to have a payload prepared for your ROV
- Assemble your ROV in the designated area of the MHL & check that all seals, ballast, and zip ties are secure – but remember not to pull the payload wires too tight!
- Have your IA or Justin double check your payload and attach the tether.
- DO NOT MESS WITH THE PAYLOAD ITSELF. AT ALL.
- When you are ready, tell whoever is with your team that you are ready to go to the ballast well.
- Carefully carry your ROV, tether with float, and control box down the hall to the south end of the towing tank
- When you arrive at the ballast well station, we will give you some additional safety instruction. Please pay attention!
- Check your ROV and the tether, and then gently lower your ROV in the water using a boat hook (if necessary). DO NOT TOSS YOUR ROV IN THE WATER
IMPORTANT
DO NOT DROP ANYTHING IN THE TOWING TANK!!!
OR THROW YOUR ROV INTO THE WATER!!!
OR THROW YOUR TEAMMATES INTO THE WATER!!!
Remember: If you ever see a conductivity reading (a number other than zero), GET YOUR ROV OUT OF THE WATER IMMEDIATELY! There is a leak in the payload!
Goals for Ballast Well Activities
This time at the ballast well is primarily to give you time to get your flotation and/or weights adjusted so that the ROV behaves the way your teams wants it to behave. Assuming your ROV is complete before we go to the MHL and you don’t take longer than 5 minutes or so to attach the payload system, you should also have some time to practice driving your ROV around in deeper (and wider!) water than our test tank in GFL. Some things to observe and document (bring a notebook!):
- Does your control system work correctly?
- Is the ballast/flotation correct? If not, make adjustments
- Who is comfortable driving the ROV? Make sure everyone gets a chance to drive it!
- How maneuverable is your ROV? (Does it turn the way you design it to? Does it move forward/backward/up/down/etc. the way you intended?)
At the end of 20 minutes, someone will tell you that it is time to pull your ROV and move on to the next station. Be careful of all the equipment and move slowly and carefully!
IF YOU ARE LOSING BUOYANCY or if you SEE A CONDUCTIVITY READING (a number other than zero), GET YOUR ROV OUT OF THE WATER IMMEDIATELY! There is a leak in the payload!
Station 2: Midtank (20 minutes)
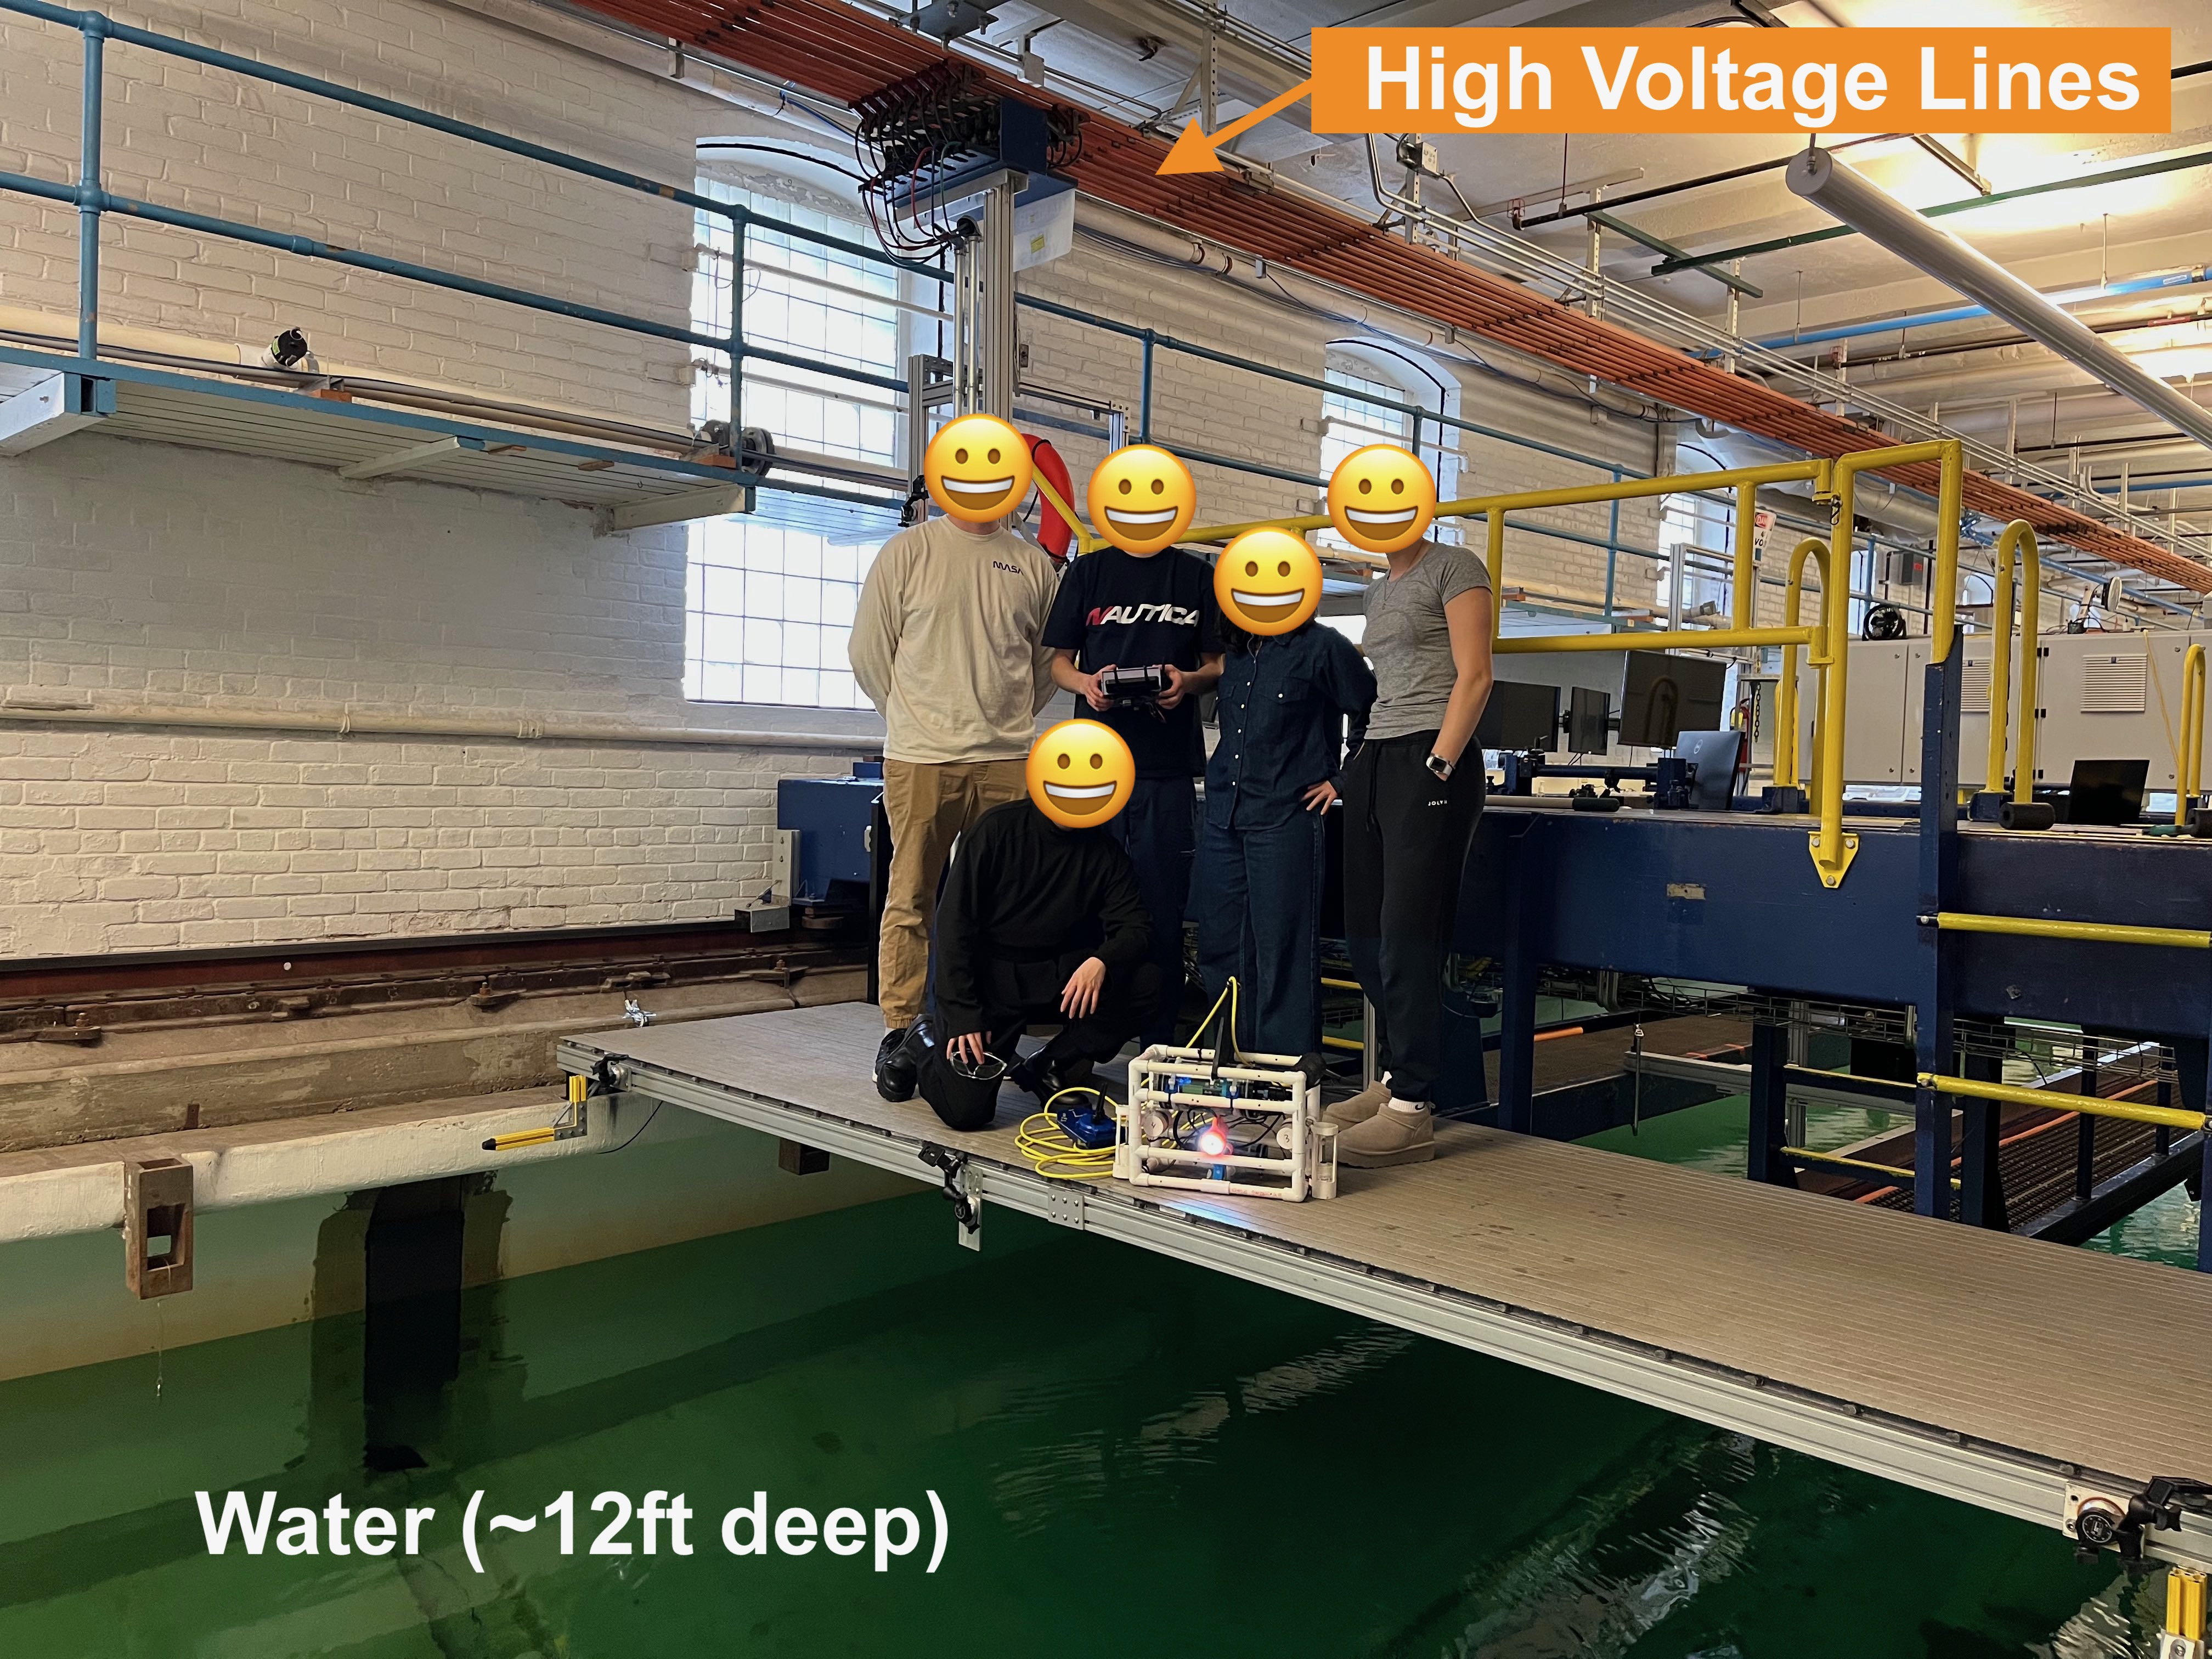
The midtank door is located at the middle of the towing tank. Aren’t we good at naming things?? Your team will launch your ROV from the back platform of the carriage, as shown in Fig.
Safety Information for the Midtank Area
When you arrive at this station, we remind you of this additional safety instruction. Please pay attention!
- Be very cautious when stepping out onto the carriage; use handholds wherever possible and move slowly and deliberately
- Only one person should enter or exit the tank at a time; overcrowding the entryway can result in injury or falling into the tank
- Be very cautious of the overhead power rails (orange bars on the outside-wall ceiling); these are 480 Volts, 3 Phase and can kill you if you make contact with them with any electrically conductive material
- Work with your ROV from the inside-wall side or middle of the tank, never the outside-wall
- Do not walk the rails! Only IAs, Instructors, and MHL Staff are permitted to do so
- Do not climb the ladder on the carriage; only IAs, Instructors and MHL Staff are permitted to do this
- Please communicate using an indoor voice; shouting is for emergencies only
- If you drop something do not lunge for it, simply let it go. Lunging for a dropped item may end up with you falling in or knocking someone else in
- If someone falls into the tank do not get in yourself! An IA, Instructor or MHL Staff will address this incident
- Do not handle or disturb any of the equipment or materials on the carriage; these are for NA&ME laboratory classes and/or funded research
- When in doubt ask an IA, Instructor, or MHL Staff member
Procedures for Getting in the Water
When your team is ready to continue testing, carefully lower your ROV into the water using a boat hook; this platform is much higher above the water than the areas around the ballast well and you should not try to launch/recover your ROV by leaning over the water.
Stay near the entrance to the hallway when using the boat hook to deploy and recover your ROV. This will help keep the boat hook away from the high voltage lines up near the ceiling.
Take a few minutes to get your ROV re-situated in the water:
- Check that your control system still works correctly
- Re-adjust your ballast/flotation if necessary
- Have your chosen driver get comfortable with where they are at on the platform
Here are some additional rules and guidelines when testing in the towing tank:
- Do not drive more than 10 feet past the ROV target, otherwise you will interfere with the team testing on the other end of the tank.
- The video transmitter is STRICTLY LINE-OF-SIGHT. If you stand between the antenna and the ROV, you will lose video.
- As you drive your ROV around, your battery will (slowly) deplete. We recommend that you do your official speed trials as soon as you are reasonably comfortable with driving your ROV.
IF YOU ARE LOSING BUOYANCY or if you SEE A CONDUCTIVITY READING (a number other than zero), GET YOUR ROV OUT OF THE WATER IMMEDIATELY! There is a leak in the payload!
Goals for Midtank Activities
The primary goal at the midtank station is to measure your ROV’s speed in the 2-3 directions that you have been reporting on in your design reviews. The secondary goal is to practice driving to a practice target for the riser inspection task. If you have time to do the practice target stuff, great! But focus on getting your speed measurements first!
Procedures for Speed Measurements
When you are comfortable with your ROV’s ballast and control systems, tell your peer mentor you are ready to start your speed measurements (if your peer mentor isn’t there, tell your IA).
Longitudinal (Forward/Backward) Speed
Follow these procedures if you are measuring forward or backward speed:
- Have your peer mentor walk out to the designated finish line (30 feet from the starting line)
- Position the front (or back, if you are going backwards) of your ROV at the starting line, which is the front edge of the platform you are using for testing.
- When your peer mentor says, “Go”, travel forward.
- Your time ends when your ROV crosses the finish line at the peer mentor’s location.
- Your peer mentor will record your official times for you, and then report them to the instructional staff.
- You may do as many trials as you want, but you must have AT LEAST 3 qualified trials.
- Your top speed will be calculated by your single fastest time trial.
Vertical Speed
Follow these procedures if you are measuring speed going up:
- Put your ROV all the way at the bottom of the trench (you’ll see the trench along the bottom of the towing tank); position the ROV so that it is “facing forward”, i.e. in its normal driving attitude.
- When your peer mentor says, “Go”, travel upwards in whatever fashion your ROV ascends.
- Your time ends when your ROV breaks the surface of the water AND is “facing forward”, i.e. its normal driving attitude.
- Your peer mentor will record your official times for you, and then report them to the instructional staff.
- You may do as many trials as you want, but you must have AT LEAST 3 qualified trials.
- Your top speed will be calculated by your single fastest time trial; we will provide you with a depth measurement.
Follow these procedures if you are measuring speed going down:
- Put the top of the ROV at the water’s surface; position the ROV so that it is “facing forward”, i.e. in its normal driving attitude.
- When your peer mentor says, “Go”, travel downwards in whatever fashion your ROV descends.
- Your time ends when your ROV hits the bottom of the trench AND is “facing forward”, i.e. its normal driving attitude.
- Your peer mentor will record your official times for you, and then report them to the instructional staff.
- You may do as many trials as you want, but you must have AT LEAST 3 qualified trials.
- Your top speed will be calculated by your single fastest time trial; we will provide you with a depth measurement.
Lateral Speed
Follow these procedures if you are measuring lateral (left/right) speed:
- Position your ROV with one side of the ROV touching one of the walls of the towing tank; position the ROV so that it is “facing forward”, i.e. its normal driving attitude.
- Have your peer mentor walk out to a location that is directly across from your ROV
- When your peer mentor says, “Go”, travel across the tank in whatever fashion your ROV can get across the tank.
- Your time ends when the side of your ROV touches the wall at the peer mentor’s location AND is “facing forward”, i.e. its normal driving attitude.
- Your peer mentor will record your official times for you, and then report them to the instructional staff.
- You may do as many trials as you want, but you must have AT LEAST 3 qualified trials.
- Your top speed will be calculated by your single fastest time trial; the tank is 6.7 meters (22 feet) across.
Additional ROV Testing with Practice Targets
When you are finished with your time trials, if there is still time remaining at this station, you may continue testing your ROV. We recommend doing dry (or should we say “wet”??) runs for the riser inspection task that you will do at the next station. Fig shows an example of what you can try out with your ROV with these practice targets.
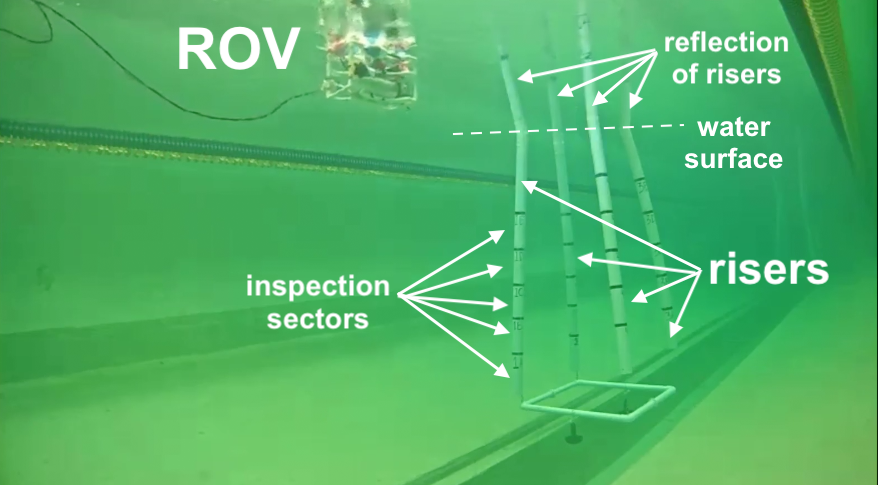
We recommend picking sets of random sectors and then “inspecting” them for damage to practice inspecting all views of the sector.
Station 3: North End (20 minutes)
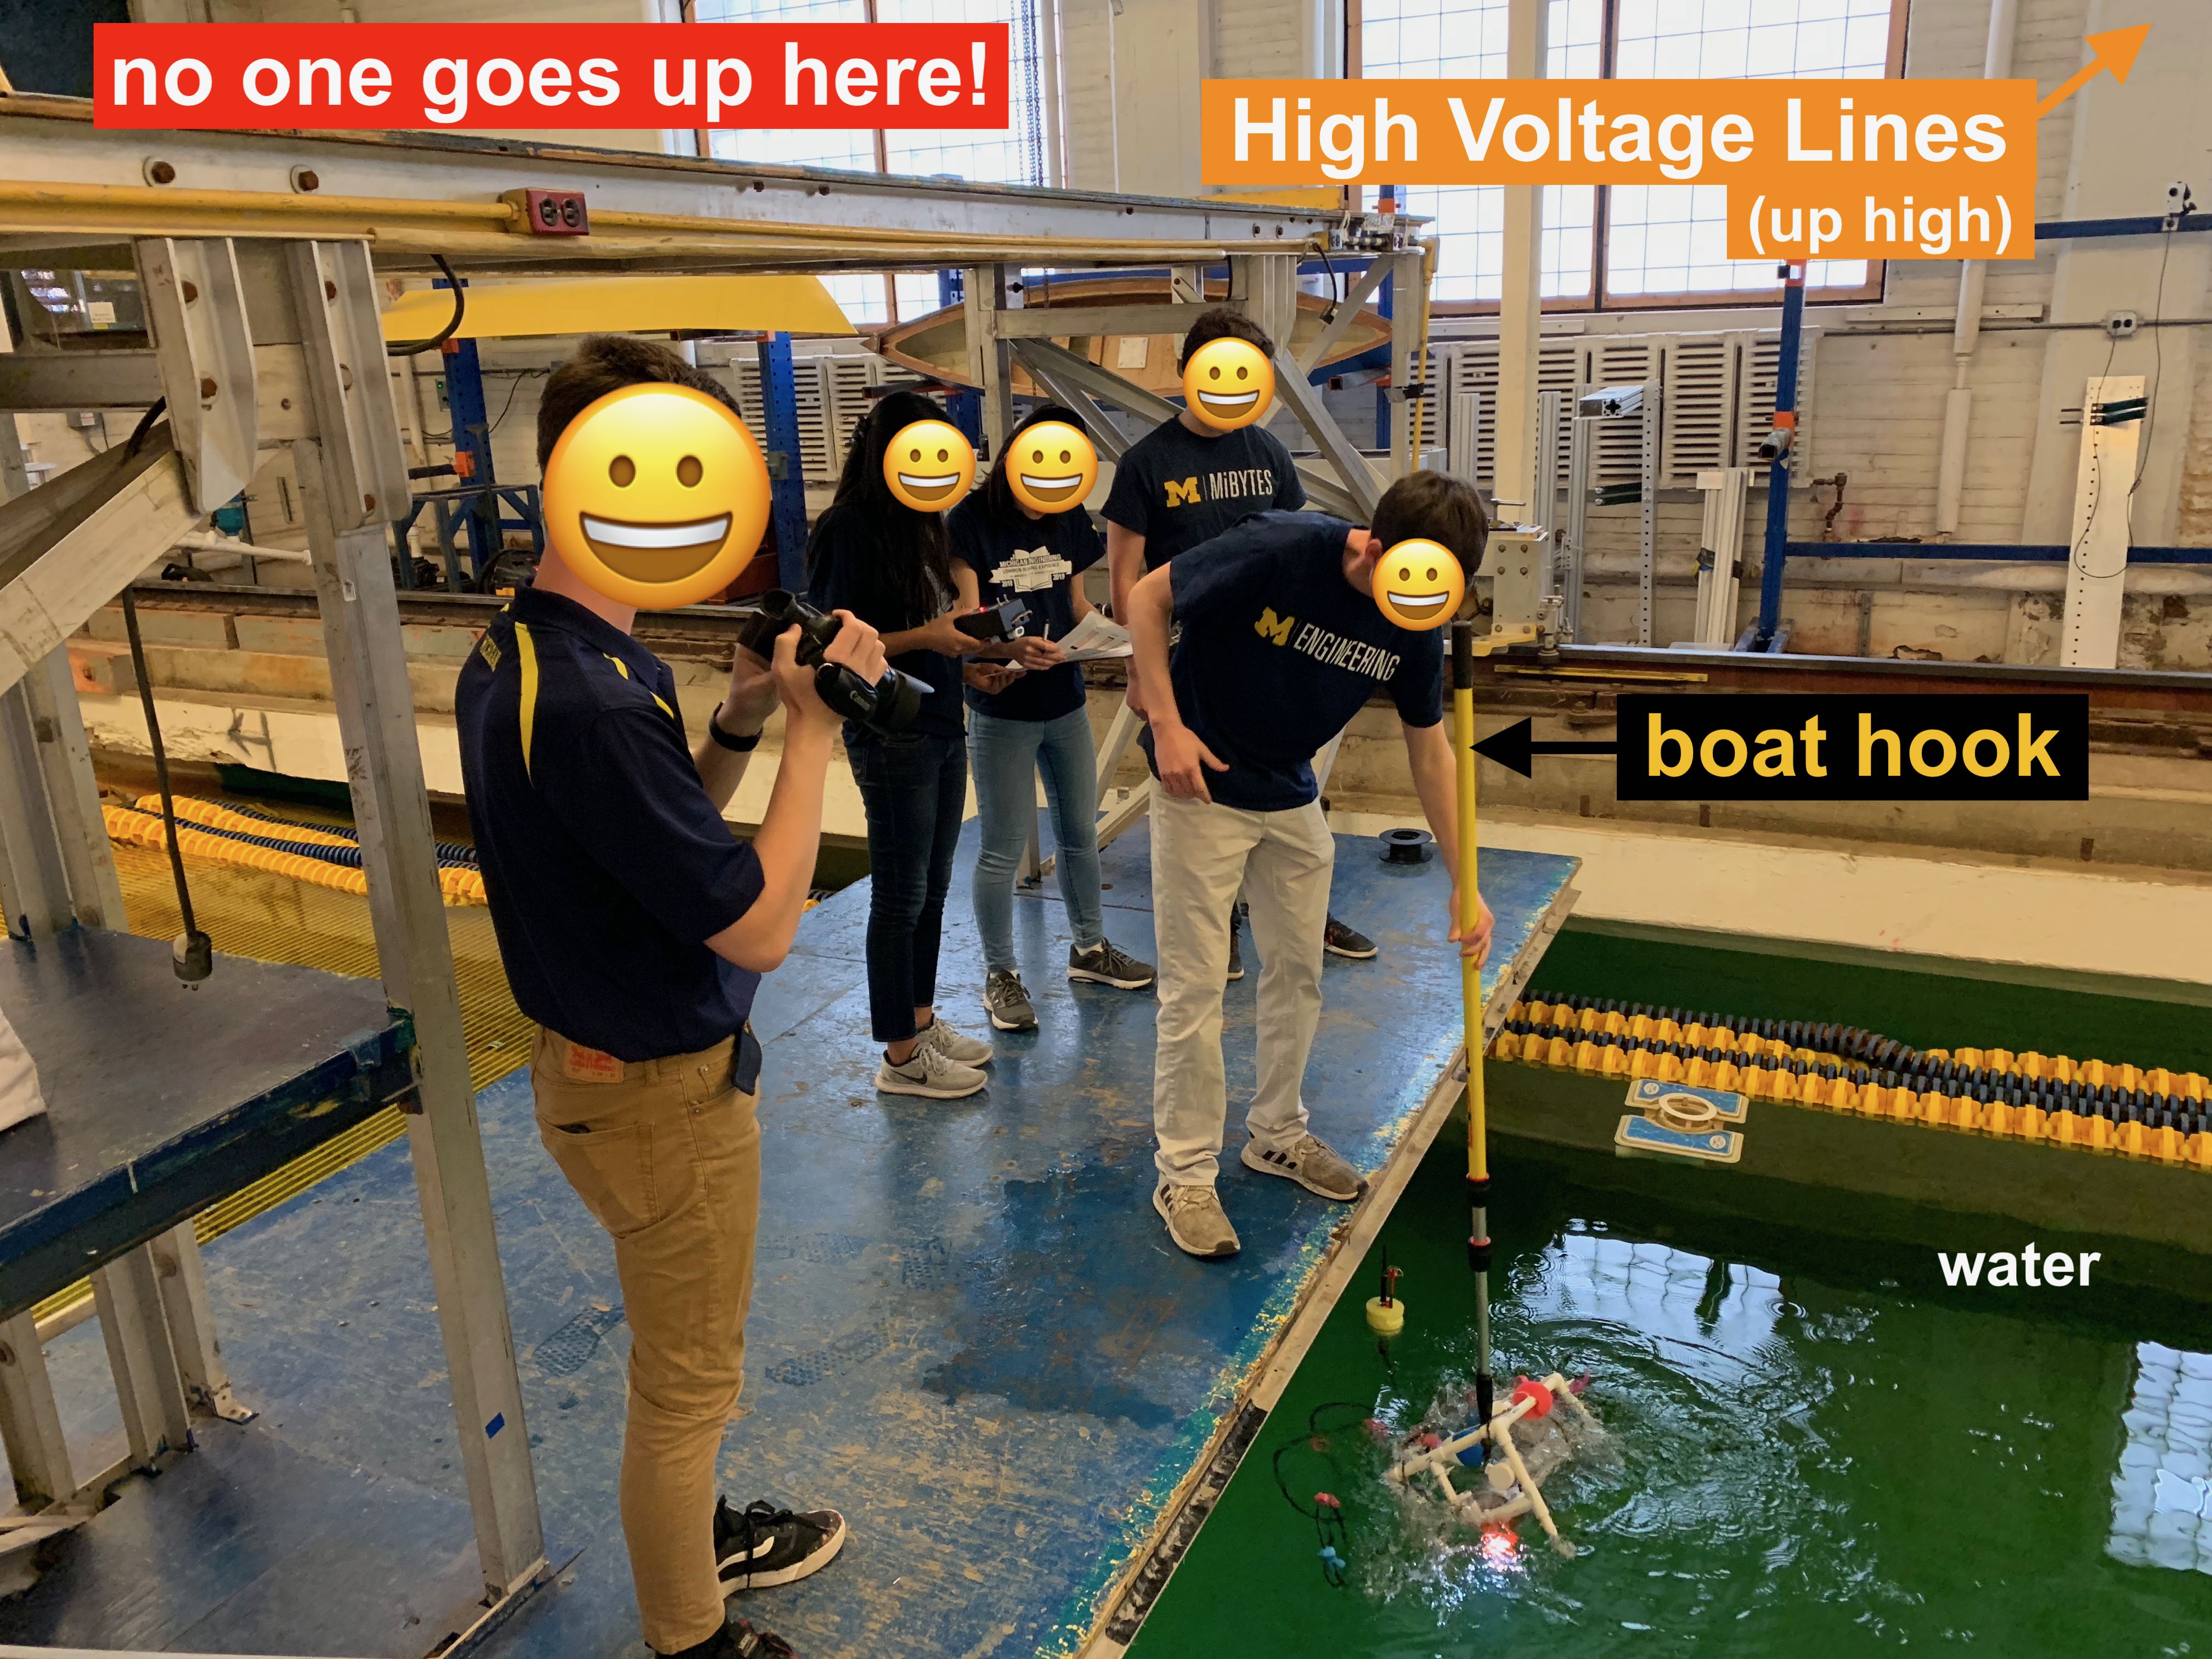
The doors at the north end of the tank will give access to the subcarriage, which is the platform you will use to launch your ROV for the riser inspection task. A view of the subcarriage at the the north end of the tank is shown in Fig.
Safety Information for the North End Area
When you arrive at this station, we will remind you of this additional safety instruction. Please pay attention!
- Be very cautious when stepping out onto the sub-carriage; use handholds wherever possible and move slowly and deliberately
- Only one person should enter or exit the tank at a time; overcrowding the entryway can result in injury or falling into the tank
- Be very cautious of the overhead power rails (orange bars on the outside-wall ceiling); these are 480 Volts, 3 Phase and can kill you if you make contact with them with any electrically conductive material
- Work with your ROV from the inside-wall side or middle of the tank, never the outside-wall
- Do not walk the rails! Only IAs, Instructors and MHL Staff are permitted to do so
- Do not climb the ladder on the sub-carriage; only the MHL Staff are permitted to do this
- Please communicate using an indoor voice; shouting is for emergencies only
- If you drop something do not lunge for it, simply let it go. Lunging for a dropped item may end up with you falling in or knocking someone else in
- If someone falls into the tank Do not get in yourself! An IA, Instructor, or MHL Staff will address this incident
- Do not handle or disturb any of the equipment or materials on the sub-carriage or outside-wall of the towing tank; these are for NA&ME laboratory classes and/or funded research
- When in doubt ask an IA, Instructor, or MHL Staff member
Procedures for Getting in the Water
When your team is ready to conduct the riser inspection task, carefully lower your ROV into the water using a boat hook.
Remember to stay near the entrance to the hallway when using the boat hook to deploy and recover your ROV. This will help keep the boat hook away from the high voltage lines up near the ceiling.
Take a few minutes to get your ROV re-situated in the water:
- Check that your control system still works correctly
- Re-adjust your ballast/flotation if necessary
- Have your chosen driver get comfortable with where they are at on the platform
Remember these additional rules and guidelines when testing in the towing tank:
- Do not drive more than 10 feet past the ROV target, otherwise you will interfere with the team testing at the midtank station.
- The video transmitter is STRICTLY LINE-OF-SIGHT. If you stand between the antenna and the ROV, you will lose video.
- As you drive your ROV around, your battery will (slowly) deplete. We recommend that you do your riser inspection task as soon as your ROV is settled in the water.
IF YOU ARE LOSING BUOYANCY or if you SEE A CONDUCTIVITY READING (a number other than zero), GET YOUR ROV OUT OF THE WATER IMMEDIATELY! There is a leak in the payload!
Goals for North End Activities
The primary (and only) goal of the North End station is to complete the riser inspection task. Make sure your whole team knows what the rules and procedures are for the riser inspection task!
Rules for Operation During the Riser Inspection Task
- When operating the ROV, the driver may use both the video monitor and look at their ROV in the water.
- Teams must stay on the carriage/subcarriage.
- No ENGR 100 students may walk down the rails.
- You must use the system as provided and in the spirit of the riser inspection task, so you must do all operations in real time. In other words, you may not take photos of the monitor to post-process data.
Procedures for the Riser Inspection Task
- An IA or designated alternate will be the official timekeeper.
- The riser inspection task will begin when the timer says “go” and the ROV is at the subcarriage (similar to the speed measurement procedure).
- You will be given a list of sectors to check. Your task ends when you have checked all sectors correctly and your ROV returns to the starting position.
- After you complete an inspection run, have a team member take your data sheet to the audit table. An IA there will check your damage report. If there are any sectors that have incorrectly reported damage, return to your ROV and go re-check those sectors.
- Each time your ROV returns to the starting line, your time will stop. If you need to go back out to re-check your sectors, the time will start and will add on to your total time.
- Notes on things that might happen during the official riser inspection task:
- If, during your trial, your tether is caught on something (e.g. the platform legs), an IA will help you untangle your ROV with the pole hooks.
- Your timer will continue to run, so TRY TO AVOID GETTING TANGLED.
- If the payload stops during operation, the timer will stop and an IA will fish your ROV out. Time will restart when you are back in the water.
- If your ROV fails in a way that is not due to the provided equipment (e.g. a thruster falls off, all your buoyancy falls off, etc.) and your ROV needs to be rescued, your team will be assessed a “salvage penalty” of +$200 on your cost audit.
- Lost wireless connections do not count as this kind of failure
- If, during your trial, your tether is caught on something (e.g. the platform legs), an IA will help you untangle your ROV with the pole hooks.
- Once you have correctly identified all the sectors (or you run out of time), your riser inspection task is over.
When You Are Finished With Your Task
When you have completed your riser inspection task (or if your time at this station is up), take your ROV equipment back to where you orginally set up the ROV. Detach the payload system and return it to Justin, pack everything up, clean up your area, and get Justin or your IA to check your area.
THROW AWAY ALL OF THE GARBAGE!! ESPECIALLY THE ZIPTIES!!!
Check out with Justin or your IA and once they are happy with your clean up, you may return to the conference room.
Station 4: Conference Room
The conference room will be our base of operations while at the MHL. You may safely leave your belongings in this room. This room is also where we will gather at the beginning of lab for the initial safety talk.
The schedule shown in Fig shows that teams will have different “shifts” in the conference room as everyone moves through the other stations. Your team will have approximately one hour in total where you will be working in the conference room, although this time may be split before and after working with your ROV in the towing tank.
Goals for Conference Room Activities
The primary goal of the conference room activity is to work on the draft of your final report that is due soon. This “draft” needs to be a complete report, not an outline! The draft final report is more along the lines of a report that you submit to your project manager for review: the report is done and you want feedback on how to improve the report before its final submission to the client.
We know that it can be hard to find time to meet outside of class. This time in the conference room is valuable time when everyone on your team is there! Make sure you take advantage of this time and make good progress on your final report.